Showing posts with label modeling. Show all posts

Thursday, June 4, 2026

J-B Weld as a Filler


One of the things that has sometimes stymied me is the right filler for resin. Putty-type fillers like the old green Squadron stuff, 3M for auto body work, the tube fillers from Tamiya and the like, as well as the "liquid" fillers like Mr. Surfacer and Tamiya Surface Primer (which acts as a liquid putty directly from the jar) all flake off of resin because they are not able to bond with the surface like they can with styrene. I have used ACC/super glue as a filler in the past, but you have to sand it at just the right time... too soon and it can "ball up" and come off as you sand and too late and it is harder than the resin, meaning that the materials are removed at different rates by sandpaper, leading to surface defects of a different order, which is what you are trying to eliminate by filling and sanding.

I recently mixed up some of the J-B Weld (pictured above) to use as a bonding agent. It mixes like a two-part epoxy, where you stir equal amounts and then apply. While it worked for the bonding task, I also noticed that the dried leftover material (I mixed it in the underside of the bottle cap) was hard enough to sand, but not rock hard after 24 hours. When the right opportunity presented itself, I mixed up a little bit and applied some to a resin surface that needed a little touchup. It worked exactly as intended. It is now in the arsenal of filling and sanding solutions and is a good choice for resin.

Monday, June 13, 2022

Kadee Lake Superior & Ishpeming PS-1 Box Car Completed


I recently completed my model of a LS&I PS-1 that I started a couple years back. The prototype info can be found via this link and the original modeling info can be accessed via this link. This post highlights the finishing of that model, most notably the painting and weathering. The task was to blend the "bare" areas of the doors, lower doors tracks, and other details in with the decorated portions of the model and to also create the sharp transition between oxide and black at the corners that was rather sloppy on the model as it came from Kadee.


For the oxide color, I experimented with an acrylic ink product that I anticipate using again in the future, as it airbrushed beautifully. It comes in a rainbow of colors and is incredibly convenient for me since I can buy it at my local Blick's, about three blocks away in Brooklyn (Blick's also carriers my preferred super glue, airbrushes, PanPastels, and kabuki masking tape, making it a go-to stop for many of my hobby needs!) The inks are called abstract acrylic ink by Sennelier. The color I used was 645 - Chinese Orange. The color is not a 100% match, but I was able to get it closer by using some Pan Pastels to lighten it enough to be passable. I sealed everything with a coat of Future and added a few chalk marks. These were sealed with a flat coat.


For the weathering I used Bragdon's grimy grey powder. I applied it in vertical streaks to simulate light streaking. I sealed that with a flat coat and then applied another coat of Future. I added several more chalk marks. I also masked around the existing repack stencil and applied a thin coat of oxide red for a newer repack. I added the new repack stencils from a set of New York Central decals. I sealed everything with a final flat coat.


A couple other notes of mention: I used Kadee's ASF A-3 trucks, but replaced the wheelsets with Kadee ribbed back 0.088" tread width wheelsets. I also used Kadee screw mounted draft gear ("coupler boxes") in place of the kit's original boxes. A keen observer will also note that I need to add the angle cock/air hose parts (from Hi-Tech) to the brackets to actually complete the model!

Now I have another mostly ready-to-run Kadee PS-1 for the fleet. I plan to replicate this model exactly, but letter it for New York Central (if you read the prior posts on the LS&I prototypes, you will find that the LS&I cars were piggybacked on a NYC order.) I will blog about that model when I get around to building it.

Tuesday, December 3, 2019

Types for Lettering on Structures and Other Layout Signage


One of the things I am always on the lookout for is interesting types (“fonts”) that I can use to create specialized lettering. I have been particularly attuned lately as I have become more focused on structures. “Simple” sans serif types of the 1930s and 1940s have a more stylized look than the basic computer "fonts" of today. When I see a model structure that is to represent a period (e.g. late 1940s) structure, yet uses Arial or Helvetica for the sign that has the name of the business, it doesn’t look correct to my eye; it has a simple, anachronistic quality that screams, “I’m a model!”

The photo above of Utah Ice & Storage Co., May 9, 1928, by Harry Shipler/Shipler Commercial Photographers, is from the Utah State History project hosted by the University of Utah's J. Willard Marriott Library. While the PFE R-30-2 (at right) and R-30-13 reefers are interesting, my attention was also drawn to the lettering on the building at right in the image (for a better view, click on the image and note the red rectangle around the lettering.) I replicated the characters by tracing using a tight crop of the image, as shown below (the 'J' is a composite of the 'I' and 'S' while the 'O' is derived from the 'C'.) I plan to use the characters to letter a structure of an ice plant on my proto-lanced layout of Jefferson (based on Medford,) Oregon.


The two photos below (March, 1957, Chula Vista, Calif., Col. Chet McCoid photos, Bob's Photo,) illustrate another example of an interesting type that can be used for structure lettering. I initially purchased the photos for the subjects, a PFE R-30-9, above, and R-40-4, below, but stumbled upon the sign in the background. I found the style of the lettering compelling and I have need for a feed mill/ag supplier in Jefferson. So, after cropping, I pulled the images into Illustrator and created the "Willis-Burr Co." as seen below. I will finish the lettering for the details (Fertilizer, etc.) at a later time, but what's here illustrates my point.

The options for lettering are limitless and I have several others to be generated. Note that there are many font purveyors with period types available for download that can be used for these purposes. I tend to favor fee-based fonts over free downloads as I don't trust freeware to not have other malicious software embedded into it (my own cautious nature.)


Speaking of decals, I have two new sets for freight cars. They are D215 for the Virginian's 1916-built single sheathed box cars and D216 for the Minneapolis & St. Louis's ARA-design single sheathed cars built in 1930. Both have "cuts" in the lettering to accommodate surface details as on the prototype.


Thursday, November 7, 2019

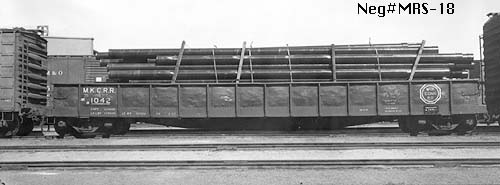
McKeesport Connecting Railroad 1000-series 50-foot Gondolas

ACF Industries, Hawkins/Wider/Long Collection
The McKeesport Connecting Railroad was part of the U.S. Steel family of railroads and its very modest fleet of cars reflected that affiliation. It received 100 fifty-foot gons from American Car & Foundry in 1941 that were similar to cars received by other USS roads. The cars were placed in the 1000-1099 series. They had fairly low sides, steel floors, fixed Dreadnaught ends, and fishbelly center sills, among other details. They were painted in a decidedly gray (not black) color: Scully #320 black graphite and as delivered featured a Pratt & Lambert "Vitralex" red circle as part of the company monogram.


The cars did have some unusual details, many of which are called out in the graphical photo overlay above. Note the grab arrangement in the in service photo below.

John W. Barriger National Railroad Library flickr site, TRRA of St. Louis album
Funaro & Camerlengo offers HO scale resin model kits for these cars. There are a few details that need to be addressed/corrected for an accurate model:

  • Grab iron mounting arrangements at corners of sides and ends (note that these were simplified for many cars by the early to mid-1950s; scratchbuild on model)
  • USS-style towing loop/jacking pads and route card holders (spare etchings from Speedwitch B&LE box car kit)
  • Universal 5700 XL power hand brake with M1704 wheel (from Intermountain covered hopper kit)
  • Collapsible stake pockets (model includes them; prototype did not have them; will model a car with a load to hide interior, but must remove rivets from exterior of sides)
  • Red circle in the as-built scheme (small custom decal project!)
I will highlight the modeling of a car in coming posts. Here are photos of my model in its current state (not very far along!):
Reservoirs and AB valve installed and piped with 0.010" wire
Floor glued in place; not collapsible stake pockets (not correct for this prototype)
Etchings for towing loops/jacking pads and route card holders

Other photos:
MKCRR 1029 - Ed Wilkommen Collection of Lake States Railway Historical Association - note replacement Equipco hand wheel
MKCRR 1042 - Jack Whitmeyer Collection (small image)

I plan to bring this to Cocoa Beach as a finished model, including pipe load

BIG thank you to Ed Hawkins for his help with the prototype information

Thursday, September 26, 2019

Grain Belt Models Corrugated Pipe Load

CB&Q Collection, Newberry Library, University of Chicago
I have been meaning to complete this post since last winter. I have finally managed to get it completed. For years, I have been noodling that with the state of 3D printing technology, you could make a highly realistic corrugated pipe load. Well, I didn't do it, but Grain Belt Models has. They have released HO scale corrugated pipe in a variety of sizes. They are a great candidate for a load, as well as culvert pipes to be integrated into scenes.

FSA-OWI Collection, Library of Congress
They are offered in packs of several pipes (number dependent upon diameter,) in rigid clear plastic containers (I'd prefer something biodegradable). They are printed in a silvery-grey color that is not entirely unlike galvanized, corrugated pipe, but I will paint mine before adding to a car as a load. My target is a more shiny, bluish-sliver color like that of new galvanized metal.


If there is one nit, the thickness of the pipe is out of scale. However, that is necessary to preserve some strength. It's not grossly oversized and the benefits of actually having these pipes outweighs the slightly out of scale thickness.


They are available at the Iowa Scaled Engineering website. There are several sizes from which to choose. The ones I purchased were $5.00 for a 4-pack and I purchased 6 packs to make a load with 24 pipes.

I consolidated three packs (12 pipes) into one container, as shown here

Thursday, February 28, 2019

A dedication


Right before Thanksgiving last year,  I corresponded via email with Chester Fesmire about his remarkable blog dedicated to 1/87 (HO) scale vehicle modeling, Modeling in 1/87. He is one of the finest scale modelers I have ever come across, be it railroad, vehicles, aircraft, armor or any other subject matter. I had been visiting his blog and asked if he might consider adding a search box to aid me (and others) in trying to find things he might have posted about by searching for various terms. Chester said he would try, but he wasn't entirely tech savvy, so I walked him through the steps and we succeeded in adding the search tool.

I was also hopeful I might meet him at the Springfield show in late January in the area where the vehicle guys congregate in the Mallory building. Imagine my shock and chagrin to find that Chester passed away in December from terminal cancer. What an incredible loss and what an amazing person. While fighting cancer, he took the time to respond and help me out. I am deeply saddened by his passing and send my condolences to his family.

I encourage you to visit his blog to see the incredible legacy he has left us in digital form.

Image above lifted with the utmost respect from Chester's blog. Thank you, Chester.

Wednesday, January 2, 2019

Wordy Wednesday - New York Central PS-1 NYC 169664


This photo of NYC 169664 seemed vaguely familiar to me when I looked at it a couple of days ago. Strip the paint, change the hand brake to a Miner hand brake, and then repaint it like Lake Superior & Ishpeming PS-1 LS&I 2242 that I profiled on this blog a few days ago and you would have the same car. They used the same New York Central-style placard boards, including their locations, the same welded-on roping loops, and the same arrangement of the lower corners, including push pole pockets, side sill angle sections, and "un-PS-1-like" uncoupling devices. So, as I modify my Kadee model of LS&I 2236, most or all of those changes apply to NYC 169000-170499 specifically depending upon the doors, as well as to NYC 170500-172499. The cars in the 169000 series were essentially from the same Pullman-Standard lot, 5965 for NYC 169000-170499 and 5965A for LS&I 2226-2275. Details for the NYC cars are noted below. If the 50 cars of the LS&I are a little too obscure for your tastes, perhaps the 3,500 built for the New York Central in 1950-1951 are more to your liking.


Note the New York Central paint data triangle at lower left of car side on NYC 170750. This is the earliest instance this blog author has seen of the paint data triangle in use. This car was built in February, 1951

Between 1950 and 1951 the New York Central received 3,500 40' PS-1 box cars from Pullman-Standard. The details are as follows:

*7-panel Superior door with third panel from top wider than other panels

There were also 1,000 cars delivered in 1948 and 500 cars delivered in 1952. These are each different and not covered in the data presented above.

Tuesday, January 1, 2019

Thoughts on "In Praise of Mediocrity" on this first day of 2019


I have been thinking about something on and off for a few months now. It hasn't consumed me, but it's been there lingering. The September 29, 2018 issue of The New York Times included an opinion piece by Tim Wu, titled "In Praise of Mediocrity." Mr. Wu's premise is that the reason that most Americans do not have hobbies as we did decades ago is not because we lack leisure time*, but for an entirely different reason: "We're afraid of being bad at them." He posits that seemingly everything we now do comes with an "expectation of excellence." We have been culturally programmed that we can't have casual pursuits; we must practice these leisure time activities at the highest level.

"But there is also a real and pure joy, a sweet, childlike delight, that comes from just learning and trying to get better." This is his counterpoint. I could not agree more. I learn something new from every project I undertake. However, as someone who is always trying to produce the most accurate replicas possible, and one who I humbly submit already practices the craft of my hobby at a fairly high level, I do not see how the pursuit of excellence detracts at all from my joy and delight. If anything, it is what provides those very comforts since it is excellence on my own terms, not anyone else's. If it failed to deliver satisfaction and pleasure, I wouldn't do it any longer. I find that the very fact that it is a hobby and the fact that I continue to do it makes it pleasurable. Why else would I?

How do you feel about the approach you take to our hobby?

*Mr. Wu is not a social scientist and presents no hard data to back up his supposition regarding free time. I think that in the aggregate, we do have less leisure or free time, as expectations with jobs and careers have morphed dramatically; the internet and smart phones have allowed us to be "on" as much as we want (or can tolerate) and employers carry this expectation. Those same changes have affected how we view (either actively or passively) leisure time and hobbies. The distraction of the TV was a speck on a gnat's behind compared to the distractions offered by the collective Youtube, Hulu, Netflix, cable, Amazon et al universe. It's a lot easier to do nothing...

Thursday, December 27, 2018

Kadee Lake Superior & Ishpeming 40' PS-1 Box Car LS&I 2236... or my latest "ready-to-run" project

I was so satisfied with the results of my Santa Fe Kadee PS-1 that I thought I would add another that, excepting weathering, would be a more ready-to-run project than the Bx-57 proved to be. I had seen photos of LS&I PS-1s from Kadee and liked the look of the black ends and red and white diamond emblem. Although they are no longer available, I easily tracked one down on ebay. As soon as I received the car, I opened the plastic box and compared it to the one prototype photo in my collection (which I had not really looked at too closely until that moment.) Imagine my surprise when I discovered I had another "not-so" ready-to-run project on my hands! Time to make more lemonade out of lemons...


The sides require some detailing changes. I must add roping staples, that look to have been welded to the bolster tabs rather than riveted, although that must be confirmed. I also need to add tab sections at the lower corners. The placard boards on the model are in a different location than they were on the prototype so I will repeat my efforts as on the Santa Fe car, with Southwest Scale doors and new placard boards.

On the ends, I will have to make a few changes, as well. There were push pole pockets at the lower corners that will be scratchbuilt. The uncoupling rod bracket was different on the LS&I cars. Finally, the lower portion of the right ladder stile had a "jog" in a different location. I am hopeful the new early PS-1 cars from Kadee have ladders with this feature. If not, I will ignore that subtlety. 

Stay tuned as I modify this otherwise beautiful model.

Are we having fun yet and when will I have an actual ready-to-run car???

Monday, December 24, 2018

Finishing NP 10975 - Rapido Northern Pacific 10000-series Double Sheathed Box Cars, Part 2

I posted a brief writeup of the Rapido Northern Pacific 10000-series double sheathed box car almost two months ago (link to that post here). Since that time, I have made a few upgrades to that model and painted, lettered, and weathered it. This post describes the details associated with all of that. As I stated in the original post, it is an extremely fine model right out of the box. The changes highlighted here are ones that simply suit my tastes.


Most of the upgrades were performed on the ends, with the majority of those specifically on the B end. I replaced the running board supports with styrene to create more realistic details. I replaced the original retainer with a Precision Scale retainer valve with 0.008" wire "pipe". The brake staff was secured to a pivot support. Finally, I reworked the push pole pockets to create a more dished, stamped look, as on the prototype.


On the A end and the doors, I replaced the handles with ones fashioned from 0.010" wire, filed flat on the outer surface. The last upgrade was the replacement of the stock wheelsets with 0.088" tread width sets with 1.005" long axles.


The preparation and painting of the model followed my normal regimen. All metal and engineering plastic surfaces were lightly blasted with 200-grit aluminum oxide. I primed all surfaces, using Tamiya surface primer for the first time (link to my thoughts on it here). I painted the sides Rust (no. 4675) from the Model Master Acrylic line of paints. I masked the sides and painted the roof, ends, underframe, truck sideframes, and wheelsets Tamiya acrylic flat black. In preparation for decaling, I applied a light coat of Future (now Pledge) floor wax, creating a glossy surface.

I lettered the car* using decals I created myself and had printed by PDC of Canada specifically for this model. I reserved part of the capacity data, the reweigh location, the brake test, and repack stencils to be added during the weathering process. I also added a few chalkmarks prior to weathering.


I weathered the model using PanPastel and Bragdon powders. On the roof, ends, and underframe, I used brown, light grey, and Payne's grey. On the roof, I also interspersed this with some "blobs" of light grey paint applied with a Q-tip to simulate the beginnings of paint failure on some of the panels. I used the same powders on the sides, but applied them progressively: first, I applied small pieces of masking tape over the stencil areas referenced in the previous paragraph followed by powders that were then sealed with clear flat. I removed the masking from capacity, reweigh, and brake test stencils and added those along with more chalkmarks, another clear flat coat, followed by more weathering and yet another clear flat coat. Lastly, I added the repack stencils and more chalkmarks. Everything was sealed with a final flat coat.


Rapido has produced a beautiful model of a very significant prototype that belongs on most layouts. Bravo and I can't wait to see what is next from north of the border!

*the lettering layout doesn't exactly follow the standards for this car. The arched Northern Pacific and capacity data are slightly shifted to reflect photos of car NP 10975. Variations in the layout of lettering on actual equipment are not uncommon... remember, the shop crews were humans, not robots!

Thursday, December 6, 2018

Airbrushing - getting started


Airbrushing is one of the tools at the gateway to advanced modeling. However, many of us who have never experimented with using an airbrush look at it as a skill shrouded in mystery, requiring some innate talent and/or voodoo. Nothing could be further from the truth, particularly for the painting most model railroaders do, with single (or maybe two) colors with minimal masking and no real embellishments (if you really want to be impressed, look at some of the World War II aircraft schemes, including Luftwaffe schemes with various blotches/mottling or the Italian scheme with green “smoke ring” camouflage - link to decal for the less adventurous who don’t want to airbrush these devils, but illustrates what military modelers can do!) For what we as railroad modelers do it is simply a matter of spraying paint.

First, the intent of this post is to recommend a quality, but reasonably priced airbrush. I own and use an Iwata Medea N4500 Neo Gravity Feed airbrush. New ones can be found on eBay for approximately $50. It is extremely well-made and uses metal parts rather than plastic (an important consideration for me). It is a “double action” airbrush, meaning that the “trigger” controls both air and paint flow. This is a little more complicated than a single action airbrush, but I started using a double action airbrush when I was 10 years old and never felt like it was too difficult. I am certain you can learn to use it easily too. The one other thing I will say that is attractive to me about this model is that it disassembles easily, allowing the entire mechanism to be cleaned hassle-free. This is important because airbrush longevity and smooth operation requires a good cleaning regimen after each use. It takes only a few moments, but the impacts on operation are worth the diligence. One note: I have owned more expensive airbrushes, including the Iwata Revolution and Eclipse models and they are more difficult to clean and offer no advantages for the type of painting we do. My recommendation: buy the Neo and use the savings to invest in a quality airbrush compressor (buy an airbrush compressor and you won’t need earplugs because you’re trying to airbrush with that Campbell-Hausfield 100 HP compressor that you use to power your nail gun!)

If you’re read this far and are still curious, then take the plunge. All that’s required to learn is some paint (I recommend either Model Master acrylic or Tamiya acrylic paints,) thinner (most paints are too viscous out of the bottle; I thin these two brands using the manufacturers’ thinners at about 60% paint to 40% thinner,) an air source (I recommend this compressor,) and something to paint. To learn I suggest practicing on plain sheets of 0.040” white styrene. The point is to understand air pressure settings, distance from the object being painted, paint flow relative to the trigger, and how slowly or quickly to move the airbrush to avoid adding too much paint to one area at once. That’s it. I will post more in future on this topic, but it’s one of those things where it’s easier to learn by doing than reading.

Thursday, November 29, 2018

Tamiya Liquid Surface Primer

Serendipity seems to make frequent visits to my hobby. Something I will be working on will make its way to the various lists that I follow, wholly unrelated to any activities or prompting by me. Such was the case within the last couple weeks. I recently purchased a bottle of the Tamiya primer shown in the photo above and within a couple days there was a discussion about primer and priming models on the Steam Freight Car list (my thoughts on that debate below). It is a rather thick surface preparation mixture, similar to the Mr. Surfacer products from Gunze-Sangyo (I am a raving fan of these products). When I looked at the bottle shown here, it noted that it could be thinned with Tamiya Lacquer thinner. I decided to give it a shot. I thinned it heavily with Dupont Lacquer Thinner, a premium thinner that I had purchased in a gallon container many years ago from an auto body repair shop. The ratio I used was about 60% thinner to 40% primer. I used it to prime an undecorated Rapido NP double sheathed box car. It sprayed beautifully, with excellent coverage and a flawless surface finish. It will be a go-to primer for my efforts.

On the subject of priming models, I fall decidedly into the yes category. A coat of primer does two things for me. It creates a neutral base that eases the coverage of the final color, be it freight car red or brown, some flavor or reefer yellow or orange, or even plain black. The other benefit is that it makes all details "pop" or stand out. This helps to reveal any and all surface defects and imperfections that need to be addressed prior to applying the main color(s).

Sunday, October 14, 2018

Southern Railway Low-side Gondola - completed finally


I find it hard to fathom that it has been about two-and-a-half years since I posted about building this car. I finally got around to dusting off the cobwebs and finishing the model. The main stumbling block beyond time was the hand brake. The prototype used a Universal Multi-power hand brake, with the gearing mechanism contained inside a housing mounted below the end sill. I spent many free moments noodling how I would replicate that feature (when I made the patterns for this model, I never even considered it… how time changes things!) I have included a prototype photo below for reference (click to enlarge).

I settled on the solution illustrated in the graphic. Since the overall shape of the prototype’s housing was roughly segments of two differently-sized circles, that’s the approach I decided to follow. I punched discs from 0.020" styrene. The larger disc was created using a Waldron punch and die set while the smaller used an RP Toolz set. Portions of the two discs were combined to create the housing.


I found it easiest to integrate the entire assembly after adding the brake step to the model. The step, with hole for the brake shaft, was “rigidly” attached to the end. I added the housing using a 50/50 mix of Goo and MEK. This allowed me to prod and move the housing into position, with 0.020" wire in place (note that the wire on the bottom of the housing is a separate piece of 0.015"; the two were of different diameters on the prototype, too.) Once I was satisfied, I added some ACC to the housing — end sill joint to firm things up.


The bottom part of the housing was fashioned from pieces of 0.004" brass, cut into strips of appropriate width. As on the prototype, the bottom portion of the shaft nested in this arrangement, so I drilled holes in the straps to accommodate the 0.015" wire. This is partially obscured by the uncoupler lever rod so it likely adds little to the overall appearance of the model, but it is a feature I wanted to replicate so that I can make it for future projects.

The trucks also include a slight modification. The Tahoe Model Works Buckeye 50-ton trucks (TMW-106/TMW-206are a fairly solid match for the prototype’s trucks, but the truck bolster includes a vertical web through the center of the outside portion of the bolster casting. I replicated this feature by adding 0.010" strips into the center of the Tahoe bolsters. See the photos of the stock truck via the link above versus one on the model shown here.

I blasted all wire, metal, engineering plastic, and rubberized (Hi-Tech angle cock—air hoses) surfaces with 220-grit aluminum oxide. This created a surface conducive to good paint adhesion. I applied a coat of Tamiya Light Grey followed by Tamiya black, lightened slightly with grey. The black dried to a glossy sheen, perfect for applying decals. 

I lettered the model using the kit decals. At the same time, I added several chalkmarks to each side. These would be over-weathered, making them appear like older chalkmarks, to contrast with “newer” ones to be added post-weathering. I did not apply the reweigh, repack, and brake test stencils, as these would be added after the first application of weathering. These decals were sealed with a coat of Tamiya clear flat.

The weathering was applied in several steps. The interior of the car received a heavy application of Bragdon’s powders dark rust. Over this, I added a layer of PanPastels dark Payne’s Grey followed by an application of PanPastels dark umber over the entire model. On the trucks, I highlighted the truck springs with a rust shaded colored pencil. I then added the PanPastels Payne’s Grey and dark umber followed by some Bragdon’s soot grey. All of these powders were sealed with a coat of Tamiya clear flat.

I forgot to mask the areas where I would apply the reweigh, repack, and brake test stencils. This meant that I had to do the reverse and add fresh black paint to those areas. The reweigh and brake test stencils on the model would be applied to represent approximately three year old stencils while the journal repack would be less than a year old. Consequently, I created fresh paint rectangles for all three. However, for the journal repack rectangle I cut the rectangle from a solid piece of masking tape. I painted the area inside the opening of the masking tape with fresh black paint (I did the same for the reweigh and brake test rectangles, too.) For the journal repack rectangle, I then covered it with the “center” of the masking tape (the part that had been removed).

To the appropriate freshly paint areas, I added stencils corresponding to the reweigh location and date and brake test location and date. After application of decal setting solution, I airbrushed a coat of clear flat. I removed the tape over the repack stencil “rectangle” and added another round of PanPastels raw umber to the exterior car body followed by a coat of Future floor polish, creating a gloss surface. I added another round of chalkmarks plus the journal repack stencils. I applied a final coat of clear flat to the exterior of the car body.

Finally, I added the last details. I added wood and scattered bits of coal to the interior of the car to represent dunnage and debris from previous loads. I polished the treads of the wheelsets and screwed the trucks to the car body. Small pieces of paper were affixed to the route card boards with canopy cement to represent routing instructions (photo of finished model taken before these bits of paper were added). Southern Railway 55542 was ready for service.

Monday, October 8, 2018

Kadee Santa Fe Class Bx-57 40' PS-1 Box Car


When Kadee released this model of the Santa Fe Bx-57, I eagerly ordered one, thinking I could easily add a ready-to-run (RTR) car to the fleet. It’s rare that I find a model that meets my standards and is RTR, so I was thrilled to have it. I was recently in the process of finishing a few models and decided it was a good time to add a little weathering to this model so that it would be “complete”. Easy, or so I thought...

I did have a question about the trucks. I was curious if the trucks were black or mineral red. I consulted with Ed Hawkins and while he did not have specific information about this group of cars, he opined that if they followed Santa Fe practices of the period ordered from AC&F, then the trucks should be mineral red. So, I sandblasted the sideframes and wheelsets and while I was doing that, I also blasted the ladders, grabs, running boards, brake steps, hand brake and housing, underframe components, and other engineering plastic parts to aid in the adhesion of a flat coat to be applied prior to weathering the model. On the sides and ends, I masked the areas adjacent to the ones to be blasted to prevent lettering from being removed erroneously. The photo above shows the side after the ladders and bracket grabs were blasted. The transition from the unblasted area to the blasted area is clearly discernible near the ladder, due to more advantageous lighting at that part of the car.
Kadee and Southwest Scale Productions Improved Youngstown doors shown side-by-side for comparison
I referred to my copy of John Dobyne’s Santa Fe Boxcars 1869-1953 (currently out of print) to make sure the locations of the placard and route card boards on the model’s doors matched the prototype. Not only did they not match, but the doors on the model did not match the prototype -- see photo above. The Bx-57 used the “upside-down” version of the Improved Youngstown door, not the version on the model. Fortunately, there is a version of the door available in HO that is every bit as finely rendered as the details on the Kadee PS-1, making it a perfect complement. The door I am referring to is available from Southwest Scale as part number FC-622. The door is slightly shorter than the Kadee part, but the prototype’s door roller track is actually taller than the version on the model, so all is not lost.
New door and roller track plus placard and route card boards installed, masked, and ready to be painted to match the car body.
I removed the doors from the Kadee model. I also carefully removed the lower door tracks. I applied a coat of Mr. Surfacer 1200 and once that had dried, I carefully wet sanded the area with 400 followed by 600-grit sandpapers to clean up any telltale traces of the door guides or my poor removal of the guides. I glued the Southwest Scale doors to the Kadee model, using sparing amounts of MEK.

The door roller tracks were fashioned in a few steps. First, I added mounting “brackets” for the tracks. These were created by adding bits of 2x2 to a 0.005" styrene strip that was 2 scale inches wide. For simplicity, I created a long strip of 2 scale scale inch wide 0.005" strip and added the 2x2 bits to the strip. I removed the brackets one at a time as needed, adding 7 for each door. I added the four under the door opening first, followed by adding the 1x3 guide. I added the 3 outer brackets last, sliding them under the 1x3 guide, all the while making sure that the guide remained straight.

The placement of these brackets along the side sills corresponds to the location of rivets on the faces of the door roller tracks as shown in the photos of these cars in Dobyne’s book. The door roller track is a strip of HO scale 1x3 styrene glued to the brackets. I completed these tracks by adding rivets in the appropriate locations.

One last detail for the doors was the placard and route card styrene boards. These were scratchbuilt. The basic placard board was constructed from 1x3, 1x6, 1x6, and 1x3, glued edge-to-edge to create a 18" height, all glued to a 0.005" backing. I trimmed these to a length of 27". I then added the frame/mounting brackets using 2" wide strips of 0.005". The route card boards were created from single pieces of 1x6 12 scale inches in length, glued to a 0.005" backing. The frame/mounting brackets were again created from 2" wide strips of 0.005" styrene.

I had also wanted to add a piece of small chain between the brake cylinder and lever to capture that nice look of a dangling chain when viewed from the side. I was not aware of how easy it is to remove the center sills, crossbearers, and crossties in one part, with little effect on the overall underframe detail. So, I decided to upgrade all the AB brake details, as I was going to paint the underbody and details (as well as the doors and tracks) mineral red. I removed the Kadee brake details and added the aftermarket parts and wire, as shown.

An additional "construction" detail that will be covered in the next and final installment on this car is the replacement of the running boards. The model came with an Apex Tri-Lok running board. Kadee has since released a U.S. Gypsum Expanded Metal running board that is accurate for the Bx-57. I will also provide details about my paint matching efforts, as I feel that the color I used is extremely close to the factory model, and will be virtually indistinguishable with a small amount of weathering.