Showing posts with label Chicago Burlington & Quincy. Show all posts

Thursday, March 13, 2025

Clearing Up a Misperception

Santa Fe Caswell design GS gondola ATSF 171033 from class Ga- 5, Reading Yards, Rutherford, Pennsylvania,  June 19. 1947, Bob Charles Collection, Kalmbach Memorial Library 

There is a perception that GS gondolas (GS = "An Open Top Car, having fixed sides and ends and drop bottom, consisting of doors hinged at center sills to dump outside of rails," per the Official Railway Equipment Register) were West Coast cars and if you model the Northeast, Southeast, mid-Atlantic, etc., you don't have need for these on your layout*. I understand that notion. However, it is not correct. Granted, if you model western Massachusetts, for example, you should not have a gondola fleet comprised of 50% GS gons. That said, in a roster of solid bottom ("GB") gondolas, you could and would see GS gondolas from a variety of roads and should have a few in your fleet to mix into operating sessions. I have included some photos of GS gons in locales that support my contention (one shared by Richard Hendrickson and that I discussed with him on more than one occasion.)

C&EI 90108 was also of Caswell design, although it had received steel sheathing in place of the wood by the time it was photographed on February 10, 1952 in Columbus, Ohio, by Col. Chet McCoid. The doors were held in the "up" position using Wine door locks. Bob's Photo

Numerous fine models of GS gons have been offered over the years in both styrene and resin. The reason for and timing of this post is that I am working on a new pilot model for a styrene offering that one, is a GS-type gon like described in the previous paragraph, e.g. "western" GS gon, and two, is a fine example of contemporary HO scale technology, with fine tooling and separate details. Stay tuned for more about this model in the coming days...

Chicago & Illinois Western 1247 (ex-IC gon) was photographed in Aberdeen, North Carolina on October 30, 1951 by Col. Chet McCoid. Bob's Photo

The Burlington had a large fleet of composite GS gons that employed composite, Murphy or Dreadnaught ends. They also used Wine door locks. Note that there were not doors in all locations; from left, panels 2 and 4 had doors in the corresponding floor locations. Reading Yards, Rutherford, Pennsylvania, August 24, 1947, Bob Charles Collection, Kalmbach Memorial Library

*one caveat is that I am referring to and advocating for GS gons of the upper Midwest, Northwest, Mountain West, Southwest and West Coast; if you model western Massachusetts as the example I cited, you would quite likely see GS gons from the B&M, MEC or CN, as well, as they (and not too many other Eastern roads) did have modest fleets of GS gons 

Thursday, June 8, 2023

Finishing the Sunshine CB&Q XA-14

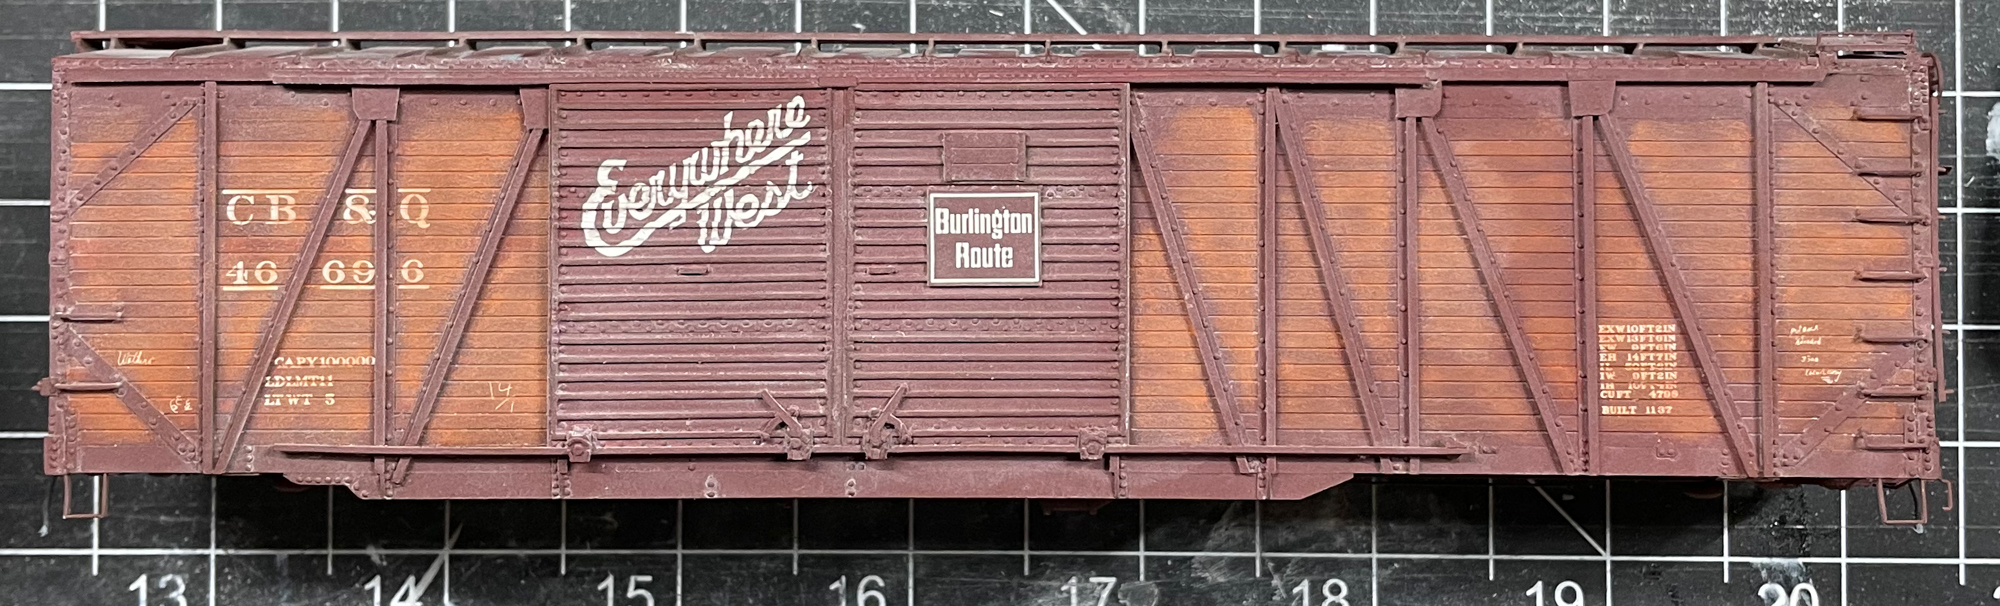
The completed XA-14C CB&Q 46696

Several weeks back, I shared some of the work I had done on a Sunshine Models CB&Q XA-14C. I have since completed the model and wanted to share that info, particularly how I weathered it. The weathering turned out mostly how I intended, although I think the number of steps could have been reduced and I also didn't quite achieve the look I was seeking. Hence, the use of mostly. However, the car does look good to my eye.

These photos illustrate how the car looked just prior to painting. The differences from what I showed in the last post include the addition of all rivets post-gritblasting as well as the addition of the plates on the main doors for the Burlington Route emblems.

The underframe is shown in the photo above. Again note that the crossties are "unflanged" which I believe is not how the prototype's crossties were fabricated, but have chosen to leave that unchanged on the model.

These two images illustrate the brackets for the hand brake housing, fashioned from 0.002" sheet brass shim stock. The brackets are channel sections and L-sections that were cut and bent to fit. I did not have any drawings, etc. so it was all made “by eye” from photos. You can click on each photo to see the detail. The brake step was created from the same brass stock, with bends at the front and back edges, and a hole punched in the sheet using an RP Toolz punch and die set.

I painted the entire model a mix of two-thirds Tamiya Hull Red (XF-9) and one-third Tamiya Red (XF-7) to approximate the Burlington's freight car red. I also used artist's oils to lighten and darken several boards. The oils were various mixes (on a palette) of Raw Umber and Terra Rosa.

I drybrushed several areas on the roof with Tamiya Light Grey (XF-66) to represent areas of paint peeling/failure.

The decals are from my own artwork and were printed by PDC. You will note that the "Everywhere West" slogan was a tricky one to make conform to the corrugations of the door. Overall, it snuggled down well enough, although there were some splits that I touched up with SP lettering Grey paint. Weathering hides the rest of the warts. The chalkmarks are from National Scale Car. I sealed the decals with Future followed by a coat of Tamiya clear flat, both applied with an airbrush.

For the first step in the weathering, I applied a dilute wash of Titanium white artist's oil heavily thinned with odorless mineral spirits.

I followed the first wash with a similarly dilute wash of medium-dark brown made from Raw Umber and Titanium white artist's oil heavily thinned with odorless mineral spirits.


I applied a clear flat coat over the oil washes and added some Bragdon's powders over the wood areas to create a slightly faded look to the boards and lettering. Yes, it looks quite stark here as I had not yet applied a clear flat coat, which tones down the effect quite considerably.


This is after the clear flat coat. The effect is still a little pronounced, but far less than before the clear coat.


I applied a couple more washes with the artist's oils to further blend and tone down the effects of the powders.


I masked the areas where I needed to apply reweigh, repack, and brake test stencils. They are surprisingly well hidden, but you can see them here if you look closely below and to the right of the capacity data and along the lower right side sill in the panel with the ladder made from grab irons.


The paint peeling/failure on the roof came out okay, I guess. I think for it to be more convincing, the grey areas might need top look cleaner. On a future effort, I will add that during the weathering steps as opposed to at the outset.


This is the B end of the completed model. Overall, I am pleased with how this build looks and from a few feet away, it is a very attractive addition to the fleet. 


Sunday, April 23, 2023

Sunshine Models Burlington XA-14 Auto Car


Virl Davis photo, Scottsbluff, Nebraska, ca. 1958, courtesy of Richard Hendrickson

Many years ago, I purchased one of the Sunshine Models CB&Q XA-14D kits. I have always loved 50' single sheathed auto cars and this prototype just looks massive. However, as much as I like single sheathed cars, I equally dislike HO scale single sheathed models where the patterns were made using Evergreen scribed siding. To my eye, the grooves look all out of proportion compared to the prototype. It's a hangup that is difficult for me to overcome. Fast forward to the past few months. I pulled out the box again and took a look at things. Almost as soon as I purchased the kit, I I had assembled the basic box of sides, ends, underframe, and roof, and felt that I had done a good job of keeping things square. I decided to ignore my misgivings about the board sheathing and plow ahead. Keen observers will note that I didn't build the -D variant; the -D kit included both styles of A ends, "tight" and end door. I opted for tight ends.

East St. Louis, Illinois, Joe Collias photo, 1963

A note about the prototypes is in order. There was a fantastic article in Railway Prototype Cyclopedia 12 about the Burlington's single sheathed auto cars by "Bat" Masterson, Hol Wagner, and Al Hoffman. There were 500 members of class XA-14 in total, all built in 1937 at the road's Havelock shops. There were differences in linings, auto loading equipment, and end doors that resulted in subclasses -A through -D. I would refer those seeking additional information, including about those cars rebuilt with increased inside height to support the war effort, to consult the article.


I made numerous substitutions and changes to the kit along the way. Those are noted in the following bullet points and I will elaborate more on many of these enhancements at a future time.

  • I am highly skeptical of the crossties on the model not having any sort of flanges. However, adding flanges to those crossmembers was not something I wanted to engage in
  • I added a mix of AB brake parts; I did not add a train line and the pipe from the dirt collector to what would be the train line is unprototypically anchored directly into the floor
  • I made all new running boards from strip styrene and also brass for the latitudinal running boards
  • the brake step and brackets for the Ajax hand brake housing and pressure retaining valve were all also fashioned from brass
  • the end ladder stiles were created from strip styrene
  • the top and bottom door guides and tracks were created from strip styrene (unless these parts are perfectly cast in resin, they can be a bear to work with... I found it easier to just make new parts)
  • the angle cock brackets are from Yarmouth and the angle cock/air hose parts are from Hi-Tech
  • the sill steps are etched parts from Yarmouth
  • The uncoupling rod brackets are etched brass parts from my own artwork etched by PPD. The rods are 0.010" wire
  • all grabs were bent from 0.010" wire
  • the right hand end grab iron bracket was created from brass
  • the door handle hardware is from an old resin PRR X31 kit
  • the upper side gusset plates are 0.005" styrene
  • the trucks are AAR spring plankless from Tahoe and are a "close enough" truck. I am not aware of a correct HO scale truck for an AAR spring plankless design that also has Barber lateral motion devices
  • the draft gear (coupler pockets) are a mix... one is a resin part from Pittsburgh Scale Models and the other is from Moloco. The reason being that I had a full set of the PSM resin parts, but managed to lose one along the way (this car was one of many that was reboxed after my disastrous basement flood back in 2011)

The next step is to blast the model to create a surface more amenable to good paint adhesion. After that I still need to add the following:
  • rivets
  • nut-bolt-washer castings
  • the plate on the door for the "Burlington Route" emblem
I will follow up in part two with painting, lettering, and weathering

Saturday, February 20, 2021

Lots of interesting things in this photo


This photo of Clyde Yard from the Newberry Library from the Chicago, Burlington & Quincy collection. The image was recorded by Russell Lee in May, 1948.

In the image below, I have overlaid text to highlight some of the details. Views of roofs are especially interesting as they illustrate the diversity of types, as well as the differing heights of cars. 


Thursday, February 4, 2021

When is a Monon Box Car not a Monon Box Car?


John W. Barriger III National Railroad Library

This photo was recently posted at the Barriger's flickr site. It immediately grabbed my attention because I knew from the car number and details that it was not a Monon car. CIL 9147 was a 1937 AAR-design car, like CIL 9157 shown below. Monon's 1947-built cars were different, as well, with welded sides and Improved Dreadnaught ends with full-width top ribs and that group of cars also had either Superior or Improved Youngstown doors. I love this type of challenge. Fortunately, I knew immediately what it was, but as an A+ geometry student in high school, I like working through the proof.

This is what CIL 9147 would have looked like, including the National B-1 trucks:

Big Four Graphics

Here are the details that I used to arrive at the real prototype (highlighted in the image below):

  • "Bow-tie" arrangement of rivets at the bolsters
  • Pre-war Youngstown doors
  • Abbreviated top rib in Improved Dreadnaught ends
  • "Kinked" right ladder stile
  • Capacity data fully spelled out, along with type style


The conclusion: CIL 9147 was actually a CB&Q postwar car from the XM-32 family of box cars (note that while the prototype shown below has Improved Youngstown doors, there were cars in this group with pre-war Youngstown doors; I just don't have a good photo of one!) The Monon marketing team no doubt doctored the photo to promote their service to Old Forester. Case closed... Columbo solves the crime again! Book 'em Danno

Al Hoffman Collection


Monday, August 13, 2018

Q Connection CB&Q NE-10 Modernized Waycar


Longer ago than I'd care to admit, friend Al Hoffman asked if I would paint, decal, and lightly weather a model of a Burlington waycar that he had built. The model is a Q Connection resin modernized NE-10 Waycar.


Al is a talented builder. I agreed, hopeful that I wouldn't diminish his finely detailed model. The model as turned over to me is as seen in the "in-progress" photos shown herein.


I blasted all of the metal, wire, and engineering plastic surfaces with 220 grit aluminum oxide in preparation for painting. I followed by cleaning all surfaces using dishwashing liquid and a soft toothbrush. I thoroughly rinsed the model and allowed everything to air dry.


For painting, I began with a coat of TruColor primer on both the interior and exterior surfaces. For the main body color, I used a mixture of TruColor Daylight Orange and MEC Harvest Yellow. I masked the areas that would remain orange and sprayed the remainder of the model, including underframe and trucks with Tamiya XF-1 flat black. Imagine my horror when I removed the masking tape and peeled up large strips of the orange. A closer examination revealed that there were many areas of the car body that had a decidedly glossy sheen.

After an outburst accentuated with many colorful bits of verbiage, I put the model aside. After several months, I came back to it. I took it to the blasting booth and hit every area that I could see that might pose problems with 220 grit aluminum oxide. I repeated the washing procedure. I sprayed the orange areas using a mix of Tamiya paints, about 80% X-6 orange, 10% XF-59 Desert Yellow, and 10% XF-19 Sky Grey. I again masked the areas to remain orange and sprayed the rest with XF-1 flat black. With great trepidation, I removed the masking tape. Success!

The orange areas were glossy already so I applied the decals without any extra gloss coat. The model was lettered with Microscale 87-1197 for CB&Q Way Cars in the orange scheme (1954-1970). At this time, I also drybrushed orange on to the top surfaces of the running boards. I sealed everything with Tamiya XF-86 flat clear.

I lightly weathered all surfaces with Bragdon's weathering powders. Soot gray powder was applied to everything including the trucks and wheelsets. Grimy black was applied to the roof and truck sideframes. The powders were sealed with the same Tamiya flat clear. Small black rectangles were added to the car along with white repack stencils. These were also sealed with flat clear.

The final detail was to add window glazing. The glazing is 0.010" clear styrene cut to shape. To affix these pieces, I dipped them in Future (now Pledge) floor polish and nested them into the back of the window frames. I added a little more Future from the back, which served to "glue" the glazing in place.

I assembled the car body to the frame and screwed the Tahoe Model Works trucks in place. I then met Al at Pepe's Pizzeria in New Haven to receive my reward - a pepperoni pie.