Showing posts with label Westerfield. Show all posts

Tuesday, May 26, 2026

The State of Westerfield and Resin


One of my favorite Westerfield builds ever, even with the loathsome Evergreen scribed siding for the boards...

With the announcement by Andrew Dahm that he has suspended Westerfield, there were many of the usual comments hoping someone will "step up" to acquire the business and keep it going. Given my still recent dive into the casting pool, I want to provide some (valuable... I hope) context about what is involved in the business. 

Another of the scribed boards brigade, but I loved building this one too

First, a going concern like Westerfield generates residual income in the form of sales of items already in the product line/catalog. However, the vast majority of income for resin kits is in new releases, by multiples. In other words, if you're not releasing new stuff, you're treading water, at best, or sinking.

One of Westerfield's great offerings... you need more than one

Second, people may presume that you make some castings, add details and wire, and throw it all in a box, and sell it. Simple, right? 20+ years ago, that model worked. There were tons of purveyors of ladders, sill steps, brake parts, running boards, etc., to help make these kits a reality. That is no longer the case. If you've been paying attention, you know that Detail Associates is gone, Proto Power West/Details West (A-Line sill steps, anyone?) is a shell of its former self, Plano parts are unavailable at present... there are others, but if you depend upon a good variety and supply of parts, in bulk, things are bleak. Even stuff that is "active" may not be in stock or rerun any time soon, affecting your ability to generate revenue. A good example of the current state of things is the simple ladder. It used to be that you could get sprues of ladders, in bulk, from Detail Associates, Details West, Branchline, Intermountain, Tichy, Red Caboose, and perhaps one or two others I'm forgetting and the ladders were different (number of rungs and spacing) so you could usually find a ladder to match your project's needs. Today, Tichy is it, severely limiting your options... which leads me to another point...

Another classic

What passed muster 20+ years ago doesn't cut it any longer. Back then, there was a small mafia of people who had or knew where to get the drawings needed to produce accurate patterns for models. The prototype had a fishbelly center sill underframe and so does your model... awesome! Today, if you did that, someone would order the drawing(s) to aid in their build of the kit and then post on groups.io, facebook and six other places, that on your kit's underframe, the stringers are missing, the diagonal braces aren't the right shape, the fishbelly sections aren't deep enough and your crossties are in the wrong location. We are collectively better informed and more sophisticated and the models need to reflect that. Some people view them as standalone models, not parts of scenes and they expect them to hold up to such scrutiny.

and last, but by no means least... one of the finest resin offerings ever. A tour de force 

Which leads me to that same thing that is always important: moola. I know that I am charging (for kits that have trucks and wheelsets, Kadee couplers, "rubber" angle cock/air hoses, plus all the other stuff, including extensive etching sheets) mid $80. That is "too much" for some and that's fine. My kits aren't for everyone, but if you think I'm gouging, you're pretty far off the mark... the days of runs of 400 of a specific resin kit offering are long gone; 150 is a great success these days. However, I also know that mid $80 no longer works for kits with all those things. Etchings take a lot of time (= money) to design and engineer and the best value provider (quality and cost) is in Scotland. That wasn't an issue, but now, I not only have to pay the cost of the goods, but with the elimination of de minumus imports, I have to pay an additional ~40% for duties plus the filing fees that couriers charge. Trucks with wheelsets are a significant outlay of $8-$10+ and the days of 40% discounts from providers of those things are gone. Kadee couplers are expensive, too. Resin is petroleum-based and we know what has happened to oil prices twice in the past several years. On things like resin, those prices creep up, but don't usually retreat when oil goes down. All of these things add up. Then there is my time. I have no choice, but to procure drawings and/or photos, draw the artwork for the decals, design the etchings, make the patterns, duplicate the parts, build up one-piece bodies, make molds, cast parts, write instructions, fill bags, stuff boxes, print labels, and mail things (which is also more expensive as of April 26.) None of this intended to be a "woe is me" sob story; it's intended to provide context about what is involved.

To circle back to the original idea of finding someone to "step up" and buy Westerfield to keep it going, that's a huge ask and would take a very special person. There are a lot of hats to be worn in this business... designer, modelmaker, caster, office manager, and a half dozen other roles. Stepping up is what Jeff Hostetler and Tom Brady did. However, they were already professionals specializing in exactly what they were being asked to do. The person who buys Westerfield would be doing a lot more than stepping up in all likelihood; they'd probably be learning many new skills on the fly

Saturday, April 6, 2024

New York Central USRA Design Automobile Cars


Fayetteville, NC, Oct 12, 1952, Col. Chet McCoid photo, Bob's Photo

In 1922-1923, the Michigan Central added 4,000 automobile cars based heavily upon the USRA-design steel box cars that were the de facto standard box car of the NYC System from the 20s into the 50s. They had the same rather diminutive inside height (for an auto car) of 8'7". They were delivered in three groups: NYC Lots 440-B from Standard Steel (Hammond, IN, car nos. 96000-97999,) 464-B from American Car & Foundry (St. Louis, car nos. 98000-99499,) and 465-B from Standard Steel (Hammond, IN, car nos. 95000-95499.) They had auxiliary doors with a door opening of 10 feet. They were eventually renumbered into NYC reporting marks, series 189300-190999, 145400-146999, and 194000-195498.) Most (if not all) of the cars were built with Camel-Gilroy doors, like those shown on NYC 189735, above, and some cars, like NYC 189735, shown above, had their auxiliary doors sealed, making them into box cars. NYC 146479, shown below, had Youngstown doors and also received a replacement Murphy rectangular panel roof.

Fayetteville, NC, Oct 22, 1951, Col. Chet McCoid photo, Bob's Photo

Between 1930 and 1932, The NYC increased the height of many of these cars by adding plate steel sections at the top of the sides and raising the roof. An indeterminate number also received replacement Murphy rectangular panel roofs, as well, although photos show that many continued on with the Solidsteel roofs (lacking raised panels.) The raised roof cars were eventually assigned to series 194000-195498.

Charles Winters Collection

Paul Dunn photo, R. J. Burg

These three prototype images (above and below) illustrate how the cars appeared after the modifications. Note the Solidsteel roof and two extra Murphy end corrugations on the car shown below. 

crop of "Milwaukee Road, general view of part of Galewood Yard, Chicago," Jack Delano photo, FSA-OWI Collection, Library of Congress, call number LC-USW36-619


Years ago, I built a Westerfield kit to replicate one of the cars that continued on with its original 8'7" inside height, as shown above. While Broadway Limited released a specific version of the NYC System's USRA design box cars, Westerfield is still the only way to model many variants (including the most numerous varieties.) 

Sunshine Models also produced a kit to replicate the raised roof variants. These went out of production with the death of Martin Lofton. However, Yarmouth Model Works has resuscitated this model, with one-piece body casting.


I was fortunate to have one of the Sunshine kits in my stash and decided to start building it. As it's a flat kit, one has to assemble the sides and ends and then add the roof and floor to complete the basic assembly. I did all that, following my usual process, the most important part of which is to true up the sides first (equal length and square edges... it's been awhile since I have detailed that process, so I will post about that in the next couple weeks, with commensurate detail.) The biggest hurdle, as shown in the photos above, was that the lines of the peaks of the ends did not match that of the roof. To overcome that, I finessed things into place. My approach was to glue [ACC] the roof to one half of the top of the ends and also one side. You can see in the photo of the end of the car, how the roof is attached at the left, but the right portion is raised (not yet glued.) I let the half that was glued dry thoroughly and also augmented the joint with some 0.125" square styrene on the interior of the body where the side and roof abut. I then repeated this process for the other side. This resulted in a clean and strong assembly with the underside of the roof matching the peaks of the ends. I will continue this build in a future installment.

Thursday, May 25, 2023

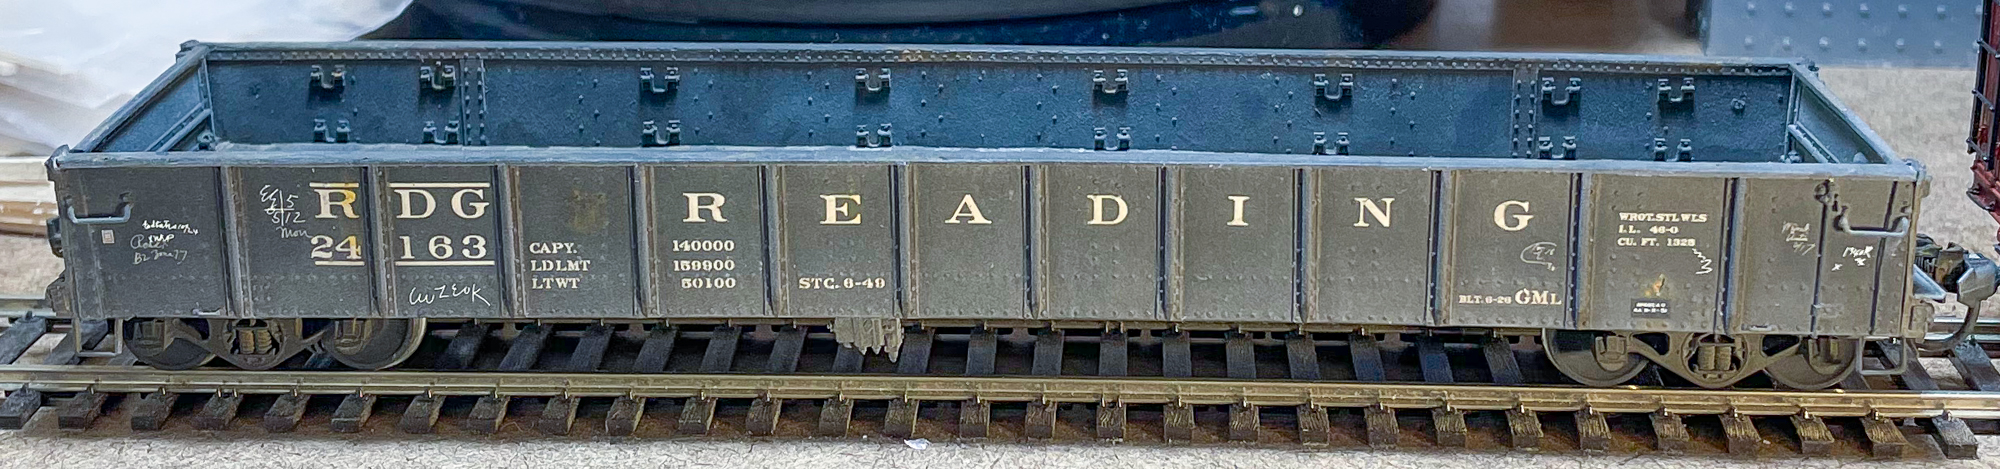
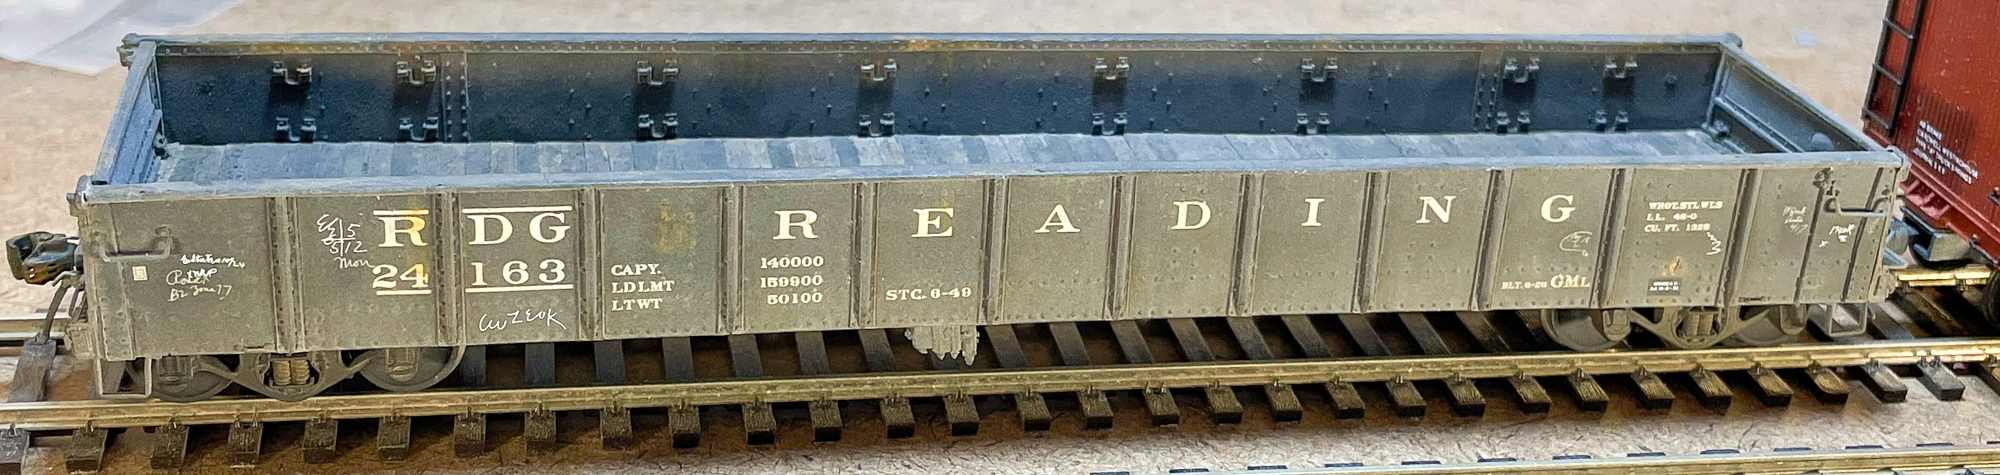
Finishing a Bill Welch Model - Reading USRA-design 70-ton Class GML Gondola


Much of Bill's model work that he was engaged in just prior to his death was lost due to the condition of his apartment after he was admitted to the hospital. I have shared the details with a few people, but have not published any sort of explanation. There was a plumbing issue that flooded Bill's apartment between the time he was admitted to the hospital and his death. Using your imagination, one can easily conclude what a wet apartment from backwashed toilet water in central Florida looked like. It was effectively a hazardous area. Much of what was in the apartment was unsalvageable. However, a few in progress models were tossed in boxes. Many were damaged as packing them carefully was not feasible. This model is one of the ones that was salvaged.

There were no instructions, parts (including the simulated wood floor casting), decals, trucks, etc. Fortunately, I have one of these kits in my stash and could use it to help complete the model.

Additional details include:

  • Yarmouth Model Works Carmer cut levers
  • Perfect hand brake wheel (Dayton Malleable Iron Co.) from alternate Westerfield Reading gon kit (which includes an extra, fortuitously!)
  • Custom decals from my artwork, printed by PDC
  • Plate C Taylor trucks (they are 50-ton whereas the prototype used 70-ton, they they are a unique design and 70-ton versions are not available; more on these trucks below)
  • Lead sheet and styrene
  • Stripwood (1x8) for the floor
  • Weathered predominantly with artists' oils plus limited powders from PanPastel and Bragdon
The model was mostly completed. Prior to painting, I added some missing details as well as a couple other items. I began by adding lead sheet at the ends of the floor and some styrene in the center. The lead sheet is quite thin, ~0.020", so I used 0.020" sheet styrene in the center section. Bill had already added lead sheet between the structural members on the bottom of the car so the additional lead made the car sufficiently heavy to run without a load. I added small amounts of strip styrene and rivets to simulate the mounting of the sill steps. 

Images of the Plate C Taylor trucks, above and below


A note is in order about the Plate C trucks. They are quite well detailed, but require some care in handling. They come assembled and should be handled that way. I removed the wheelsets and painted them in a wheel mask jig. That worked well, but in reinserting the wheelsets into the truck sideframes, I broke one. The truck sideframes are quite brittle. It would have been better to mask the wheel treads and leave the wheelsets in the sideframes. I did manage to repair the sideframe as the break was clean and I braced it as well. I used Barge cement to glue it back together and then "framed" the break with styrene attached with Barge cement secured additionally with ACC.

After all the detailing was completed, I blasted the metal/wire parts, trucks, and wheelsets with 220 grit aluminum oxide. This adds some roughness to improve paint adhesion. I primed the model using Badger Stynylrez primer. I then painted all surfaces with a mix of Tamiya flat black (~90%) and XF-66 light grey (~10%) using an airbrush. This was followed by a coat of Future floor polish again applied with an airbrush to create a gloss surface for the decals. 


I applied all decals except the brake test and repack stencils. In addition, I added a few chalkmarks, too. These were sealed first with Future and then Tamiya XF-86 clear flat, both applied with an airbrush. I began weathering by applying a rust color that is a mix of gold ochre and terra rosa artists's oils. The technique involved using mineral spirits (odorless) to allow the color to "bleed" into various areas, including along the structural members on the sides, as well as the end sills. I also added less diluted rust to many areas, including several of the interior stake pockets and some "pits" (imperfections) in the car body casting to simulate rust. I sealed all of this with another flat coat followed by a thorough application of a light grey from a blend of white and Payne's grey artists' oils. This was applied to all surfaces, but more was added along the side sill and allowed to "travel" up the sides and structural members through capillary action. I again sealed this with a clear flat coat. I followed with another similar application, except this time with raw umber artists' oil, followed again with clear flat. 


Since the floor casting was missing, I decided to add strip basswood to simulate the floorboards. I used HO scale 1x8; I don't know the dimensions of the prototype's boards, but I wanted them to be as thin as possible since I added lead and the width of 8" is dimensionally close to 7+ inches, a common board width on gons and flat cars. I secured the boards using a 50/50 mix of Barge cement and MEK. I began at the center of the car and added boards, working from the center to the ends. Once in place, I applied a basic wash to the boards of diluted raw umber artists' oils thinned with mineral spirits. I sealed everything with a flat coat before proceeding.


Next, I highlighted several of the boards with raw umber and Payne's grey artists' oil washes of various strength to create subtle differences in the boards, followed by a clear flat coat. I followed with some judicious applications of PanPastels and Bragdon's powders. The PanPastels (Payne's grey) were applied to the floor boards as well as to slightly darken the chalkmarks. I also added Payne's grey and raw umber to the truck sideframes, the wheelsets, and the couplers. The Bragdon's powders were added to the interior (not the boards) - grimy grey - and the faces of the wheelsets - soot. Everything was again sealed with a coat of Tamiya flat.


I masked the area where the repack and brake test stencils would be added and airbrushed them with the same Tamiya black-grey mixture, followed by a coat of Future. I applied several more chalkmarks, as well as the reweigh and brake test stencils. These were sealed with Future followed by Tamiya clear flat. Finally, I applied a very, very dilute wash of white artists' oil to tone down and blend everything, followed by one last clear flat coat.  I added the trucks and couplers and Reading GML 24163 was ready for service. I hope that Bill "the reluctant weatherer "extreme modeler" Welch would approve!


Wednesday, March 1, 2023

Pennsylvania GRa Gondola Finished

I recently completed a Westerfield Pennsy class GRA gondola. You can find the previous posts via these links: Part 1 and Part 2. When I left off, the model was painted and awaiting lettering. I created my own lettering and had the decals printed by PDC.


The photo above illustrates the model after the decals were applied, excepting the repack stencils and some of the chalk marks. I also applied a wash on the interior boards using AK Interactive's Streaking Grime. I followed that by some light blending with a fiberglass scratch brush. I sealed the lettering with a coat of Future applied with an airbrush followed by a coat of Tamiya flat, also airbrushed.


Next, I applied some streaks to the sides below the floor boards. I have a prototype photo that displays a similar type of weathering. I dabbed on a mix of white and Payne's grey artist's oils that were then drawn upwards using mineral spirits, so that the greatest paint concentration was where the floor boards are exposed on the sides and also to create simulated streaks.


The photo above illustrates the model after a light weathering. I sealed the oils referenced above with a coat of clear flat first. I then added light amounts of PanPastels Burnt Sienna and Raw Umber. This toned down both the white of the lettering as well as the harshness of the light-colored streaks. I sealed these with a coat of Future, followed by the addition of more chalk marks. I sealed the chalk marks with a coat of Future followed by clear flat. 


The last steps to create the finished model, excepting the load, are shown here. I masked small areas for the repack stencils and painted them gloss black using an airbrush. I applied the repack stencils, using spares for Missouri Pacific from my decal bin. After they had dried, I sealed them with clear flat. Lastly, I added bits of white paper to simulate routing instructions, secured with Loctite Stik'n Seal. I added the couplers and trucks to complete the car.


The load is something I have been passively working on for years. I have a ziplock bag that I add bits of this and that too, knowing that they will end up as part of a scrap load. While loose on a piece of newsprint, I sprayed most of the junk with silver and grey paints from a rattle can. Once everything was ready, I placed the pieces inside the car body. I masked around the top edges of the car sides and then applied a very liberal stream of clear flat using a rattle can. This served as a quasi adhesive to secure much of the matter in place. I then added diluted white glue using an eye dropper to help secure things even more, especially the material at the bottom of the load. Finally, some of the larger pieces were secured using Loctite Stik'n Seal. While nothing is 100% securely in place, everything is nonetheless in place sufficiently that when turned upside down, nothing falls out! The final step involved several applications of drybrushed grey and black paints along with the addition of various rust shades of Pan Pastels and Tamiya brown wash. If one looks intently at individual pieces of the load, they may not stand up to scrutiny, but as a whole, I find the load highly convincing to simulate scrap from machining waste and various pieces of junk. In a moving train, it definitely does the job. On to the next project...


Sunday, January 22, 2023

PRR GRA Gondola Part Two


In part one covering the PRR GRA gondola, I covered some prototype info as well as many of the noteworthy modeling points in replicating these cars using a Westerfield kit. Since then, I have blasted the metal details with 220-grit aluminum oxide and added rivets and other fasteners that might have been vulnerable to be blown off the model during blasting. In the photos directly above and below, you can see rivets on the bottom crossbearer cover plates, on the metal straps in the end panels, and at the towing loops.


I primed the model using a Tamiya grey that is not a true primer, but does apply a consistent grey color to the model. I followed by spraying the sides, underframe, and some of the interior hardware with Scalecoat II PRR Freight Car Red. After that I masked in appropriate places and painted the interior with Tamiya Desert Yellow. The underlying grey and this pale yellow will be a good foundation to weather the interior boards. I will be adding a scrap load so the lower potion of the interior is not as great a concern to me as the upper portion. 

Next, I will weather the interior as well as to letter and weather the rest of the model, too, followed by the addition of the scrap load. More in a few weeks...


Sunday, April 3, 2022

Pennsylvania Railroad GRA Gondola


Like seemingly everything in its fleet, the Pennsy had a large number of class GRA gondolas. The cars were built early in the 20th Century (between 1907-1916) and many managed to hang on into the 50s, with over 2,000 still in service in 1952. I covered these and other PRR gons in my Hindsight clinic (details posted here.)

Robert W. Smith's two-part article about these cars and the related class GR, "Pennsylvania GR-GRA, Variations on a Theme," was published in Mainline Modeler, February and March, 1990. It contained drawings and other useful details. Be careful with the drawings as I know one is captioned, "MODIFIED WITH AB BRAKES" for a drawing of car prior to upgrade with AB brakes!

I built a Westerfield kit years ago and loved the model (photo above). However, the kit I bought and built was more of a spur of the moment purchase and it had stake pockets on the sides, a feature not common on cars in the early 50s. Recently, I saw a kit without stake pockets on eBay at a very modest price so I decided to take the plunge. Here is how I built it.

As with any resin flat kit, I ensured that the sides were of the same length. With that accomplished, I glued the basic box together as shown in the photos. It was important to get the tops of the sides to match the tops of the ends. Mission accomplished. The accompanying photos show the basic box from the top, bottom, and side, prior to the addition of the floor/underframe. The floor/underframe were glued top-to-bottom and sanded to fit inside the carbody. The castings contain quite nice detail on both the exterior and interior. Given that the largest surface is wood, there is ample opportunity for weathering.


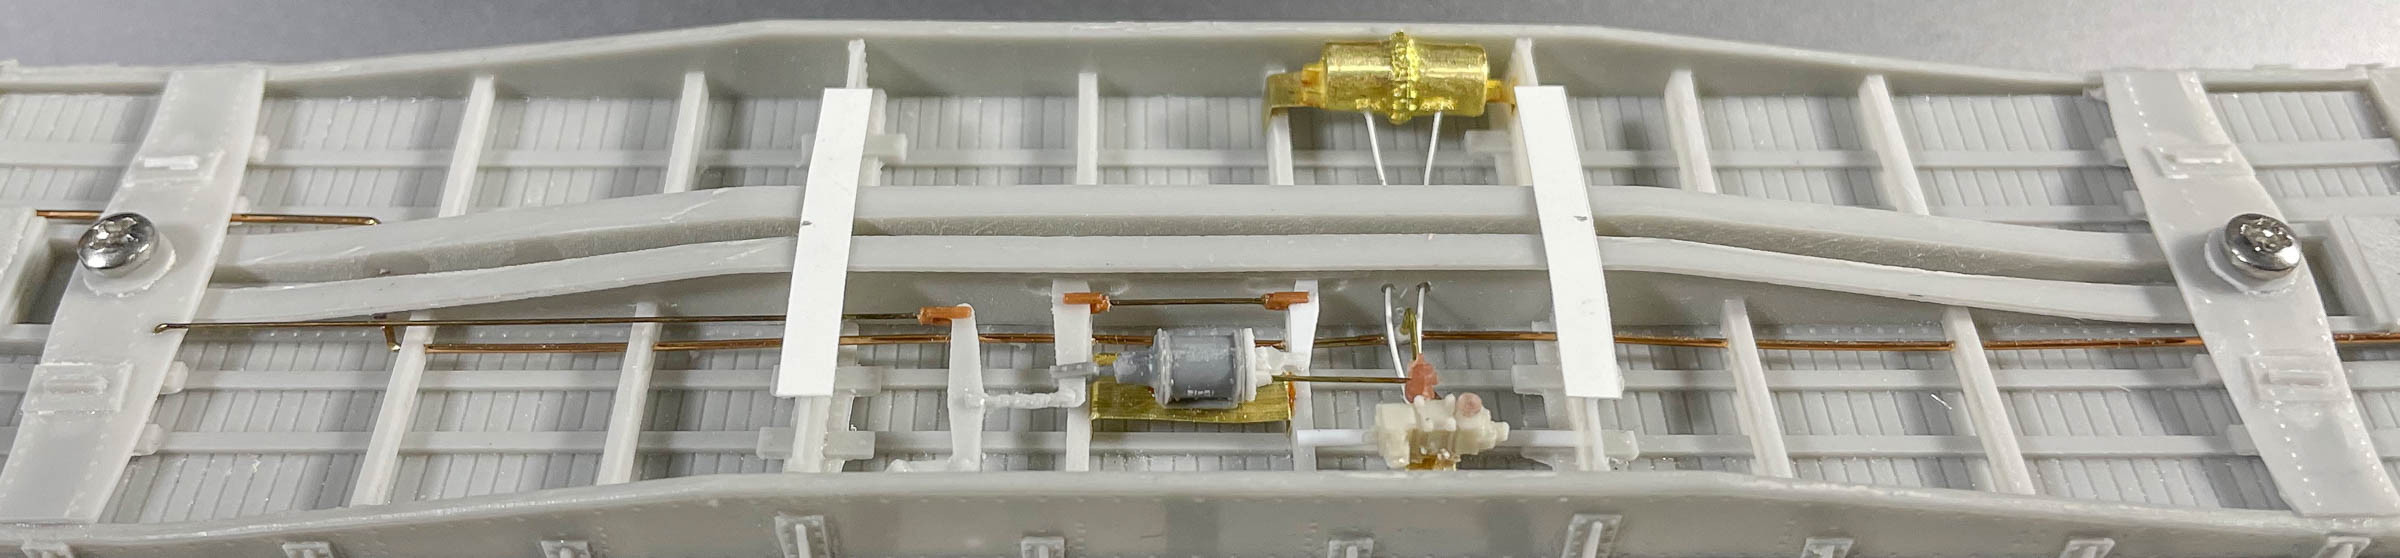
By far the area with the greatest amount of detail to be added is the underframe. I cobbled together an AB brake system from a bunch of scraps, including a spare brass casting from Overland for the reservoirs, a Tichy cylinder, but with a Speedwitch integral cylinder head with brake lever bracket, and a Sunshine AB valve (a dupe of the Detail Associates part) embellished with some spare Detail Associates parts including a dirt collector. The levers are a mix of the cast resin parts and strip styrene cut to shape, with Tichy turnbuckles modified to simulate clevises. The pipes and rods are a mix of styrene rod (between the reservoirs and AB valve) and brass wire in the other locations (0.010" to 0.020".) The mounts for the main brake components were all created from 0.003" sheet brass cut and bent to shape. The crossbearer cover plates are 12"-wide strips of 0.005" styrene. I used the kit's coupler covers, secured with 0-80 screws.


For the sides, I changed a few details. For the straps in the two end panels, I used 0.005" styrene instead of the cast resin pieces. For the towing loops, I created them from 0.015" brass wire, but opted to remove the kit's nut-bolt-washer detail and added discs punched from 0.005" styrene using an RPToolz punch and die. For both these discs and the straps, I will go back and add rivet detail after the model has been sandblasted prior to painting. The pressure retaining valve is a Precision Scale styrene part wit 0.008" wire. The sill steps are Yarmouth Model Works etched metal parts. The trucks, as shown in the photo below, are Sunshine Models 2D-F8 prototypes, with Reboxx wheelsets and Reboxx journal inserts that dramatically improve the rolling quality of these trucks.


In the final post on this model, I will highlight the detail on the ends, the method used to assemble these white metal truck castings, as well as the painting, lettering, and weathering.

One note: in several photos of the GRA class, I see some type of additional bracing in places, as shown in a closeup of PRR 335933. It would be a nice detail to add, but it's not something I felt compelled to add. Of course, you are welcome to tackle that detail...