|
| While the Western Maryland Baldwin-built I-2 Decapod and its train are no doubt the subject of this image, the color of the New Haven 1937 AAR box car immediately behind the tender is illustrated nicely. Cash Valley, Cumberland, Maryland, Bob's Photo |
It's amazing what almost 20 years can do to the approach to a model. I added some detail to this kit a loonngggg time ago and it has languished since. Earlier this year, I pulled it from the pile of in-progress kits and decided to use it as a test bed for some of my detailing efforts.
 |
| Circa early 1945, Al Armitage photo, Ron Morse Collection |
First, a little about the New Haven's fleet of 1937 AAR box cars. By the early 1940s, the New Haven box car fleet was on borrowed time. It consisted of thousands of thirty-six foot box cars rebuilt in the second half of the 1920s from cars that were built between 1903-1912. To provide a little context, by the early war years, these cars were so rundown that the War Production Board authorized their mass scrapping, even while forcing just about every other railroad to keep their equipment running. In the face of the cars' condition as well as the increase in traffic resulting from the war, the New Haven added 1,000 1937 AAR box cars in 1941 and an additional 2,000 in 1944. Like many blocks of cars built during the war years, they featured a hodgepodge of specialties. I chose to model a Pullman-Standard 1944 product with Superior 7-panel doors and a Miner power hand brake, narrowing my car nos. to 31000-31349 or 31500-31649.
 |
| Bob's Photo |
.jpg) |
| This Norman E. Kohl photo of a NH '37 AAR that had come off the rails affords an excellent view of many of the end details, including the unusual placard board and the bracket for the angle cock/air hose. |
The basis for this build is the IMWX/Red Caboose 1937 AAR box car with W-section, round corners, a match for the NH's '37 AAR cars. There are a couple issues with the underframe that I chose to ignore. First, the original '37 AAR cars had two stringers, one on each side of the center sills. Later cars had four, two on each side of the center sills. When tooled, IMWX tried to have their cake and eat it too, so the two stringers on each side of the center sills are not correctly spaced. The other issue is that an option for buyers was to employ stringers between the bolsters and end sills, instead of diagonal bracing, as on the model. The NH's 1944-built cars (and perhaps the '41 cars, as well) used stringers instead of the corner braces. On to the things I did choose to update...

As previously noted, I did not modify the stringers and corner braces on the underframe (if you do wish to go that route, I suggest that you consult "New Haven's first steel boxcars," from the December, 1996 issue of Railroad Model Craftsman, by Ralph Harris.) I did replace the brake equipment with a Detail Associates AB brake set, styrene levers and dead lever bracket, Tichy turnbuckle "clevises," chain, and styrene and vinyl brake component brackets plus Grandt Line nut-bolt-washers on the reservoir lugs, plus Tichy wire for the piping and rods. The draft gear (coupler pockets) are Moloco parts with 1-72 screws.

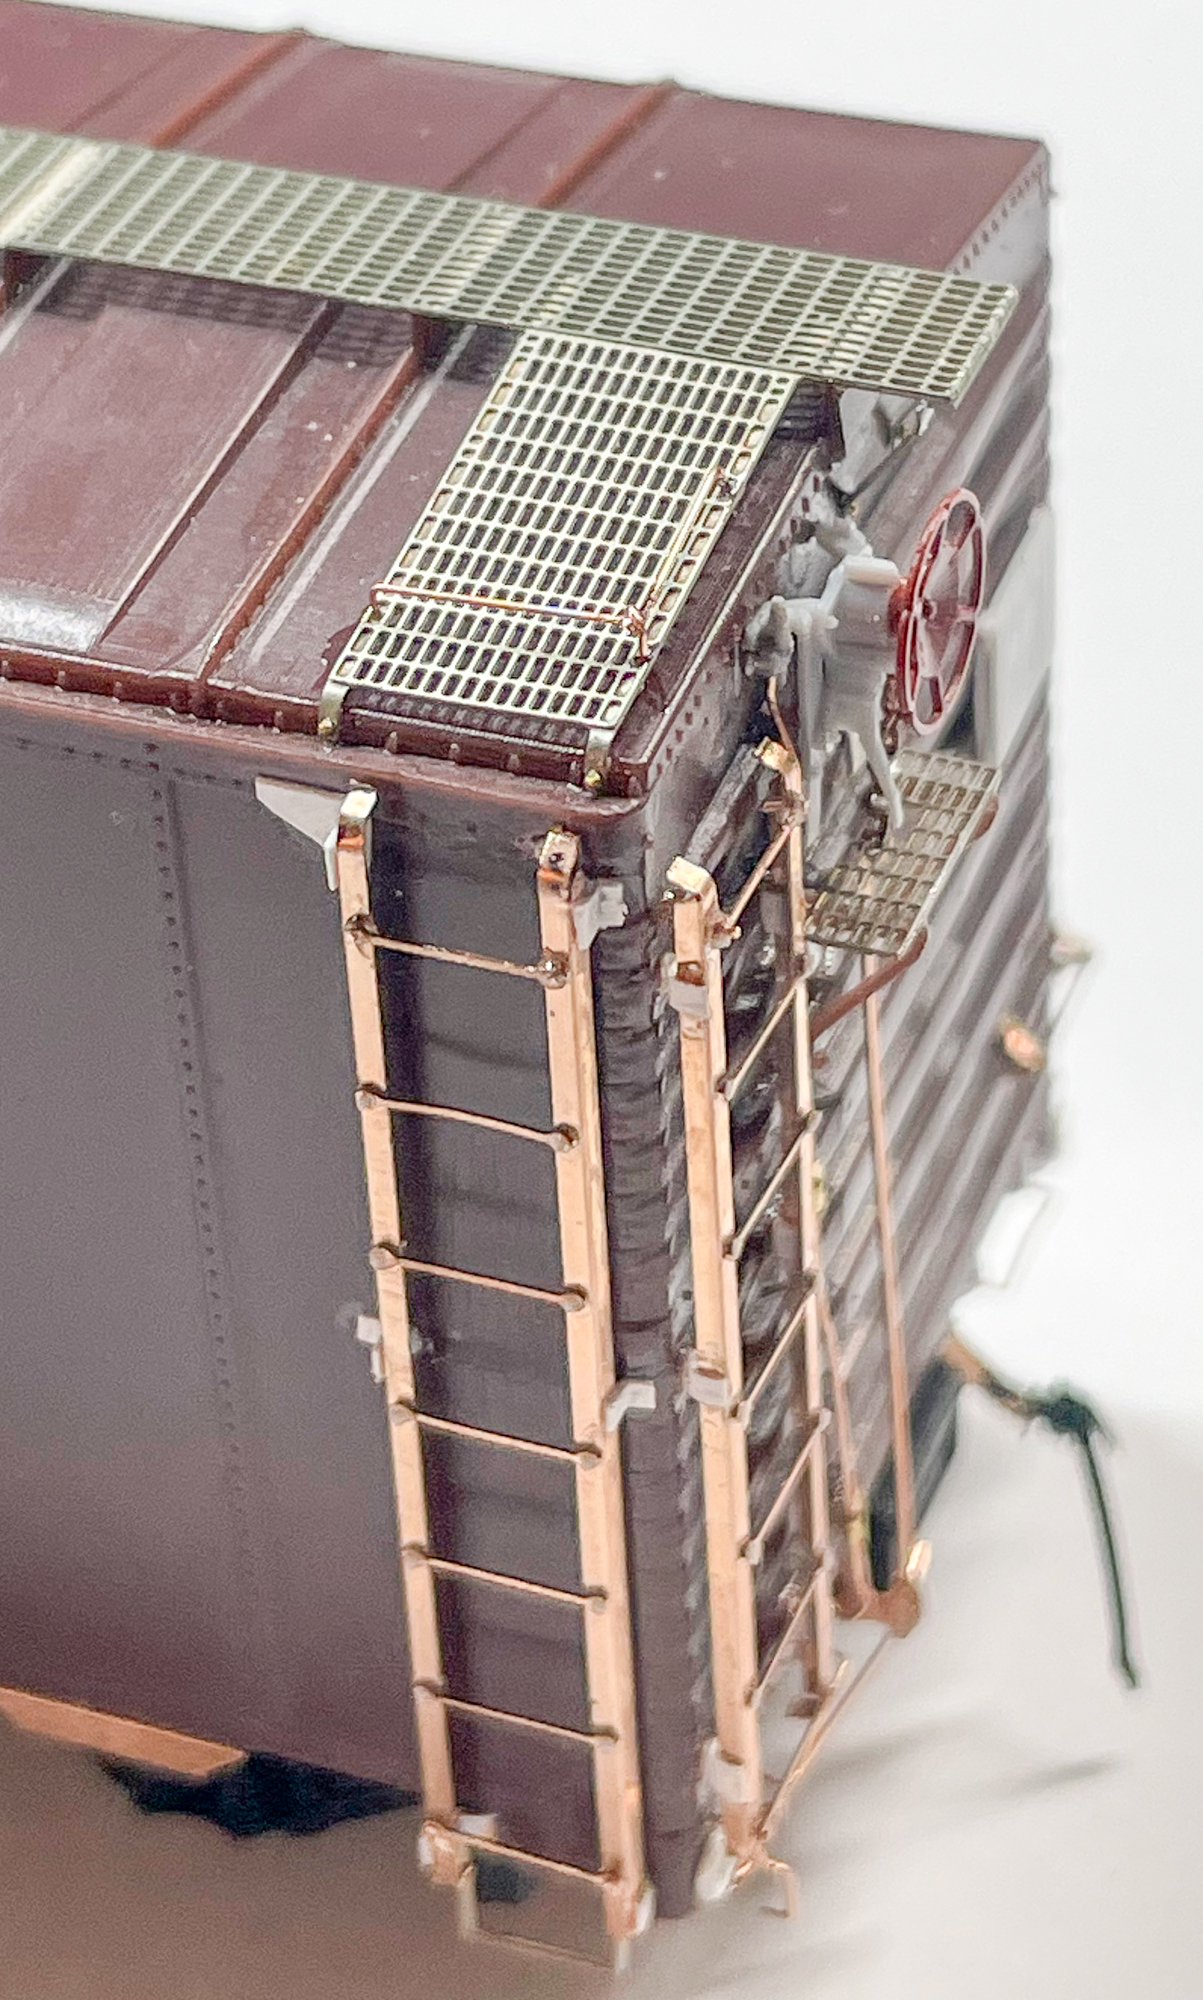
On the sides, I made a few upgrades. The bolster tab sections (added after I glued the center sills/bolsters to the car body, making the endeavor a little more challenging!) are etchings from my own artwork that capture the "notched" look of the tab sections favored by Pullman-Standard. The door tracks are 0.002" brass sheet cut and bent to represent an angle. I opted to add this detail because the door tracks and hardware for Superior doors is quite different than for Youngstown doors and manufacturers have largely ignored this, opting to replicate Youngstown features. After adding the door tracks, I applied brackets along the side sill supports behind the door tracks. The last bracket is also part side sill support tab, as shown. These features were fabricated from styrene. I scratchbuilt the "ramps" and "stops" for the door latches using styrene. They are fairly crude, but are better than nothing! The placard and route card boards on the doors were scratchbuilt from styrene to match the NH-style ones used on the prototype (I didn't have actual dims so these are my best guess.) Note that the placard boards on the doors and ends are different. The door handles were also fashioned from styrene. They are too long, but do impart some texture that is lacking on the stock IMWX/Red Caboose doors. The final door detail I added is the locking mechanisms pilfered from a Detail Associates Superior door parts set.The roof received very minimal change and upgrade. The kit includes wood running boards. The prototype I am modeling was equipped with an Apex Tri-Lok running board (and brake step.) I used etched parts from Yarmouth to replicate this. For the corner grab irons, I used 0.008" wire for the grabs and the corner eye bolt-like fixtures. Before adding the running board, I carefully drilled holes (no. 80 bit) in the "legs" that curve down to the eaves to be able to pin these legs into the roof edge. I also trimmed the legs to an appropriate length. The running board was affixed with Barge cement thinned with MEK (~50/50) augmented with ACC applied with a pin.
I replaced all of the ladders and hand holds with finer parts. The bracket grabs at the left edge of the car sides are Kadee parts (use a Yarmouth etched drilling guide to save yourself some headaches!) The ladders and treads (rungs) are etched parts from my own artwork supplied to PPD and etched in phosphor bronze. They are extremely close to scale-sized and are durable. A little bend here and there looks highly prototypical, as the rungs on the prototype were beaten up over time, as well. The sill steps are from Yarmouth and are designed specifically for this model. The end sill grabs are 0.008" wire (I filled the holes before drilling newer, much smaller diameter ones.) The right edge bracket grabs on the ends are also from my own etching artwork.

For the end details, I again used very little from the kit. Brake step supports are a combination of the kit's with 0.005" styrene. The power hand brake is a Miner housing from Tangent with a Kadee hand wheel. I added chain and 0.012" wire from the housing to the bell crank. The bell crank is from Detail Associates and the "clevis" is also one of my etchings. The pressure retainer valve is a styrene part from Precision Scale with 0.008" wire plus "brackets" created from 0.001" brass. The angle cock/air hose parts are from Hi-Tech Details with brackets created from phosphor bronze scrap from etched parts (the leftover "fret" material.) I used this because it is more rigid than brass. The brackets have pairs of no. 80 holes drilled in each end and a no. 68 hole for the main parts. I secured these brackets to the end sills with "rivets" from Scale Hardware. The angle cock/air hose parts are secured to the brackets with 0.006" wire threaded through the holes and around the angle cocks. The uncoupling devices were bent from 0.010" wire. The brackets for these are also from my own etchings and those are attached to styrene added at the corners. I also added push pole pockets created from round styrene discs punched with an RPToolz punch and die. These push pole pockets were dimpled witha drill bit and the outer edges shaped to replicate the prototype.

The next step is to blast the model with 600-grit aluminum oxide in preparation for painting. This prep will be done to the metal and engineering plastic details, including the trucks. After that, I have a bunch of rivets to add (I save these for post-blasting to ensure none are blown off in that step.) Then, it's off to the paint shop, but that's for Part Two in this journey...


.jpg)