Showing posts with label Kadee. Show all posts

Wednesday, January 29, 2025

Coupler boxes, draft gear or whatever you choose to call them

My in progress PRR X41B has been equipped with the new prototype-sized draft gear

Yes, it's been awhile since I last posted, due to a variety of factors including illness, the holidays, work, moving stuff upstate, fostering an elderly pit bull and myriad other things. That doesn't mean I haven't been doing anything, although truth be told, I haven't done as much as I'd like. However, a little over a year ago, I made a pattern for a new scale-sized coupler box. Aren't there many of those already, one might ask? Yes, but none has satisfied my want for something a lot narrower than what the market has offered. [click on any photo to view in a larger format]

Note how narrow the opening is. These will operate down to "small" radius curves, especially if easements are used to form the curves. P.S. - I messed up on my X41B - the stringers should be 2 scale inches closer to the respective side sills; I (mis)located them too close to the center sills and they are "crowding" the middle section of the underframe!


I made a pattern that is essentially the narrowest box that I could create to accommodate the Kadee 158 whisker coupler and still have it be reasonably easy to duplicate via resin casting (and operate, of course!) At least for my wants and needs, I believe I have succeeded. The parts fit inside the boxes of the other scale and semi-scale coupler boxes. The caveat: these are not intended for hands-free magnetic uncoupling. I cannot state that they won't work with magnetic uncoupling tools, but my focus is for operators who use manual uncoupling tools, such as skewers or other similar tools. They do pivot easily and if assembled properly and not overtightened, will self center reliably.


The assembly is held in place with a single 00-80 screw

The draft gear installed on the (in progress) pilot model for the upcoming ATSF Bx-34 box car conversion parts including Duryea underframe

The draft gear for the Duryea underframe extends prototypically far (compared to standard draft gear) beyond the end sills

A third view on the Bx-34 pilot model

These will be available directly from Speedwitch in one dozen pair packs in the near future and if demand warrants, five pair packs, too. Pricing will be announced when these parts are available

Monday, June 13, 2022

Kadee Lake Superior & Ishpeming PS-1 Box Car Completed


I recently completed my model of a LS&I PS-1 that I started a couple years back. The prototype info can be found via this link and the original modeling info can be accessed via this link. This post highlights the finishing of that model, most notably the painting and weathering. The task was to blend the "bare" areas of the doors, lower doors tracks, and other details in with the decorated portions of the model and to also create the sharp transition between oxide and black at the corners that was rather sloppy on the model as it came from Kadee.


For the oxide color, I experimented with an acrylic ink product that I anticipate using again in the future, as it airbrushed beautifully. It comes in a rainbow of colors and is incredibly convenient for me since I can buy it at my local Blick's, about three blocks away in Brooklyn (Blick's also carriers my preferred super glue, airbrushes, PanPastels, and kabuki masking tape, making it a go-to stop for many of my hobby needs!) The inks are called abstract acrylic ink by Sennelier. The color I used was 645 - Chinese Orange. The color is not a 100% match, but I was able to get it closer by using some Pan Pastels to lighten it enough to be passable. I sealed everything with a coat of Future and added a few chalk marks. These were sealed with a flat coat.


For the weathering I used Bragdon's grimy grey powder. I applied it in vertical streaks to simulate light streaking. I sealed that with a flat coat and then applied another coat of Future. I added several more chalk marks. I also masked around the existing repack stencil and applied a thin coat of oxide red for a newer repack. I added the new repack stencils from a set of New York Central decals. I sealed everything with a final flat coat.


A couple other notes of mention: I used Kadee's ASF A-3 trucks, but replaced the wheelsets with Kadee ribbed back 0.088" tread width wheelsets. I also used Kadee screw mounted draft gear ("coupler boxes") in place of the kit's original boxes. A keen observer will also note that I need to add the angle cock/air hose parts (from Hi-Tech) to the brackets to actually complete the model!

Now I have another mostly ready-to-run Kadee PS-1 for the fleet. I plan to replicate this model exactly, but letter it for New York Central (if you read the prior posts on the LS&I prototypes, you will find that the LS&I cars were piggybacked on a NYC order.) I will blog about that model when I get around to building it.

Monday, January 20, 2020

Modeling the Lake Superior & Ishpeming PS-1 Box Car - Part 2


This is the left side of the car as re-detailed
Over a year ago (!) I wrote about the things I would need to do to model a Lake Superior & Ishpeming (or New York Central) PS-1 box car. I have done almost all of the work highlighted in the post and the updates are shown here. I am certain that with some paint and weathering the white bits that are difficult to see herein will display more clearly. I will post the finished and weathered model in Part 3.

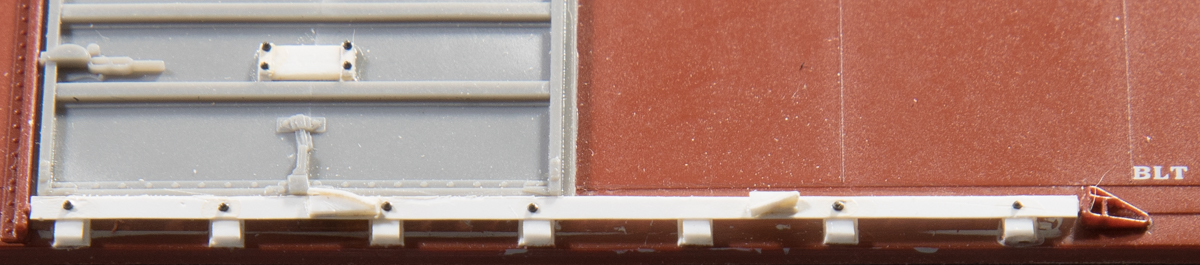
This is the first phase of the lower door tracks. The seven lower pieces are 0.015" x 0.040" strips on a scale 5 inch wide strip of 0.005" with equal overhang on both sides. The upper strip on edge is an HO scale 1x2.

The "face" of the track is a 4 inch wide 0.005" strip. Individual rivets were glued in place (note that the "missing" one was flicked off and needs a replacement.) The fixtures that held the door open or closed are scratchbuilt using photos as guide. They will undoubtedly be rendered better in photos once painted.

The lower right corner, with push pole pockets (they were welded in place so there are no rivets, just pairs of discs punched from 0.005" styrene.) The sill step is from A-Line while the short sill section and corner "wraparound" are scratched from styrene.

The push pole pocket was fashioned from a styrene disc that was shaped (note that the left edge is "open" in a crescent shape as on the prototype) from a styrene disc. The center was "dished" using a no. 50 drill. The uncoupling lever was bent from 0.012" wire and the bracket is sheet brass bent to shape.

The defect card holder on the sill of the right side of the car was created by filing 0.015" x 0.025" styrene strip (0.010" x 0.015" butt-glued against a 0.015" x 0.015" strip) and adding a 0.005" styrene "flap" as shown

The placard boards were created to replicate those of the prototype, using individual boards and a "frame" of 0.005" styrene

The AB brake components, piping, and rods were all replaced

The view from the "top" of the underframe

Thursday, November 21, 2019

Kadee Early PS-1 40' Box Car

Earlier this year, Kadee released an early version of the Pullman-Standard PS-1 40' box car. As seen in the photos, they tooled an entirely new car body with details to match the early versions. The basic model is shown here in New Haven livery (Kadee did an excellent job capturing the NH's freight car red color, as well as the black doors.)


The most notable differences are on the sides with the tabs and sill sections below the actual side sills. Notice not only the bolster sections within the green-rimmed rectangles, but also the sections that span the area below the doors. The early version is shown at top above (the NH car), while the undecorated car is one of the previously released models that replicates the cars circa 1949 and later. There were many subtle variations in these details prior to 1949. Kadee's model is tooled to represent one flavor, with 6" ship channel tabs at the bolsters, 6" x 3-1/2" bulb angle reinforcements under the doors, and 4" x 3-1/2" rolled angles at the crossties.

The early version of the roof on the newest Kadee car is shown at top, while the later 1949 roof is shown on the model at bottom. The difference is the absence of the corrugation in the end panels on early (roughly pre-1949 built) cars. Both iterations have riveted seam caps (there were prototypes with welded seam caps).

The early PS-1 end is shown at right. Note the absence of trapezoidal stiffeners at the top, the three-point bracket grab at right, and straight stiles on the ladders, as well as the grab below the ladder on the early New Haven car. Also, of interest is the Universal power hand brake, particularly the wheel, which is stunning and has never been offered in HO. Unfortunately, it is not correct for the New Haven's Universal hand wheel as shown on the prototype below. 


The underframe shown above is from the New Haven model. Unfortunately, it is not correct for early cars, as Kadee did not tool a new underframe. Early cars used what were essentially welded AAR underframes. The PS-1 welded underframe, similar to that shown on the model above, was introduced in 1949. The main difference was that in 1949 there were only four stringers total, as opposed to the six on the Kadee model, a 1951 introduction.

Sunday, April 28, 2019

Forty-foot PS-1 12-panel Box Cars

San Diego, California, December 27, 1956, Col. Chet McCoid photo, Bob's Photo
In my various clinics on 'oddball' 40' PS-1s I have touched on the 12-panel box car variants (link to presentations). I have wanted to model a couple of them and will start expanding upon that here with the two prototypes I intend to replicate in HO scale. One is a Mississippi Central car and the other is a Nickel Plate prototype. The Mississippi Central has been released by Intermountain using their PS-1, which is not accurate for this car, but offered nonetheless, no doubt due the the attractive scheme and the sales it could generate. The Mississippi Central had 100 cars, nos. 5000-5099, delivered in June, 1949 by Pullman-Standard. Nickel Plate received 1,000 12-panel PS-1 box cars, nos. 6000-6999, delivered by Pullman-Standard in early 1948.


courtesy of Al Hoffman
The starting point for the Mississippi Central car is the original Kadee PS-1 with six-foot door opening. The biggest consideration aside from the specialties of the prototype (hand brake, running boards, etc.) is the 12 panels. More on that in the post on modeling the cars. It's a relatively easy car to model, though.

Until late 2018, the Nickel Plate car would have required a more formidable effort. However, the recent release by Kadee of the early version of the PS-1 makes things considerably easier. The main thing to be addressed, assuming one chooses to, is the underframe (aside from the number of panels, of course.) For the earlier cars Kadee opted to leave the underframe tooling from the original kit unchanged, even though it is not technically accurate. Early PS-1s used what was in essence a welded AAR underframe, while the Kadee model uses the later proprietary PS-1 underframe. I will cover my efforts to address that in the subsequent posts on modeling these cars.

Wednesday, January 2, 2019

Wordy Wednesday - New York Central PS-1 NYC 169664


This photo of NYC 169664 seemed vaguely familiar to me when I looked at it a couple of days ago. Strip the paint, change the hand brake to a Miner hand brake, and then repaint it like Lake Superior & Ishpeming PS-1 LS&I 2242 that I profiled on this blog a few days ago and you would have the same car. They used the same New York Central-style placard boards, including their locations, the same welded-on roping loops, and the same arrangement of the lower corners, including push pole pockets, side sill angle sections, and "un-PS-1-like" uncoupling devices. So, as I modify my Kadee model of LS&I 2236, most or all of those changes apply to NYC 169000-170499 specifically depending upon the doors, as well as to NYC 170500-172499. The cars in the 169000 series were essentially from the same Pullman-Standard lot, 5965 for NYC 169000-170499 and 5965A for LS&I 2226-2275. Details for the NYC cars are noted below. If the 50 cars of the LS&I are a little too obscure for your tastes, perhaps the 3,500 built for the New York Central in 1950-1951 are more to your liking.


Note the New York Central paint data triangle at lower left of car side on NYC 170750. This is the earliest instance this blog author has seen of the paint data triangle in use. This car was built in February, 1951

Between 1950 and 1951 the New York Central received 3,500 40' PS-1 box cars from Pullman-Standard. The details are as follows:

*7-panel Superior door with third panel from top wider than other panels

There were also 1,000 cars delivered in 1948 and 500 cars delivered in 1952. These are each different and not covered in the data presented above.

Thursday, December 27, 2018

Kadee Lake Superior & Ishpeming 40' PS-1 Box Car LS&I 2236... or my latest "ready-to-run" project

I was so satisfied with the results of my Santa Fe Kadee PS-1 that I thought I would add another that, excepting weathering, would be a more ready-to-run project than the Bx-57 proved to be. I had seen photos of LS&I PS-1s from Kadee and liked the look of the black ends and red and white diamond emblem. Although they are no longer available, I easily tracked one down on ebay. As soon as I received the car, I opened the plastic box and compared it to the one prototype photo in my collection (which I had not really looked at too closely until that moment.) Imagine my surprise when I discovered I had another "not-so" ready-to-run project on my hands! Time to make more lemonade out of lemons...


The sides require some detailing changes. I must add roping staples, that look to have been welded to the bolster tabs rather than riveted, although that must be confirmed. I also need to add tab sections at the lower corners. The placard boards on the model are in a different location than they were on the prototype so I will repeat my efforts as on the Santa Fe car, with Southwest Scale doors and new placard boards.

On the ends, I will have to make a few changes, as well. There were push pole pockets at the lower corners that will be scratchbuilt. The uncoupling rod bracket was different on the LS&I cars. Finally, the lower portion of the right ladder stile had a "jog" in a different location. I am hopeful the new early PS-1 cars from Kadee have ladders with this feature. If not, I will ignore that subtlety. 

Stay tuned as I modify this otherwise beautiful model.

Are we having fun yet and when will I have an actual ready-to-run car???

Monday, November 26, 2018

Completing the Kadee Santa Fe Class Bx-57 40' PS-1 Box Car


The first installment on the Kadee Santa Fe Bx-57 illustrated some of the changes effected to replicate the differences on the prototype. It is worth reiterating these major details. Of note, the Bx-57 class employed US Gypsum expanded metal brake steps and running boards, while the model was equipped with Apex Tri-Lok running boards and steps (Kadee has since produced the correct US Gypsum parts, resulting in a “drop-fit” replacement for the running boards; the brake step is a Plano etched metal part using the Kadee supports after carefully removing the Apex Tri-Lok step.) The Bx-57 also used the “upside-down” version of the Improved Youngstown door, while the model uses the more common version; a Southwest Scale door was substituted, along with scratchbuilt placard and route card boards. 
Kadee did replicate a few quirks of this class. Counter to usual Santa Fe practice, the Bx-57s did not have transverse-mounted brake reservoirs. Also, this class had the “SHIP AND TRAVEL Santa Fe all the way” slogan on the left side and the name train slogan on the right (Super Chief on this car) which was counter to Santa Fe painting and lettering practice. Kadee replicated these details faithfully, as well as the Royal Type F brake regulator, Ajax power hand brake, and ASF A-3 Ride Control trucks.
A note about the body color and paint matching is in order. As I replaced the door, I had to closely match the Kadee body color. I used three Tamiya colors to arrive at a satisfactory match. The mix is 50% Red, 25% Hull Red, and 25% Red Brown from the Tamiya acrylic line. As an aside, I love the ease with which Tamiya paints airbrush so this mixture will be my go-to Santa Fe Mineral Red-Brown for all future projects.
The brake test stencil on the reservoir
I replaced with wheelsets on the trucks with Kadee 0.088” tread width replacements. As I was modeling a car approximately 16 months old, I lightly weathered the car with a single application of Bragdon’s light gray powder, which mostly disappears under a clear flat coat (Tamiya). I added chalkmarks (a combination of pen and ink [a forthcoming post will cover this technique] as well as Speedwitch decal set D135) both before and after the weathering. I also applied a fresh paint patch over the repack stencil and added a late 1951 repack stencil. The door latch hardware (to the left of the doors) was salvaged from the original doors. I had to scrape off the ‘L’ and ‘R’ stencils to accommodate the door hardware so I added new ones from a Santa Fe box car decal set prior to weathering. I added a brake test stencil to the reservoir (even though I replaced the brake equipment, the original reservoir lacked this detail, too.)

After all of these subtle enhancements, I painted the angle cock/air hose parts black and gray. I added a final flat coat over everything. I polished the treads on the wheelsets, replaced them in the truck sideframes, and attached the trucks. Lastly, I added bits of paper for route cards. With that ATSF 31382 was ready for service. The PS-1 from Kadee remains one of the finest models ever produced in any scale. I look forward to adding a couple more from other roads to the fleet.

Tuesday, October 30, 2018

Kadee U.S. Gypsum Expanded Metal Running Board


A few weeks back, I started writing about modeling a Santa Fe Bx-57 PS-1 box car. One of the necessary changes was to replace the Apex Tri-Lok running board with one of the new Kadee U.S. Gypsum Expanded Metal running boards. The photo above shows this new running board. It is spectacular. It captures the lacy look of this style of open grid running board. It suffices to say that Kadee has done it again.

Note the board as shown here looks greyish because it was blasted with aluminum oxide, but not yet cleaned.

I will post the details on the finished model very soon.

Monday, October 8, 2018

Kadee Santa Fe Class Bx-57 40' PS-1 Box Car


When Kadee released this model of the Santa Fe Bx-57, I eagerly ordered one, thinking I could easily add a ready-to-run (RTR) car to the fleet. It’s rare that I find a model that meets my standards and is RTR, so I was thrilled to have it. I was recently in the process of finishing a few models and decided it was a good time to add a little weathering to this model so that it would be “complete”. Easy, or so I thought...

I did have a question about the trucks. I was curious if the trucks were black or mineral red. I consulted with Ed Hawkins and while he did not have specific information about this group of cars, he opined that if they followed Santa Fe practices of the period ordered from AC&F, then the trucks should be mineral red. So, I sandblasted the sideframes and wheelsets and while I was doing that, I also blasted the ladders, grabs, running boards, brake steps, hand brake and housing, underframe components, and other engineering plastic parts to aid in the adhesion of a flat coat to be applied prior to weathering the model. On the sides and ends, I masked the areas adjacent to the ones to be blasted to prevent lettering from being removed erroneously. The photo above shows the side after the ladders and bracket grabs were blasted. The transition from the unblasted area to the blasted area is clearly discernible near the ladder, due to more advantageous lighting at that part of the car.
Kadee and Southwest Scale Productions Improved Youngstown doors shown side-by-side for comparison
I referred to my copy of John Dobyne’s Santa Fe Boxcars 1869-1953 (currently out of print) to make sure the locations of the placard and route card boards on the model’s doors matched the prototype. Not only did they not match, but the doors on the model did not match the prototype -- see photo above. The Bx-57 used the “upside-down” version of the Improved Youngstown door, not the version on the model. Fortunately, there is a version of the door available in HO that is every bit as finely rendered as the details on the Kadee PS-1, making it a perfect complement. The door I am referring to is available from Southwest Scale as part number FC-622. The door is slightly shorter than the Kadee part, but the prototype’s door roller track is actually taller than the version on the model, so all is not lost.
New door and roller track plus placard and route card boards installed, masked, and ready to be painted to match the car body.
I removed the doors from the Kadee model. I also carefully removed the lower door tracks. I applied a coat of Mr. Surfacer 1200 and once that had dried, I carefully wet sanded the area with 400 followed by 600-grit sandpapers to clean up any telltale traces of the door guides or my poor removal of the guides. I glued the Southwest Scale doors to the Kadee model, using sparing amounts of MEK.

The door roller tracks were fashioned in a few steps. First, I added mounting “brackets” for the tracks. These were created by adding bits of 2x2 to a 0.005" styrene strip that was 2 scale inches wide. For simplicity, I created a long strip of 2 scale scale inch wide 0.005" strip and added the 2x2 bits to the strip. I removed the brackets one at a time as needed, adding 7 for each door. I added the four under the door opening first, followed by adding the 1x3 guide. I added the 3 outer brackets last, sliding them under the 1x3 guide, all the while making sure that the guide remained straight.

The placement of these brackets along the side sills corresponds to the location of rivets on the faces of the door roller tracks as shown in the photos of these cars in Dobyne’s book. The door roller track is a strip of HO scale 1x3 styrene glued to the brackets. I completed these tracks by adding rivets in the appropriate locations.

One last detail for the doors was the placard and route card styrene boards. These were scratchbuilt. The basic placard board was constructed from 1x3, 1x6, 1x6, and 1x3, glued edge-to-edge to create a 18" height, all glued to a 0.005" backing. I trimmed these to a length of 27". I then added the frame/mounting brackets using 2" wide strips of 0.005". The route card boards were created from single pieces of 1x6 12 scale inches in length, glued to a 0.005" backing. The frame/mounting brackets were again created from 2" wide strips of 0.005" styrene.

I had also wanted to add a piece of small chain between the brake cylinder and lever to capture that nice look of a dangling chain when viewed from the side. I was not aware of how easy it is to remove the center sills, crossbearers, and crossties in one part, with little effect on the overall underframe detail. So, I decided to upgrade all the AB brake details, as I was going to paint the underbody and details (as well as the doors and tracks) mineral red. I removed the Kadee brake details and added the aftermarket parts and wire, as shown.

An additional "construction" detail that will be covered in the next and final installment on this car is the replacement of the running boards. The model came with an Apex Tri-Lok running board. Kadee has since released a U.S. Gypsum Expanded Metal running board that is accurate for the Bx-57. I will also provide details about my paint matching efforts, as I feel that the color I used is extremely close to the factory model, and will be virtually indistinguishable with a small amount of weathering.

Sunday, September 30, 2018

Handling Kadee HGC Trucks


Many of us have welcomed Kadee's High Gravity Compound (HGC) trucks with open arms. They are beautifully rendered representations of useful prototypes, eliminate the toy-like, see-through truck springs, and have a weight near their metal cousins due to the HGC material. 

One thing about them that can be maddening is handling them when they are not screwed into a car. They can be like slippery eels as there is nothing holding them together. When purchased as separate trucks, they come with small clips that sit on the screw threads. However, these clips can easily become detached when handling. I am working on painting a pair of sideframes from a PS-1 and came up with a simple solution to keep them together until I get them screwed into the car body. I drilled a hole with a no. 50 drill bit through a piece of 0.030" x 0.188" styrene (although any suitable piece of styrene or even rod will work). I then screwed the truck screw into the piece of styrene. This holds the truck together and allows for handling while I paint and weather the sideframes. Problem solved.