Showing posts with label GRa. Show all posts

Wednesday, March 1, 2023

Pennsylvania GRa Gondola Finished

I recently completed a Westerfield Pennsy class GRA gondola. You can find the previous posts via these links: Part 1 and Part 2. When I left off, the model was painted and awaiting lettering. I created my own lettering and had the decals printed by PDC.


The photo above illustrates the model after the decals were applied, excepting the repack stencils and some of the chalk marks. I also applied a wash on the interior boards using AK Interactive's Streaking Grime. I followed that by some light blending with a fiberglass scratch brush. I sealed the lettering with a coat of Future applied with an airbrush followed by a coat of Tamiya flat, also airbrushed.


Next, I applied some streaks to the sides below the floor boards. I have a prototype photo that displays a similar type of weathering. I dabbed on a mix of white and Payne's grey artist's oils that were then drawn upwards using mineral spirits, so that the greatest paint concentration was where the floor boards are exposed on the sides and also to create simulated streaks.


The photo above illustrates the model after a light weathering. I sealed the oils referenced above with a coat of clear flat first. I then added light amounts of PanPastels Burnt Sienna and Raw Umber. This toned down both the white of the lettering as well as the harshness of the light-colored streaks. I sealed these with a coat of Future, followed by the addition of more chalk marks. I sealed the chalk marks with a coat of Future followed by clear flat. 


The last steps to create the finished model, excepting the load, are shown here. I masked small areas for the repack stencils and painted them gloss black using an airbrush. I applied the repack stencils, using spares for Missouri Pacific from my decal bin. After they had dried, I sealed them with clear flat. Lastly, I added bits of white paper to simulate routing instructions, secured with Loctite Stik'n Seal. I added the couplers and trucks to complete the car.


The load is something I have been passively working on for years. I have a ziplock bag that I add bits of this and that too, knowing that they will end up as part of a scrap load. While loose on a piece of newsprint, I sprayed most of the junk with silver and grey paints from a rattle can. Once everything was ready, I placed the pieces inside the car body. I masked around the top edges of the car sides and then applied a very liberal stream of clear flat using a rattle can. This served as a quasi adhesive to secure much of the matter in place. I then added diluted white glue using an eye dropper to help secure things even more, especially the material at the bottom of the load. Finally, some of the larger pieces were secured using Loctite Stik'n Seal. While nothing is 100% securely in place, everything is nonetheless in place sufficiently that when turned upside down, nothing falls out! The final step involved several applications of drybrushed grey and black paints along with the addition of various rust shades of Pan Pastels and Tamiya brown wash. If one looks intently at individual pieces of the load, they may not stand up to scrutiny, but as a whole, I find the load highly convincing to simulate scrap from machining waste and various pieces of junk. In a moving train, it definitely does the job. On to the next project...


Sunday, January 22, 2023

PRR GRA Gondola Part Two


In part one covering the PRR GRA gondola, I covered some prototype info as well as many of the noteworthy modeling points in replicating these cars using a Westerfield kit. Since then, I have blasted the metal details with 220-grit aluminum oxide and added rivets and other fasteners that might have been vulnerable to be blown off the model during blasting. In the photos directly above and below, you can see rivets on the bottom crossbearer cover plates, on the metal straps in the end panels, and at the towing loops.


I primed the model using a Tamiya grey that is not a true primer, but does apply a consistent grey color to the model. I followed by spraying the sides, underframe, and some of the interior hardware with Scalecoat II PRR Freight Car Red. After that I masked in appropriate places and painted the interior with Tamiya Desert Yellow. The underlying grey and this pale yellow will be a good foundation to weather the interior boards. I will be adding a scrap load so the lower potion of the interior is not as great a concern to me as the upper portion. 

Next, I will weather the interior as well as to letter and weather the rest of the model, too, followed by the addition of the scrap load. More in a few weeks...


Sunday, April 3, 2022

Pennsylvania Railroad GRA Gondola


Like seemingly everything in its fleet, the Pennsy had a large number of class GRA gondolas. The cars were built early in the 20th Century (between 1907-1916) and many managed to hang on into the 50s, with over 2,000 still in service in 1952. I covered these and other PRR gons in my Hindsight clinic (details posted here.)

Robert W. Smith's two-part article about these cars and the related class GR, "Pennsylvania GR-GRA, Variations on a Theme," was published in Mainline Modeler, February and March, 1990. It contained drawings and other useful details. Be careful with the drawings as I know one is captioned, "MODIFIED WITH AB BRAKES" for a drawing of car prior to upgrade with AB brakes!

I built a Westerfield kit years ago and loved the model (photo above). However, the kit I bought and built was more of a spur of the moment purchase and it had stake pockets on the sides, a feature not common on cars in the early 50s. Recently, I saw a kit without stake pockets on eBay at a very modest price so I decided to take the plunge. Here is how I built it.

As with any resin flat kit, I ensured that the sides were of the same length. With that accomplished, I glued the basic box together as shown in the photos. It was important to get the tops of the sides to match the tops of the ends. Mission accomplished. The accompanying photos show the basic box from the top, bottom, and side, prior to the addition of the floor/underframe. The floor/underframe were glued top-to-bottom and sanded to fit inside the carbody. The castings contain quite nice detail on both the exterior and interior. Given that the largest surface is wood, there is ample opportunity for weathering.


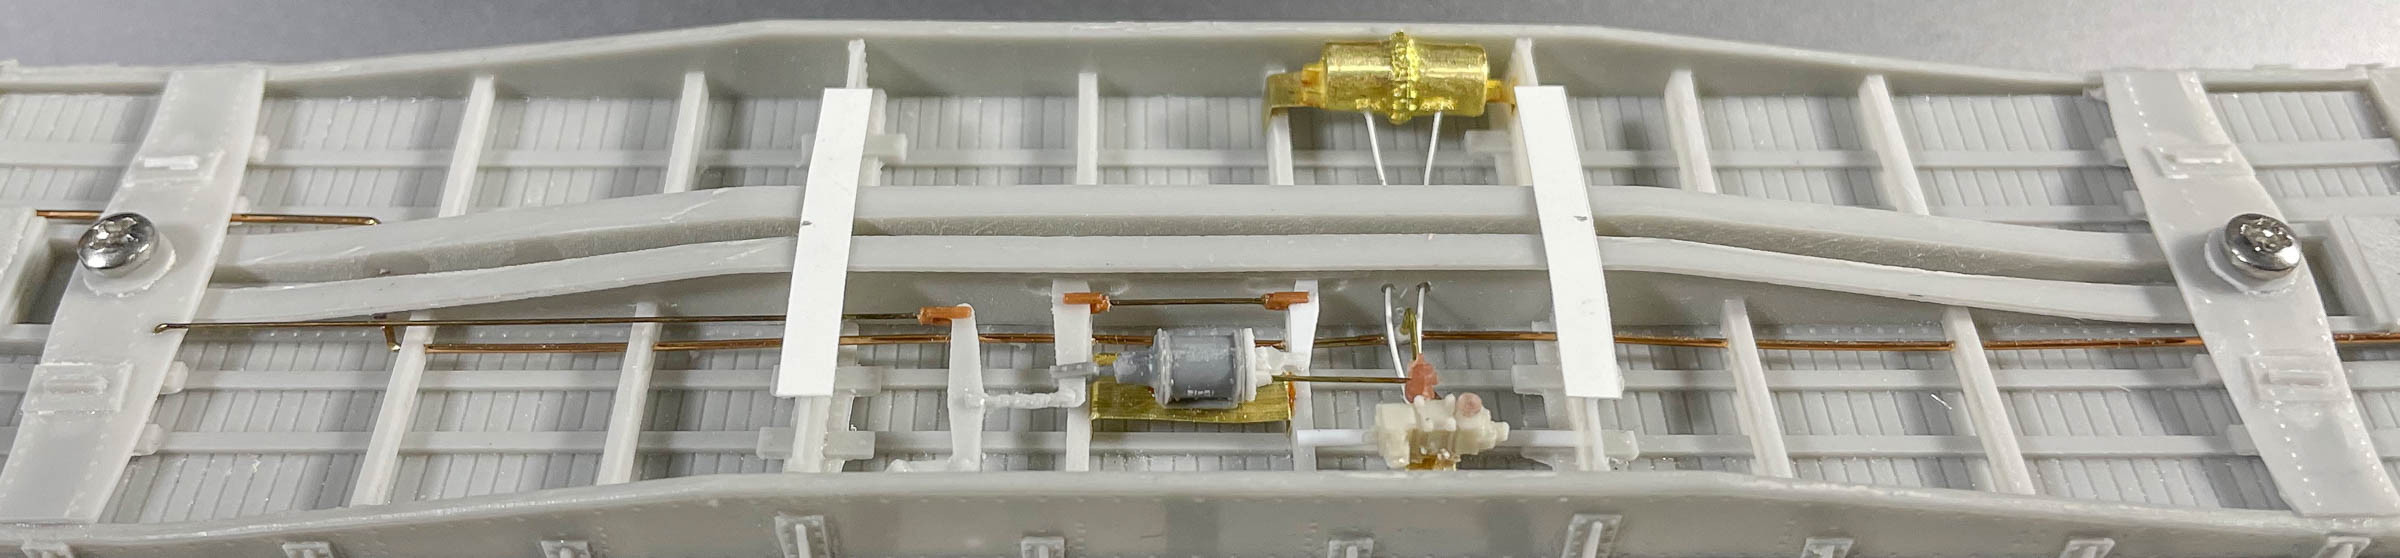
By far the area with the greatest amount of detail to be added is the underframe. I cobbled together an AB brake system from a bunch of scraps, including a spare brass casting from Overland for the reservoirs, a Tichy cylinder, but with a Speedwitch integral cylinder head with brake lever bracket, and a Sunshine AB valve (a dupe of the Detail Associates part) embellished with some spare Detail Associates parts including a dirt collector. The levers are a mix of the cast resin parts and strip styrene cut to shape, with Tichy turnbuckles modified to simulate clevises. The pipes and rods are a mix of styrene rod (between the reservoirs and AB valve) and brass wire in the other locations (0.010" to 0.020".) The mounts for the main brake components were all created from 0.003" sheet brass cut and bent to shape. The crossbearer cover plates are 12"-wide strips of 0.005" styrene. I used the kit's coupler covers, secured with 0-80 screws.


For the sides, I changed a few details. For the straps in the two end panels, I used 0.005" styrene instead of the cast resin pieces. For the towing loops, I created them from 0.015" brass wire, but opted to remove the kit's nut-bolt-washer detail and added discs punched from 0.005" styrene using an RPToolz punch and die. For both these discs and the straps, I will go back and add rivet detail after the model has been sandblasted prior to painting. The pressure retaining valve is a Precision Scale styrene part wit 0.008" wire. The sill steps are Yarmouth Model Works etched metal parts. The trucks, as shown in the photo below, are Sunshine Models 2D-F8 prototypes, with Reboxx wheelsets and Reboxx journal inserts that dramatically improve the rolling quality of these trucks.


In the final post on this model, I will highlight the detail on the ends, the method used to assemble these white metal truck castings, as well as the painting, lettering, and weathering.

One note: in several photos of the GRA class, I see some type of additional bracing in places, as shown in a closeup of PRR 335933. It would be a nice detail to add, but it's not something I felt compelled to add. Of course, you are welcome to tackle that detail... 

Tuesday, November 13, 2018

"Personalizing" Scrap Loads

Ever have that moment when you are at a layout and you see that same load that is on every other layout you've visited? Me too. I decided that I would try to minimize my reliance on the same cookie cutter loads that everyone else has. I want a scrap load, but the options are limited. How to be different? Personalize your load. I have been gathering scrap material for several years to complete a "stock" scrap load. The bag shown above illustrates this material. It is the spiral material from drilling resin, which simulates scrap material from large machining of metals, sprue bits that look like raw metal, wire and other various shapes that also resemble scrap metal. In the aggregate, these can all be added to the top of a commercial scrap load to make it unique. Give it a try.

The load above, which I made years ago, could use some toning down, as well as signs of oxidation. However, it effectively replicates scrap metal from machining operations such as milling. I didn't do such a good job "containing" the silver overspray. My next effort will be much better. I will show the results here. The car is a Westerfield model of a PRR GRA.