Monday, January 30, 2023

Woulda, Coulda, Shoulda


One of the things about being in any business is that even if you invest the time, sweat, resources, etc., there are no guarantees that any of that will bear fruit. Over 15 years ago, I made that investment in a project and created what I thought was a really solid set of patterns. Life intervened and things were pushed to the sidelines. I pulled out a box recently and was looking at the physical manifestation of my efforts (photos below). It still looks really good to my eye. However, while I dithered, the market did not. Funaro & Camerlengo released a kit of the PRR G28 I had worked so hard to create. I was scooped. I am still unsure what I will do, but I will likely have a helluva nice one-of-a-kind model and little else to show for my efforts. Time waits for no one. Get things done... 


Sunday, January 22, 2023

PRR GRA Gondola Part Two


In part one covering the PRR GRA gondola, I covered some prototype info as well as many of the noteworthy modeling points in replicating these cars using a Westerfield kit. Since then, I have blasted the metal details with 220-grit aluminum oxide and added rivets and other fasteners that might have been vulnerable to be blown off the model during blasting. In the photos directly above and below, you can see rivets on the bottom crossbearer cover plates, on the metal straps in the end panels, and at the towing loops.


I primed the model using a Tamiya grey that is not a true primer, but does apply a consistent grey color to the model. I followed by spraying the sides, underframe, and some of the interior hardware with Scalecoat II PRR Freight Car Red. After that I masked in appropriate places and painted the interior with Tamiya Desert Yellow. The underlying grey and this pale yellow will be a good foundation to weather the interior boards. I will be adding a scrap load so the lower potion of the interior is not as great a concern to me as the upper portion. 

Next, I will weather the interior as well as to letter and weather the rest of the model, too, followed by the addition of the scrap load. More in a few weeks...


Friday, January 20, 2023

Union Tank Line Type X Tank Car Parts from Shapeways

San Diego, California, December 4, 1954, Col. Chet McCoid photo, Bob's Photo

I have been intending to create this post for a long, long time. That time is finally now. For as long as I can remember, Model Die Casting (MDC; now part of the Athearn universe) has offered a ~6,000 gallon "old-time" tank car. The rivets are too diminutive and there are some in places where they shouldn't be, but that is pales in comparison to the big chunk of white metal that doubles as the underframe and running boards. An enterprising seller on Shapeways decided to rectify that major shortcoming. The seller, Austin Rail Products, offers 3D printed underframe and running boards to turn the model into a quite passable UTLX Type X tank car (for those looking for more information about UTLX and its fleet, the "bible" authored by Steve Hile is currently being reprinted with an estimated availability date in early February.)


Excepting the other shortcomings of the MDC kit as well as the aftermarket detail offerings to rectify them, the focus here is on the two parts. The underframe is well-rendered an is a perfect fit to the bottom sheet of the tank. It will be a simple matter to glue it in place at the tank saddles and the tank anchor. There are some 3D printing artifacts, but in all honesty, they are not aggregious and the underframe is a place where they will not detract in a measurable way. In terms of the underframe itself, it is an excellent rendition of the Type X underframe, with bolster castings capturing the open shape of the prototype. The one major obstacle to overcome is equipping the car with a coupler. The part is not designed with a specific HO scale coupler offering in mind (at least I cannot ascertain this) so I will need to devise a creative solution to add couplers.

Like the underframe, the running boards are a perfect fit to the tank sheets. The creator obviously spent time to ensure that they would be a "drop fit" addition. The supports ("brackets") are well-detailed and fit against the tank sheets perfectly. Being running boards, there is little else to say!


As the scope of this model is more than just a simple swap of a few parts, I will develop several posts to highlight details on the prototype and how to replicate them in HO scale, using commercially available parts as well as some scratchbuilding and/or modification. I look forward to this journey!

Monday, January 16, 2023

Part One of the T&NO Emergency Gondola Model


Awhile back I posted some prototype info about the Texas & New Orleans Emergency design gondolas. I have done a little work on the model and want to share that info here. I haven't done a ton so if you're inclined to join, it should be easy to catch up.

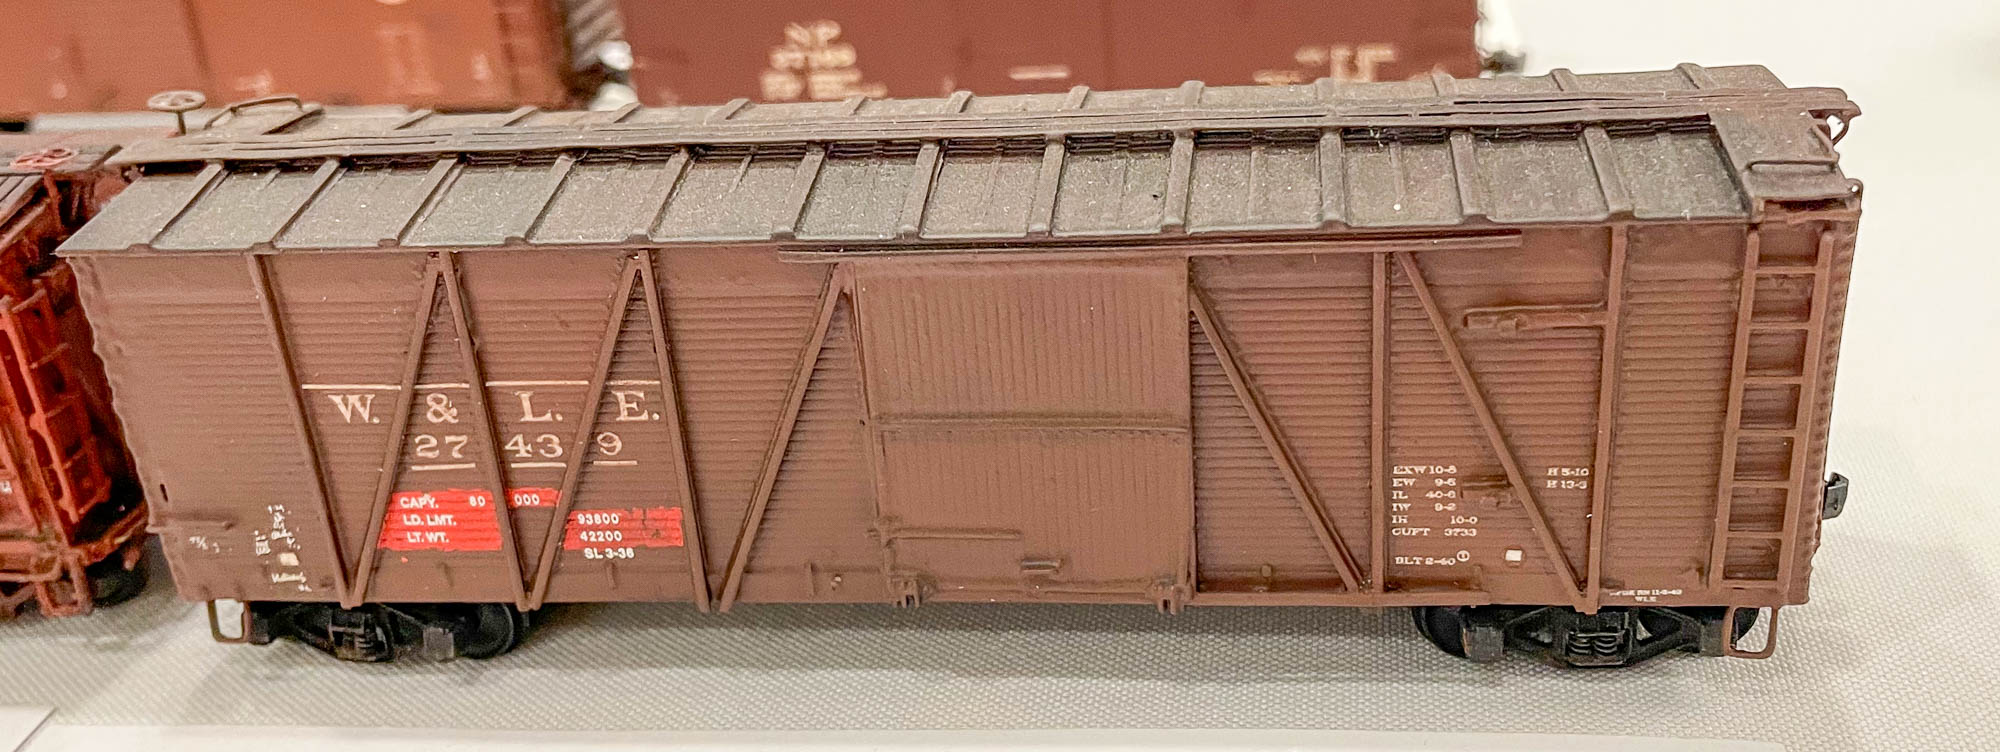
I mentioned that my plan is/was to use the Improved Dreadnaught ends from Detail Associates to model one of the later cars equipped with Scullin L-V trucks, to afford an opportunity to use the trucks offered by Plate C. Here is where things are at with the model. 

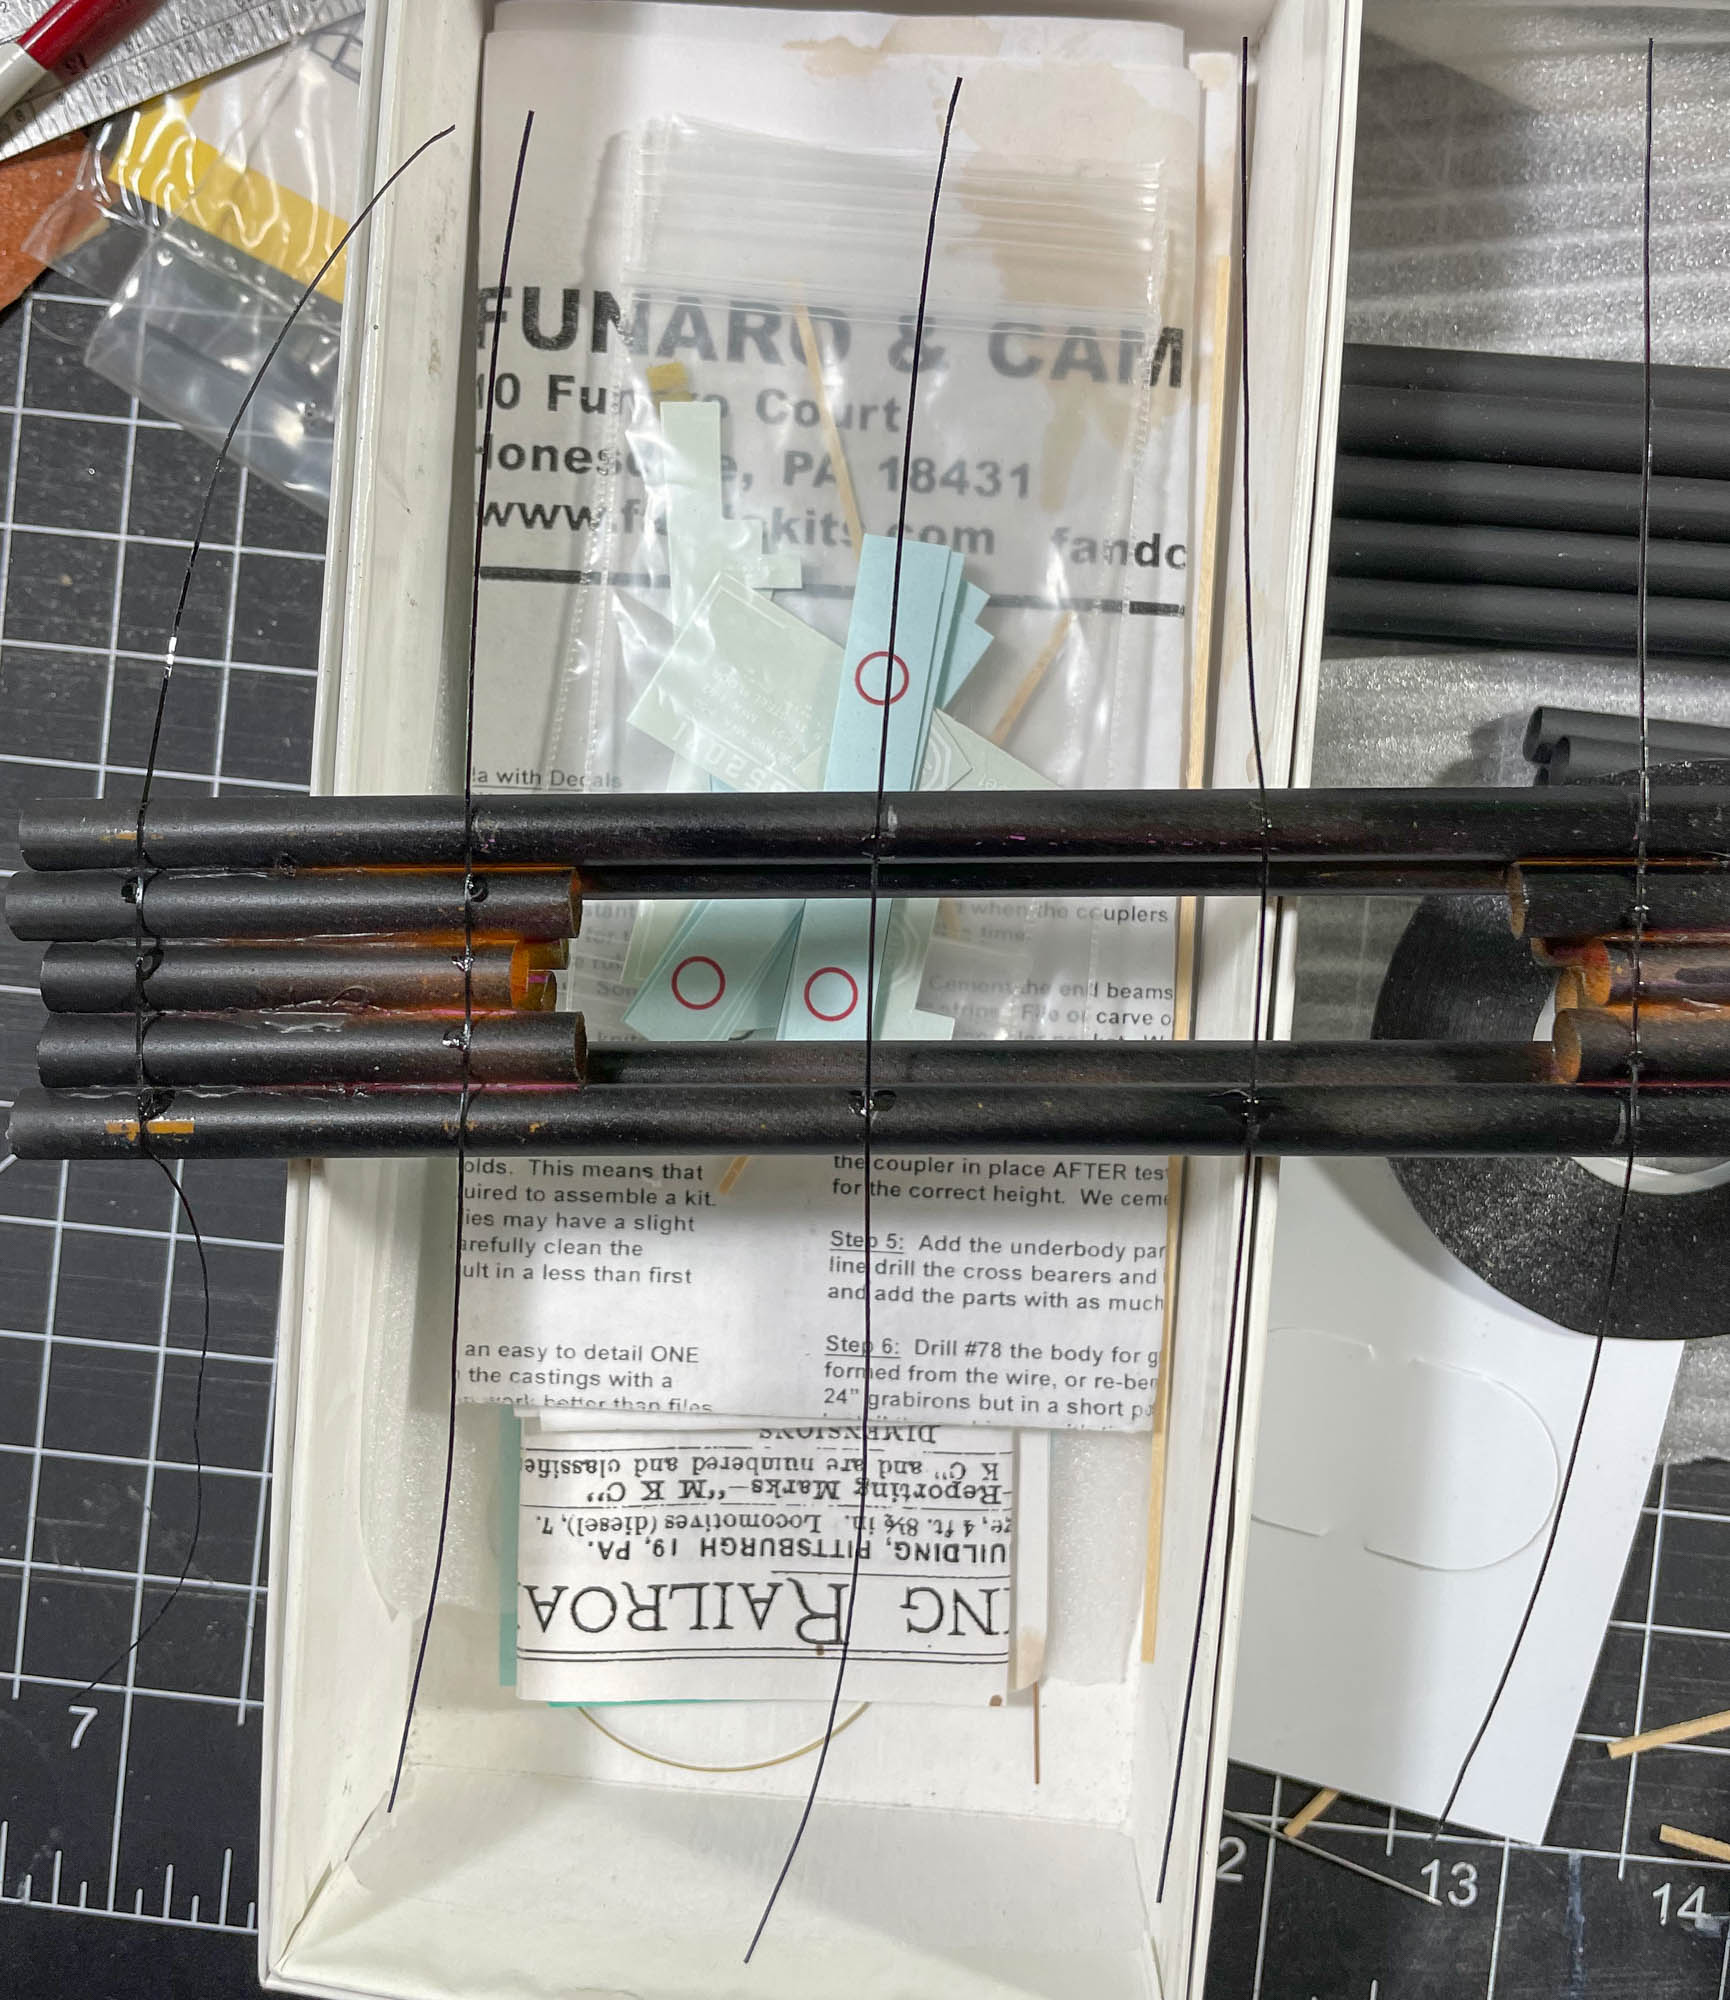
To my eye, the area where the corner of the ends overlaps the sides would lack a little depth if I simply glued the ends to the sides. I compensated by adding 0.020" styrene strip, as shown in the two photos above. I believe it's 0.020" x 0.040", although I honestly can't recall for certain.

I then tacked the two resin sides back -to-back using ACC in a few spots, taking care to align them. I used a NorthWest Short Line True Sander to remove material and in the process making the sides exactly the same length and squaring up the edges. After that, I carefully popped the sides apart and glued one side to one end and repeating for the other side/end pair, as shown in the photo directly above.

Next, I glued the two remaining side/end joints and laid the assembled body upside down on my work surface to ensure that everything remained square and that I had not introduced any unintended bowing or torque into the body.

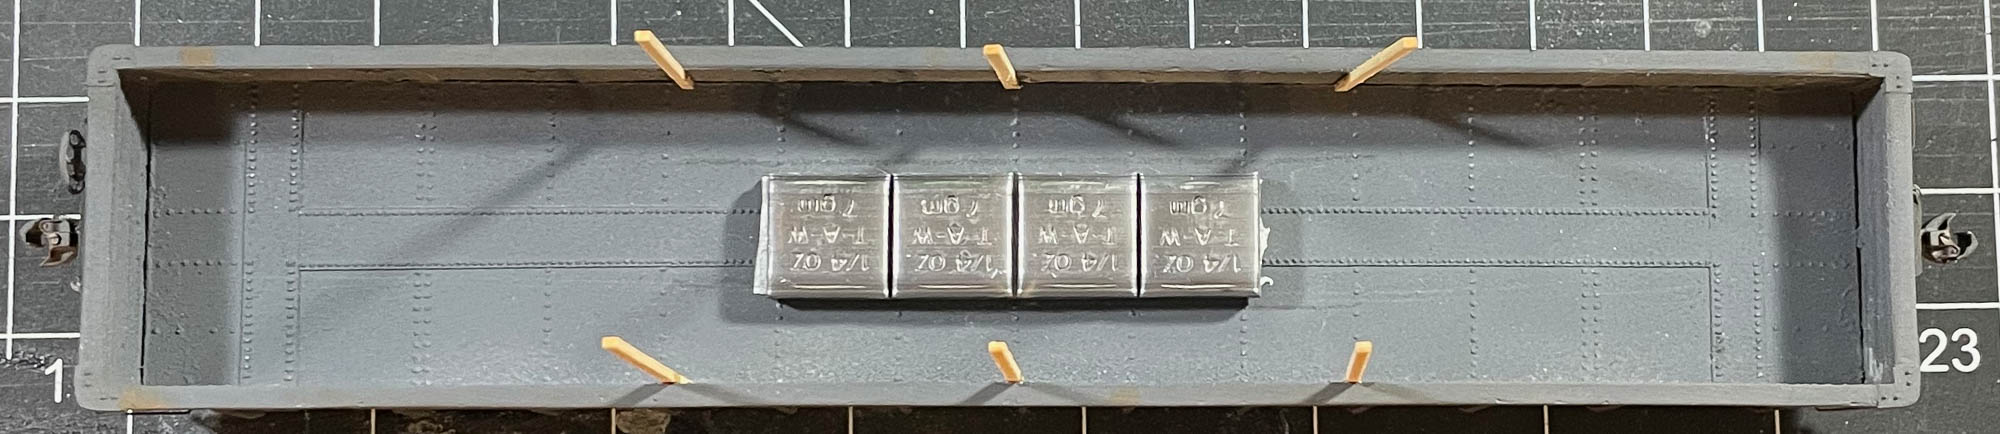
I again used the NorthWest Short Line True Sander to square the ends of the floor casting, removing material, as well, until the casting fit snugly inside the car body, end-to-end. I did add 0.010" styrene strip to both sides of the casting as it was slightly too narrow when test-fitted into the car body. Once everything was square and the fit inside the car body was tight, but not overly so, I tacked everything in place with ACC. I followed this by carefully dripping more ACC inside the car body at the floor/side and floor/end joints and then tilting the car body to allow the ACC to "run" and fill in the joints completely. In the view above, you will note that the crossmembers do not extend all the way to meet the bottom of the car sides. I will add some strip to rectify this. Below are a couple additional photos illustrating the application of the Detail Associates styrene ends to the resin body. More in the coming weeks...


Friday, January 13, 2023

Prototype Rails 2023


This past weekend, January 5th through 7th, I attended my first Prototype Rails, aka "Cocoa Beach," in three years. We all know it's been a topsy turvy world since where we were at the start of 2020. It was great to see many familiar faces and meet some new people for the first time in person. Unfortunately, since that time, we have lost several of the regulars at the event and their absences were noted and respectfully honored among us. 

I will also note that in the days after the event we learned of the passing of Mike Brock, its founder, just days before this year's event. Mike was a large personality, both literally and figuratively. He loved many things, including highjinx at the expense of guests at his UP layout and the cookies served at the meet. On a more serious note, we owe Mike a great debt whether many realize it or not. His two most obvious contributions to the hobby are the Steam Era Freight Cars (STMFC) list, which he helped create way back in the 90s, through its migration to Yahoo! Groups and then to groups.io as well as the founding of Prototype Rails. Both of these are enduring and the amount of information that has been passed through the iterations of the STMFC is staggering. Two other noteworthy "segues" from Prototype Rails that many may be unaware of are the Shake-n-Take concept that has been picked up in various iterations by other meets (Sunshine pioneered the "gift" parts set, but Shake-n-Take introduced the concept of a group build with all the necessary parts being furnished to attendees) and the partnership with the NMRA to help co-sponsor the events and share/defray some of the more expensive, but necessary costs, including insuring such a meet. Being extremely humble, Mike was a giant in his impact on what we in our model railroad community take for granted, but his contributions deserve great recognition. I hope that he is now spending his time making sure every train has at least one NP box car and trying to find that N&W hopper coming over Sherman Hill! A tip of the cap to you, Mike!

As usual, there were many fine models on display and I tried to capture a sample via the medium of photography. Enjoy the fine work!

Steve Hile presented a detailed clinic on Swift's reefer fleet, including tips to model them and showcased many of those efforts in the display room, including this kitbash
I somehow neglected to document who created this finely weathered CSX covered hopper 

This neat Erie bulkhead flat car kitbash is the work of Ben Bartlett

Dick Harley had several models of "modern" PFE refrigerator cars on display in various states of completion


Rich Remiarz brought several GN box cars from Minnesota to highlight some of the subtle differences across their large fleet

Roger Hinman showed his progress on the 2022 Shake-n-Take project, including some of his deviations from the "out of the box" kitbash. Roger has done a lot of freelancing in his model

Tony Sissons showed off not only his fine models, but his great, tiered display for showcasing his work!
Ryan Mendell of National Scale Car had several of his own offerings plus some from his peers, including this Yarmouth Semet Solvay tank car

Bob De Stefano shared this Conrail (ex-NH) PS-1 with an exceptional weathering job

Carl Marchand brought this highly detailed SCL switcher that started as a Bowset VO-1000 before his detailing, painting, and weathering efforts

Fenton Wells showed off the results of his micro virtual group build that he did with Clark Propst (who did not make this year's event although he was missed at the Tiki Lounge...) using an Accurail body and Westerfield roof among other details

Terry Kolenc brought several UP cars including this S-40-21 to represent a car rebuilt at Cheyenne in 1970
Al Brown continues his kitbashing parade (he presented a clinic on the subject, too!) W&LE 27439 is a mashup of Shapeways ends, Tichy underframe and details, Kadee trucks, scratchbuilt sides and roof, and Archer rivets!


Preston Stinger displayed this gon with a very neat load

Pardon the distortion in the photo... I had to wedge my phone between two rows of cars to get the shot! Eric Thur continued his work on interesting loads, including this JWD U-channel load

There was passenger equipment in the display room, too, including this A&WP 10-1-2 Pullman, Lake Belanona. Another one where I failed to capture the modeler's name!

Lastly, Bruce Smith had many fine models in the room, including a number of his beloved Pennsy. He replaced a few boards on this nice model of a GRA composite gondola.

That's all for now!

Thursday, January 12, 2023

PFE Clinic File from Prototype Rails 2023

Here is a link to my PFE clinic file from Prototype Rails 2023 in Cocoa Beach this past weekend, "The Early 1950s PFE Fleet: Prototypes and Modeling Details You Might Have Overlooked." If you saw my presentation at Hindsight on basically the same topic, this clinic was greatly expanded as the format was for one hour presentation.

Monday, January 9, 2023

McKeesport Connecting Gondola finale


Side view of the finished model

I recently finished my Funaro & Camerlengo model of a McKeesport Connecting Railroad 50' gondola. The big hurdle was completing the load. Below, I will chronicle how I secured it into the car body. For the previous posts on the model, please visit these links: Part 1, Part 2, Part 3.

First, I will briefly touch on the painting and weathering. The specs for this group of cars called for Scully #320 black graphite for the paint. I opted for a dark (but not close to black) grey to simulate this. Even heavily weathered the car appears grey and not black, the desired outcome. I also created a separate decal for the Pratt & Lambert "Vitralex" red circle in the emblem. The rest of the decals, except the reweigh and repack stencils, are from Jack Consoli's custom lettering for these cars. I sealed everything with Tamiya flat and applied several alternating coats of weathering and chalkmarks using PanPastels. The rust streaks were created using artist's oils thinned with mineral spirits. I dabbed the rust color on the side and then thinned and streaked it using the mineral spirits. 

I finished the weathering by adding PRR freight car oxide patches along with reweigh and repack stencils from a Speedwitch PRR set. I also added some fairly fresh chalkmarks at this step, as well, and sealed everything with a final Tamiya flat coat.


To secure the load, I began by adding the appropriate (for me) amount of weight (I tend to have my cars [consistently] lighter than NMRA standards, with the consistency being key... I am creating a fairly flat switching layout and the weights work well for my needs.) As shown above, I used self-adhesive lead tire weights, being careful to ensure that the bottom layer of pipe (drinking straws) would fit into the car body with no impingements, as shown below. I also added the first three sets of wood stakes to be used to contain the load and for tying together each level of pipe with wire (black thread.) The wood is technically supposed to be at least 4" x 4". However, the inside width of the model plus the thickness of the wood strips limited me to 2" x 4" pieces. It's not all that noticeable and is a concession I can stomach. I glued the strips against the inner face of the sides using a 50/50 mix of Goo and MEK to tack them in place followed by some ACC. The combination is secure with some measure of flex.


I carefully wedged the pipes in between the wood stakes to again ensure all fit as intended. Once satisfied, I removed the bottom pipe layer.


I carefully added Chartpack tape in six places, as shown above, with long strips left flopped over. This was a necessity as each layer of pipe had to be tied together with wire (string).


Once I had the Chartpack tape secure, I re-inserted the bottom layer of pipe and added the end pieces of wood strip, again secured with Goo/MEK and ACC. I also added the first pieces of thread to simulate twisted wire. These were added to each wood stake and then glued to some part of the pipes. Since this part of the "wire" is invisible, attention to detail is not paramount. The "wire" is actually number 50 black thread. It is quite old and has been kicking around my modeling supplies for years.


This photo provides a tighter view of the thread. The second pipe layer was added in an identical fashion, again gluing it to the pipe to secure in place.


With the top layer added, I could complete the Chartpack "bands" and wire. The bands were carefully pulled taught and attached to each other in the top and the center of the load. I created "clips" from 0.001" sheet brass. These served two purposes: to simulate the clips used to secure bands on the prototype and also to provide a place where the Chartpack tape could be secured and glued with ACC. I believe that the bands on the prototype were likely a Signode product (I used Signode to band crates when I worked summers at a machine shop as a teenager.) The metal straps had a piece of metal crimped over the spot where the straps overlapped in order to secure them. I painted these "clips" made from brass with a non-descript grey. 

Since the top layer is visible, the simulated wire must appear to be one uniform arrangement across the top of the load at each set of wood stakes. In my hands, I carefully twisted thread around and used sparing amounts of ACC to hold the twisted shape in place. Once that had set, I looped the end over a stake. Then, using two sets of tweezers, I made several twists in the other end, with the thread already looped around the stake. This was accomplished by holding the thread with one set of tweezers and using the other to go "over-under" many times and then securing that with sparing amounts of ACC until the twists held firm. I repeated that for each set of stakes. Once finished, I carefully trimmed the excess thread and was done! The load is quite secure inside the car body and I am happy with the results. The one thing I will watch over time is the glossy face of the Chartpack tape. If I find it objectionable or unrealistic, I will go back and flatten it some.