 |
| Virl Davis photo, Scottsbluff, Nebraska, ca. 1958, courtesy of Richard Hendrickson |
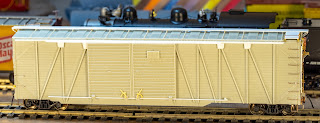
Many years ago, I purchased one of the Sunshine Models CB&Q XA-14D kits. I have always loved 50' single sheathed auto cars and this prototype just looks massive. However, as much as I like single sheathed cars, I equally dislike HO scale single sheathed models where the patterns were made using Evergreen scribed siding. To my eye, the grooves look all out of proportion compared to the prototype. It's a hangup that is difficult for me to overcome. Fast forward to the past few months. I pulled out the box again and took a look at things. Almost as soon as I purchased the kit, I I had assembled the basic box of sides, ends, underframe, and roof, and felt that I had done a good job of keeping things square. I decided to ignore my misgivings about the board sheathing and plow ahead. Keen observers will note that I didn't build the -D variant; the -D kit included both styles of A ends, "tight" and end door. I opted for tight ends.
 |
| East St. Louis, Illinois, Joe Collias photo, 1963 |
A note about the prototypes is in order. There was a fantastic article in Railway Prototype Cyclopedia 12 about the Burlington's single sheathed auto cars by "Bat" Masterson, Hol Wagner, and Al Hoffman. There were 500 members of class XA-14 in total, all built in 1937 at the road's Havelock shops. There were differences in linings, auto loading equipment, and end doors that resulted in subclasses -A through -D. I would refer those seeking additional information, including about those cars rebuilt with increased inside height to support the war effort, to consult the article.
I made numerous substitutions and changes to the kit along the way. Those are noted in the following bullet points and I will elaborate more on many of these enhancements at a future time.
- I am highly skeptical of the crossties on the model not having any sort of flanges. However, adding flanges to those crossmembers was not something I wanted to engage in
- I added a mix of AB brake parts; I did not add a train line and the pipe from the dirt collector to what would be the train line is unprototypically anchored directly into the floor
- I made all new running boards from strip styrene and also brass for the latitudinal running boards
- the brake step and brackets for the Ajax hand brake housing and pressure retaining valve were all also fashioned from brass
- the end ladder stiles were created from strip styrene
- the top and bottom door guides and tracks were created from strip styrene (unless these parts are perfectly cast in resin, they can be a bear to work with... I found it easier to just make new parts)
- the angle cock brackets are from Yarmouth and the angle cock/air hose parts are from Hi-Tech
- the sill steps are etched parts from Yarmouth
- The uncoupling rod brackets are etched brass parts from my own artwork etched by PPD. The rods are 0.010" wire
- all grabs were bent from 0.010" wire
- the right hand end grab iron bracket was created from brass
- the door handle hardware is from an old resin PRR X31 kit
- the upper side gusset plates are 0.005" styrene
- the trucks are AAR spring plankless from Tahoe and are a "close enough" truck. I am not aware of a correct HO scale truck for an AAR spring plankless design that also has Barber lateral motion devices
- the draft gear (coupler pockets) are a mix... one is a resin part from Pittsburgh Scale Models and the other is from Moloco. The reason being that I had a full set of the PSM resin parts, but managed to lose one along the way (this car was one of many that was reboxed after my disastrous basement flood back in 2011)
- rivets
- nut-bolt-washer castings
- the plate on the door for the "Burlington Route" emblem


No comments:
Post a Comment
Comments always welcome!