Tuesday, March 7, 2023

Scratch that Etch presentation

The link to the presentation about creating etchings, "Scratch that Etch," can be found here. I have also uploaded the video of the presentation to youtube at the following link. Enjoy!

Friday, March 3, 2023

Flat Car Friday - New York Central 70-ton AAR Flat Car


While this image is far from great, it does display two things that I'd like to see more: loads of crates and NYC 70-ton AAR flats. Crates are a fairly simple load to create from styrene stock or the old Sunshine export crates load, if you have one. They are easy to customize by creating your own lettering and printing decals in black stenciling or having them printed by a third party, such as PDC. They are also simple to secure using Chartpack or similar tape to simulate the banding.

I also rarely see models of the NYC 70-ton AAR flat cars in HO. It cannot be a lack of offerings since Intermountain has produced quite nice replicas and Sunshine also offered kits that still appear on the secondary market and do not fetch exorbitant Sunshine prices since there is a good styrene alternative. Protowest also briefly offered resin kits for the 70-ton AAR flats, although they are a bit crude, in my opinion. Fine decals are also available from National Scale Car. With a fleet of 1,000 cars, they are significant flat car prototypes that warrant inclusion in just about any model fleet.

I plan to take my own musings to heart and complete one in the near future.

Wednesday, March 1, 2023

Pennsylvania GRa Gondola Finished

I recently completed a Westerfield Pennsy class GRA gondola. You can find the previous posts via these links: Part 1 and Part 2. When I left off, the model was painted and awaiting lettering. I created my own lettering and had the decals printed by PDC.


The photo above illustrates the model after the decals were applied, excepting the repack stencils and some of the chalk marks. I also applied a wash on the interior boards using AK Interactive's Streaking Grime. I followed that by some light blending with a fiberglass scratch brush. I sealed the lettering with a coat of Future applied with an airbrush followed by a coat of Tamiya flat, also airbrushed.


Next, I applied some streaks to the sides below the floor boards. I have a prototype photo that displays a similar type of weathering. I dabbed on a mix of white and Payne's grey artist's oils that were then drawn upwards using mineral spirits, so that the greatest paint concentration was where the floor boards are exposed on the sides and also to create simulated streaks.


The photo above illustrates the model after a light weathering. I sealed the oils referenced above with a coat of clear flat first. I then added light amounts of PanPastels Burnt Sienna and Raw Umber. This toned down both the white of the lettering as well as the harshness of the light-colored streaks. I sealed these with a coat of Future, followed by the addition of more chalk marks. I sealed the chalk marks with a coat of Future followed by clear flat. 


The last steps to create the finished model, excepting the load, are shown here. I masked small areas for the repack stencils and painted them gloss black using an airbrush. I applied the repack stencils, using spares for Missouri Pacific from my decal bin. After they had dried, I sealed them with clear flat. Lastly, I added bits of white paper to simulate routing instructions, secured with Loctite Stik'n Seal. I added the couplers and trucks to complete the car.


The load is something I have been passively working on for years. I have a ziplock bag that I add bits of this and that too, knowing that they will end up as part of a scrap load. While loose on a piece of newsprint, I sprayed most of the junk with silver and grey paints from a rattle can. Once everything was ready, I placed the pieces inside the car body. I masked around the top edges of the car sides and then applied a very liberal stream of clear flat using a rattle can. This served as a quasi adhesive to secure much of the matter in place. I then added diluted white glue using an eye dropper to help secure things even more, especially the material at the bottom of the load. Finally, some of the larger pieces were secured using Loctite Stik'n Seal. While nothing is 100% securely in place, everything is nonetheless in place sufficiently that when turned upside down, nothing falls out! The final step involved several applications of drybrushed grey and black paints along with the addition of various rust shades of Pan Pastels and Tamiya brown wash. If one looks intently at individual pieces of the load, they may not stand up to scrutiny, but as a whole, I find the load highly convincing to simulate scrap from machining waste and various pieces of junk. In a moving train, it definitely does the job. On to the next project...


Saturday, February 25, 2023

Nichiban


As a city dweller, I don't have ready access to a local hobby shop so I tend to find ways to make do as I can. A great source of hobby goods can be art supply stores. I happen to live near one of the best known art schools in the country and have a few local options. One "hack" I have found is Nichiban tape. If it is not made by the same people who make Tamiya's masking tape, I'd be shocked (I suspect that Tamiya's tape is rebranded Nichiban.) If you're not familiar with this stuff by whatever name, it does double duty as low tack, meaning it doesn't pull up the undercoat you're trying to mask, yet it's high tack in that when you put it in place, it doesn't start to "unstick" itself. How it works, I don't know, but it just does. It comes in various widths, too, although I tend to put some on my self-healing mat and cut to the size needed. Highly recommended!

Friday, February 24, 2023

Flat Car Friday - Louisville & Nashville 24628


The Louisville & Nashville had a sizable fleet of medium length flat cars, with over 800 46'9" flat cars built by Bethlehem Steel (nos. 22000-22249, 1926), Tennessee Coal & Iron (nos. 22500-22599, 1927) and Pressed Steel Car Co. (nos. 24300-24819, 1930). This was one of the largest fleets of intermediate length flat cars (longer than 40'-42' and shorter than 50') in North America during the Steam and Transition Eras. Cars of this length were profiled in Prototype Railroad Modeling, Vol. 5 (being reprinted.)

L&N 24628, a Pressed Steel product, was photographed on the New Haven at Providence on December 12, 1957 by Col. Chet McCoid (Bob's Photo) with a carefully blocked and braced load of what appears to be cut marble. This would be a cool load to replicate using styrene skillfully painted and drybrushed to look like marble... perhaps fodder for a future post.

Chad Boas has offered parts for these cars. His list of offerings may be found here and he is a frequent attendee of the St. Louis and Chicago-area ("Naperville") RPMs, where he sells castings.

Wednesday, February 22, 2023

Decals (yet again!)

My latest PDC sheet*

I know I post a LOT about decals and artwork... it's kind of an obsession for me. I love how the correct artwork for a specific railroad, using their unique type ("font") can really add the right finishing touch to a model. I also notice that many people inquire on lists and forums if there are decals available for subject X or how they can go about creating artwork for decals. It's really not that difficult and the hardest part, the printing in white, is easier than you might think. 

My latest effort for illustrative purposes, not yet flat-coated and sharper in real-life than shown here... however, it looks exactly like PRR late steam era lettering because it's based on the Pennsy's actual lettering, not some generic "font" used by a "graphics" person at one of the model RR manufacturers. Also, it's the car number, reweigh location and date, etc. that I want.

First, the artwork. If you have a community college near you, the chances are quite good that they offer a class in Adobe Illustrator (before you say Illustrator is too expensive, read on please.) A class in Illustrator will teach you everything you need to know, and quite a lot more, to make decal artwork. Also, regardless of the software you choose, the concepts are similar and translate across software. The main thing is to learn how to work in vector graphics. Take the class. 

It's exciting to see the fruits of one's digital labors. Note that Jefferson Bus Lines is purely fictitious for my proto-lanced town of Jefferson, Oregon

Next, decide on software. If you like Illustrator, you can likely find an older version that you can buy outright on a site such as ebay. For what we are doing, even 15 year old Illustrator is adequate. Just make sure your current computer will support it. Alternatively, you can choose the Adobe subscription model (it always has the latest version!) You might find that you can subscribe, create the artwork you need in a month or two, and then unsubscribe. If you're enrolled at the community college, you'll qualify for the academic discount, too. Other options are out there, with the most common being Corel Draw. Find something that works for you and go from there.

Now for the printing and this is the part that's easier than you think... no Alps white inks or ghost white toner, unless that's the path you choose. You can simply save your file as a .pdf and send it off to PDC and within a week or so have your decals. You can fill up an 8.5" x 11" sheet to your heart's content. Also, since you're creating only what you need, you won't take up valuable real estate with extra number jumbles, reweigh locations and dates, repacks, etc. The white ink is fantastic and other colors are available, too.

I really encourage you to explore this... it's also not just for things on the rails. You can use it for signage, decorating, etc., for anything on the layout. Stop asking and start making!

*note that what you see here is converted from vector to raster (pixels) and downsampled to protect the work I have done to create all this artwork

PS - I am not interested in creating artwork for your projects. I don't have enough time for my own!

Friday, February 17, 2023

Flat Car Friday - Santa Fe Ft-P 90725


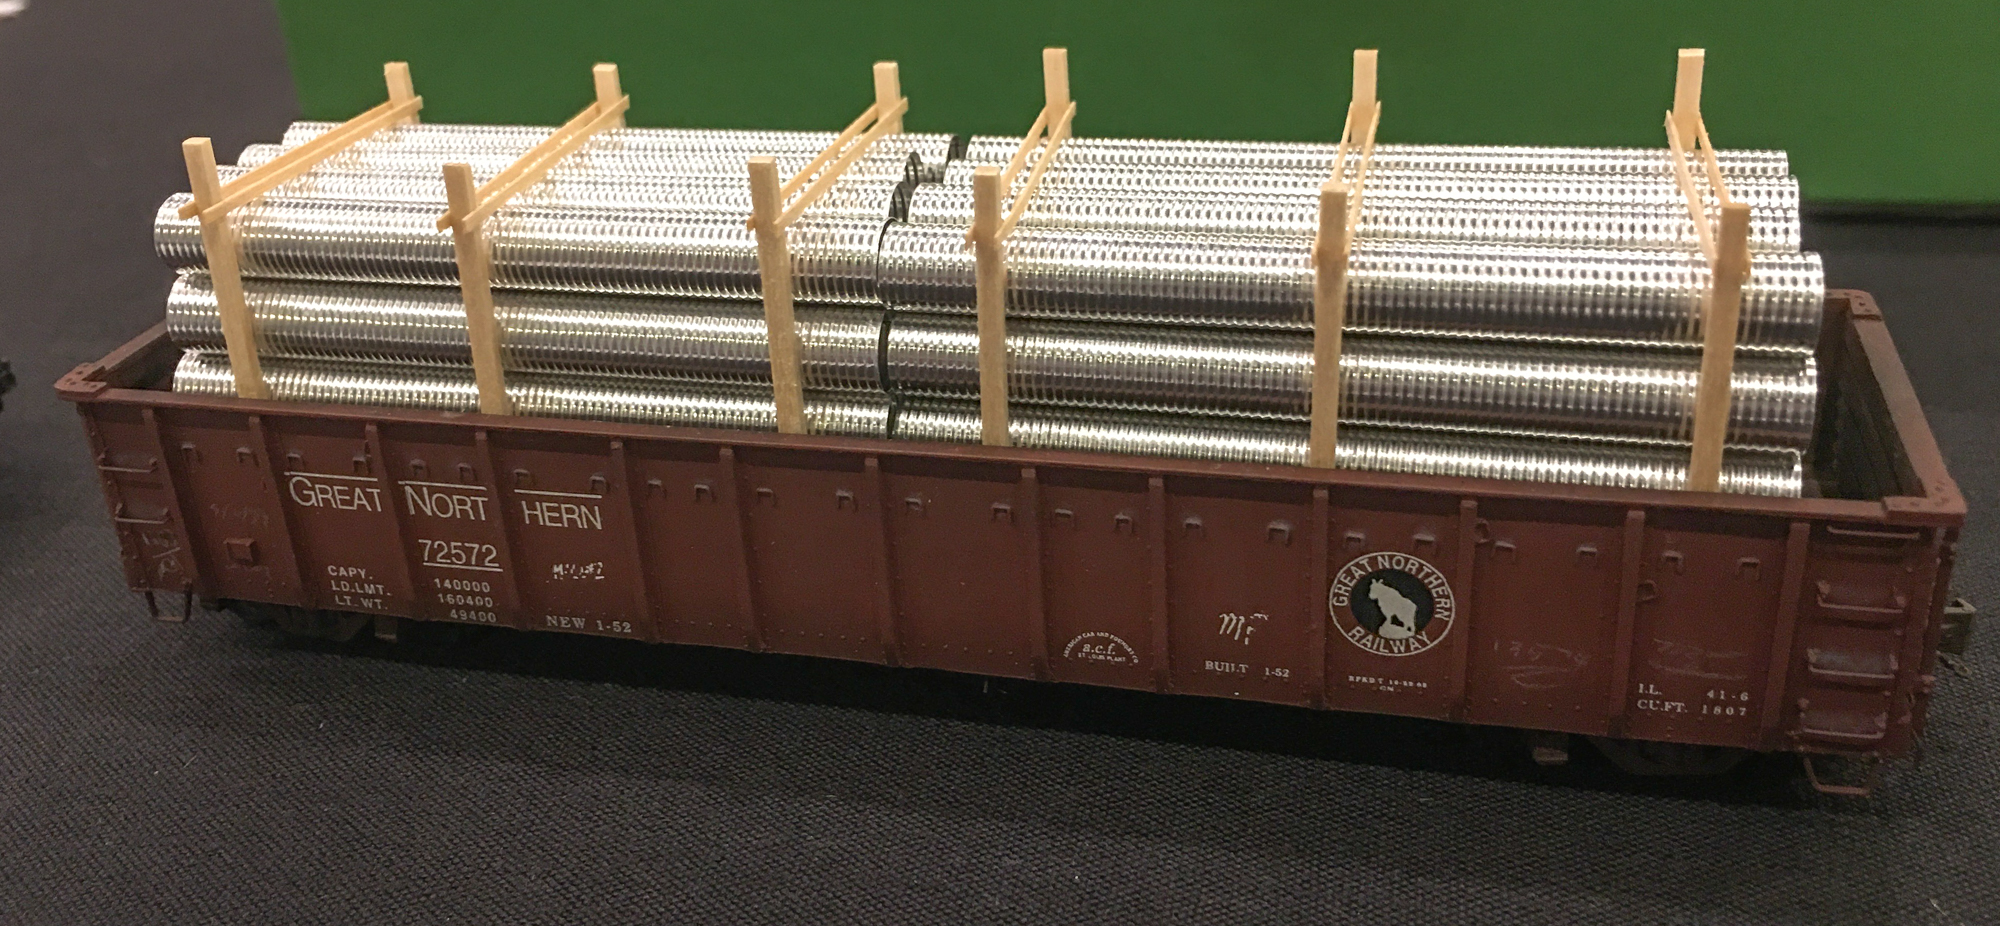
The Santa Fe received 150 flat cars from American Car & Foundry in 1930, car nos. 90701-90850, assigned to series Ft-P. They closely followed the Ft-O class delivered in 1929, with straight side sills and deep fishbelly underframe sections, visible in the photo above. The car above features a highly interested load of corrugated pipe that has shifted slightly. Note all of the loading details, including wood separating each layer, banding and strapping, plus the wood at the outside and fitted into the stake pockets. The clips attached to the sides that some of the bands are secured through were not original features of these cars. The photo dates from 1967, by which time they had been added. While the pipe here has a spiral corrugation pattern, similar pipe with straight corrugations is available from Grain Belt Models or you can track down the beautiful pipe from Jaeger that can be acquired via ebay or swap meets (it does require rolling and assemble, but looks stunning... see below)


This photo is of the old Jaeger "roll (literally) your own" corrugated pipe load, part of the joint clinic on loads prepared by Jerry Hamsmith and Ed Rethwisch at the Chicagoland RPM Meet in 2019. The model is a Sunshine resin kit, currently improved and offered by the GNRHS.