
Finishing the model had a few fits and starts. I elected to finish the car as it would have been painted following its reconditioning at PFE's Los Angeles shops in November, 1949 in the '1948' painting and lettering standard (the only known photo of this car is after it had been repainted in November, 1953 at PFE's Tucson shops.) That car had additional bracing at the body bolsters. I elected to leave those off, but in hindsight, those were likely added in 1949 and not later... my mistake! The main issue in completing the model was the SP Daylight Orange for the sides. I used Scalecoat II Daylight Orange and it proved to be a horrible match, looking rather drab with no orange "punch" to be seen. I repainted the sides with a close approximation created from Tamiya orange, yellow, and touch of red that seems to be a good match. I painted the roof and ends with Scalecoat II Oxide Red and the underframe and trucks with Tamiya Black. There was quite a bit of masking involved!
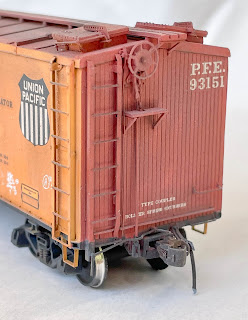
In preparation for decaling I added a coat of Future floor wax applied with an airbrush. This created a glossy surface conducive to decaling. I applied all the decals, save the repack stencil. I also added a few chalk marks at this time, too. I sealed everything with a coat of Tamiya clear flat. I masked the upper rectangle in the repack stencil blocks (the two blocks at the lower right of the side that have "chevrons" at the left and right edges). I followed that with an application of PanPastels Raw Umber, a good approximation of brownish grime, to all surfaces, trucks included. I removed the masking tape on the repack block and applied another coat of Future followed by a repack stencil on each side as well as numerous chalk marks. I sealed everything again with a coat of clear flat. With the exception of missing paper to simulate route cards, the model is finished.


This has proven to be another extremely satisfying project, from the construction of the side pattern to the completion of the model. For at least the next few weeks (maybe a little more or less) I can rest in the knowledge that I likely have the only completed model of the a PFE plywood-sheathed -9 reefer!
Great looking car, I guess I'll have to build mine. Thanks for sharing your build experience
ReplyDeleteThanks Fenton. I look forward to seeing yours.. perhaps at Cocoa Beach if not sooner!
DeleteI have had similar problems working on an R-40-26 bashed from an Accurail kit. I had to repaint sides and as I could not get my airbbrush to work have been trying to match brushable Vallejo Model colors to PBL Daylight Orange. It comes out too drark and looking rather drab, My latest version I used Vallejo 70.911 Light Orange which is better but still not looking like PFE orange in bright daylight. I'm going to leave it at this color and "Pledge" the sides for decalling. Adding the Archer rivet strips was a real challenge. Results will be on https://plasticfreightcarbuiilders.groups.io/g/PlasticFreightCarBuiilders/topic/pfe_r_40_26_plug_door.
ReplyDelete