Wednesday, October 30, 2019

Wordy Wednesday - Illinois Central 176000-series Single Sheathed Box Cars

Zanesville, Ohio, Paul Dunn photo, Howard Ameling Collection
In 1927, the Illinois Central received 500 cars each from Pullman Car & Manufacturing (predecessor to Pullman-Standard which was the result of the merger of Pullman with Standard Steel Car) and Mt. Vernon Car Manufacturing Co. The cars were of single sheathed construction with zee-bar structural members arranged in a Howe truss configuration. They had fewer ‘panels’ per side, with only four diagonals total. Other specialties included Hutchins Dry Lading roofs, Youngstown steel doors with Camel no. 50 fixtures, Dreadnaught steel ends (three main corrugations in the top panel over five in the bottom), and cast steel sideframe trucks (the prototype's trucks are most, but not exactly like, the 40-ton ARA trucks with Barber Lateral Motion detail from Tahoe - TMW-114 and TMW-214). One other notable feature was that the side sills were angles, rather than the more common channel sections. The cars were initially assigned to the 176000 series, but after the war were renumbered into the 16000 series.


Dunsmuir, California, September 4, 1954, Will Whittaker photo
HO scale models were offered by Sunshine approximately 20 years ago. They were quite good, featuring ‘board-by-board’ patterns. At this year’s Chicagoland RPM, the gift to early registrants was a set of parts to replicate these cars using an Accurail 7100 undecorated box car kit as the foundation. The parts include ends, door rollers, underframe parts, AB brake components, and other details. One note is that the crossbearer bottom cover plates have a single row of rivets in the parts set while the prototype had a double row. Although I do not have drawings, this is perhaps due to the use of pressed steel crossbearer shapes that were arranged flat back to back (again, this is purely my supposition).


These cars were included in Focus on Freight Cars, Volume One, pages 26-27.

It is my goal to complete all four of the recent gift kitbashes from the 2016-2019 meets to display at next year’s event. The cars are the B&O M-15K rebuilt Wagontop box car, Chicago Great Western 1937 AAR box car with Carbuilder’s ends, Fruit Growers truss rod reefer, and the IC single sheathed box car. Let’s see if I can keep to that timetable.


Illinois Central car diagram

Tuesday, October 29, 2019

Chicagoland RPM 2019 - Part Two

Norm Bakker displayed this attractive reworked Life-Like model of a Milwaukee 4-6-2
Here are some additional photos from the Chicagoland RPM from this past weekend, 24-26 October, 2019.
This heavily weathered Soo box car represents a company service car modeled by Tom Dowling
Dave Campbell showed off this S&G Tech 3D-based model of a C&O V4-1 ventilated box car. It is decorated with parts from Tichay, Accurail, and A-Line with custom ghost white printed decals.
Eric Hansmann displayed a similar design car (although not a ventilator) that was also built in 1923 and also represented through a private run resin kit.
Bob Chapman had a large number of cars on display, including this ACL O-16 rebuild from a Yarmouth kit
Kristen Dummler is becoming an authority on poultry equipment and is also becoming the leading modeler of such equipment, as evidenced by these two beauties

Jon Pansius is also one of the posse of mid-1920s to Depression era modelers that brought models for show. This is a private run model of an MDT reefer built in 1924
Jon also displayed this SFRD Rr-X from a Westerfield kit
Roger Hinman completed the gift from last year's event, down to the closely-spaced seam caps at the center of the roof
This 8-hatch CN reefer displayed by John Riddell is a True Line Trains HO scale model painted and lettered using Black Cat Decals
John also brought this Chad Boas resin flat car with CP trailers by Modelwerx of Vancouver. 
Ryan Mendell of National Scale Car displayed his model of last year's gift to attendees. Note the correct black roof. Ryan reworked many details, including a scratchbuilt underframe.
Weathering guru Hunter Hughson displayed one of the models covered during his weathering clinic. It started as a factory decorated Kadee model and was then weathered using many of the techniques that he discussed.
Hunter also had this in-progress model of a 1966 rebuild of a 1929 CN single sheathed box car.
These are two more examples of the many loads on display from Craig Wilson. They are both NYC models. The shorter one is a Red Caboose model, while the longer is a resin offering from Protowest. The wood loads are scale lumber
This brass 'bash caught my eye because I was gifted this exact brass model several months ago, with no accompanying documentation. Steve Hile's efforts can be used as a foundation for my own. The prototype is a Warren 8,000 gallon ICC 104W insulated tank car built in 1953 by AC&F. The model is from Iron Horse/Precision Scale.
Here are this year's parts and below is a photo of the prototype by Will Whittaker

Monday, October 28, 2019

Decal Artwork Presentation file from Chicagoland RPM


This past weekend at the Chicagoland RPM, I presented a clinic on Creating Artwork for Decals. The file can be accessed via the link. Note that there was a bit of information presented via live demonstration that is not in the file.

Sunday, October 27, 2019

Chicagoland RPM 2019 - Part One

Craig Wilson had a large number of car with loads on display
This past weekend, the 26th iteration of the Chicagoland RPM, a.k.a Lisle, née Naperville, was held at the Sheraton Hotel and Conference Center in Lisle, Illinois. As has been the case since Mike Skibbe and his team took over stewardship of the event, it did not disappoint. There were many fine vendors, a large display of exquisite models, and many excellent clinics, plus the comraderie that make these events so special. 

As a vendor, my clinic-viewing activities are somewhat constrained, but I did manage to catch several, including the excellent offerings on tools by Ryan Mendell, a weathering tour de force from guru Hunter Hughson, and a very entertaining town-building presentation by the resident class clown, Clark Propst. It always amazes me that every event yields new and interesting perspectives on the prototype modeling side of our hobby.

I urge you to make plans to attend in 2020 if you were unable to make it this year.

Here is a sample of some of the modeling efforts on display.

Clark Propst not only brought the 2018 gift for attendees all built-up, but he also displayed the oil dealer featured in his clinic...
... as well as the 2016 & 2017 attendees' gifts' and a feed mill from his clinic
Jeff "the UN ambassador from S Scale" English displayed his built-up 2017 gift, in S scale, no less, with the correct Equipco power hand brake. In fact, this very car, CGW 92066, was interchanged on August 18, 1961 at Bellows Falls, Vermont, from the Rutland to the B&M. It was loaded with paper towels from Crown Zellerbach in Carthage, New York, and would have been interchanged by the originating road, New York Central, to the Rutland on August 16 or 17. The ultimate consignee was the Boston Army Base, served by the B&M
A Labelle tank car displayed by Alan Brotherton from Muscatine, Iowa
While I cropped out a little too much when composing this photo, you can still see how nice this Rio Grande AC&F box car is, a new offering from Cannon & Co.

Dick Scott presented this highly detailed Rails Unlimited resin offering, including many aftermarket parts. Rumor has it from a highly reliable source that HO scale modelers will have Rio Grande 50' double sheathed auto cars in 2020.
George Toman is working his magic on a pair of Artitec resin D-7 dozers
Lester Breuer has been quite prolific this year. He brought many models including this GTW single sheathed auto car from a Steam Shack/Funaro & Camerlengo kit
I failed to capture who built this attractive SP B-50-38. Help!
Jerry Hamsmith displayed this decaled and redetailed Atlas ballast car, decorated as it appeared ca. 1955
Jerry also showed off this custom cast resin model of a CB&Q FM-11 45' flat car, also as it appeared ca. 1955
This photo and the one below were of the old Jaeger "roll (literally) your own" corrugated pipe load, part of the joint clinic on loads prepared by Jerry Hamsmith and Ed Rethwisch. The model is a Sunshine resin kit, currently improved and in the process of being re-released by the GNRHS.

This is another of Ed Rethwisch's fine models. It is loaded with Artitec Massey-Ferguson combines on a Northern Specific Models/Speedwitch NP straight side sill flat car
This impressive Cudahy meat reefer was scratchbuilt by Joe Binish. Feast your eyes!
Clark Propst wasn't the only person to present a fuel dealer. Jared Harper brought this model of the Phillips 66 bulk oil dealer as it appeared circa May, 1943, in Eskridge, Kansas
Aaron Gjermundson has been hard at work making improvements to a Sunshine CB&Q single sheathed auto car
He is also using these ends to work on a couple Soo Line gondolas with Van Dorn ends. They are 3D printed parts from Shapeways that he modified slightly and then copied in resin.
More photos to come in Part Two...

Tuesday, October 15, 2019

Wordy Wednesday - Chicago and North Western Emergency Box Cars and Ron Sebastian

San Diego, Sept. 5, 1955, Col. Chet McCoid photo, Bob's Photo
The Chicago and North Western had a sizable fleet of Emergency box cars. They were delivered in two groups with differing specialties. They were delivered by Pullman-Standard (417 cars, nos. 77416-78248, even nos. [part of an order for all-steel cars that was modified due to restrictions imposed by the War Production Board], Viking roofs and both Superior and Youngstown corrugated steel doors) and American Car & Foundry (500 cars, nos. 79250-80250, even nos., Murphy panel roofs and Superior doors.) Only the Northern Pacific received more Emergency design box cars.


Tacoma,  Feb. 19, 1955, Col. Chet McCoid photo, Bob's Photo
HO scale modelers have been blessed with two routes to replicate these distinctive prototypes. Sunshine Models offered resin kits to duplicate most versions of Emergency box cars. Intermountain followed with models that replicate most of the tall (10'5" - 10'6" inside height) cars. One nice detail that is included in undecorated kits as well as on the decorated cars that require it is the Viking corrugated steel roof (this part was offered by Des Plaines Hobbies as an add-on to the IMWX/Red Caboose 1937 AAR box cars and then re-tooled to fit the Intermountain AAR box car offerings.)


Some of the Des Plaines Hobbies parts in my stash (the steps are partially used)
One other point of this post is to indirectly pay homage to the late Ron Sebastian. Over the last ~50 years, Ron was a giant in the hobby, owner of Des Plaines Hobbies, where many made the pilgrimage, either on visits to the Chicago area or as part of the annual Sunshine Models Naperville now RPM Chicagoland. Ron was also a driving force in the manufacturing side of the industry, both directly and indirectly. In addition to the Viking roof referenced above, Des Plaines obtained and temporarily resuscitated the Storzek line of HO resin kits, he produced other injection molded parts, he heavily influenced several projects with major manufacturers, he was the driving force behind other manufacturers, and he was a promoter and supporter of all types of modeling, including his efforts to expand the S scale community and his donations to RPM modeling door prizes, clinics, and giveaways over many decades. His legacy is immense and he will be missed not only for his contributions to the hobby, but his jovial, kind way. I considered him to be a friend as well as a mentor to Speedwitch and I am deeply saddened by his passing.

Saturday, October 5, 2019

RPM Chicagoland Chicago Great Western 1937 AAR Box Car Part One

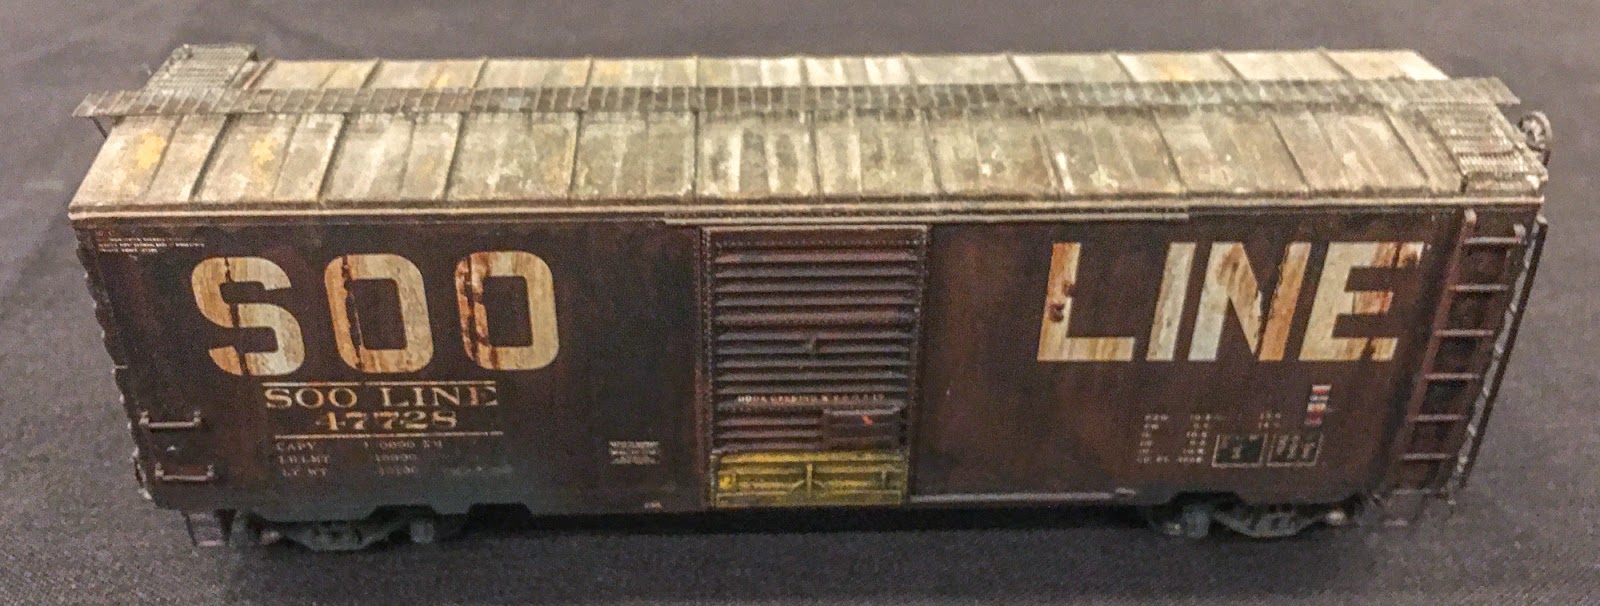
Prototype photo ca. early 1948, Charles Wales, William Hopkins Collection

Naperville, or RPM Chicagoland as it is known now, had been in a bit of a funk for several years. Interest had waned and St. Louis and Cocoa Beach had leapfrogged it as the events to attend on the RPM calendar. One of the things that Mike Skibbe and his dedicated band of volunteers revived was the gift for attendees in the form of a set of parts to kitbash a model into an interesting prototype. They offered a B&O M-15K in 2016. They followed it up in 2017 with a Chicago Great Western 1937 AAR box car that incorporated the distinctive Pullman-Standard Carbuilder’s end.

The entire package included almost everything needed for the kitbash. The attractive Centralia Car Shops box contained a Red Caboose (ex-IMWX) square-corner 1937 AAR box car, resin ends, doors, and details, plus decals (there were corresponding packages for N and O scale modelers.) The instructions were included in the printed and bound meet program, including general arrangement and brake arrangement drawings.

It struck me a little sacrilegious to chop up a perfectly good Red Caboose car. The Intermountain (IM) 1937 AAR cars already come with separate ends, making them suitable models to mate with the resin Carbuilder’s ends. However, when I test fitted the ends to the IM car, I found they were a little too narrow, meaning they did not span the entire width of the car end. I made the decision to cut up the IM car to create a flat kit: sides, ends, roof, and floor/underframe (the prototype underframe had a pair of stringers between the body bolsters and end sills while the IM cars have diagonal supports [see drawing from instructions included at the bottom of this post.] I was willing to overlook this difference if the IM car body was used unmodified. However, since I was creating a flat kit, I opted to use a spare resin floor/underframe.)

Halfway through the car body assembly, illustrating the styrene added at the corners
To create a flat kit from the IM car, I made a series of cuts with a razor saw. The precision of the cuts is less important than avoiding any slips that could damage the side detail. I made vertical cuts to the flat “sub-ends” just inside, finishing all the way into the car body. Once both verticals cuts were complete, I could “flex” the sub-end (still attached at the floor.) Using an Xacto knife, I scored the floor-end joint from the inside of the car body, making several strong passes in both directions. Once scored, it was an easy task to snap away the sub-ends. To remove the sides from the floor, I made two razor saw cuts the length of the car, starting from the bottom of the floor (not from inside the car body,) again with the precision of the cuts not being as important as avoiding damage to the car side detail. I cut all the way through (I did not use the score and snap method because the minimal amount of styrene at the door opening tends to be difficult to get to snap away, leaving one with a side that is missing the portion below the door opening… warning delivered to others, I hope!) Once these two cuts were complete, I removed the excess material from the back of the car sides, leaving two clean and flat car sides.

The sides and ends assembled into the basic car body
At this point, I had two sides, two ends, a roof, and a floor/underframe, ready for assembly. The sides have a relatively thin profile; I wanted a little more surface area for the side-to-end joints. I remedied this by adding 0.125" x 0.125" styrene strip to the back of the sides at the corners, flush with the edges of the sides (leaving some room for the floor and roof parts to be added into the car body.) This provided some extra surface area for a stronger as well as more pronounced 90° joint. I carefully assembled the sides and ends into the basic car body, taking care to ensure that everything was aligned properly and square. Since the joints were resin to styrene, I used ACC. I added extra ACC to the interior to secure these joints. Next I added the floor/underframe casting into the car body. Fortunately, it required almost no filing to fit. I tacked it in place in several spots with ACC and then flowed ACC into the joints from the inside of the car body by adding several drops of ACC and tilting the car body to let the ACC run along the joint until all four joints were filled. I checked the fit of the roof, which required a little amount of filing and added it into the car body, but did not glue it in place at that time. I am still contemplating whether to paint the roof separately as it is black. I also added weight attached to the top of the floor.

The crossbearers as described in the text
The underframe ready for detailing
While I had the floor/underframe casting, I had to scrounge for the associated structural details. I removed the portions of the stringers where the crossbearers are located. I added strips of 0.005" styrene eight scale inches in width to simulate the crossbearer top plates. I fabricated the main crossbearers from 0.010" x 0.100" strips trimmed at an angle to represent the slope of the crossbearers. These were framed by HO scale 1x4 strips on edge. I pre-drilled two for the train pipe, as shown in the photo. I added these to the floor followed by crossbearer bottom plates, again represented by strips of 0.005" styrene eight scale inches in width, but tapered to four scale inches wide at the side sill supports. The crossties are resin pieces from the spare parts bin. The train pipe is represented by 0.020" wire (my holes were not located perfectly, so it is not straight, but from the side, that will not be discernible.) At this point, I was ready to move on to the detailing of the car. That will be covered in Part Two...


A slightly different view of the underframe
This underframe drawing, included in the instructions, illustrates the brake arrangement