Showing posts with label 1937 AAR. Show all posts

Tuesday, November 4, 2025

Photos of the completed ATSF Bx-34


Here are some photos of my completed Santa Fe Bx-34 Modified 1937 AAR box car with Duryea Cushion underframe. The model was built using a Sunshine kit combined with Speedwitch parts (1959+ lettering.) I finished the model using Polly Scale mineral red for the majority of the car body plus Tamiya black for the roof.


The intention was to keep the weathering fairly modest. I applied some streaks using artists' oils dabbed on and brushed down the side using mineral spirits. I also added some light washes, again with thinned artists' oils. These were sealed with flat coats. I then added some sparing and selective applications of PanPastels and Bragdon powders, mostly to the roof, underframe, and trucks. The chalkmarks are from National Scale Car and the routing cards are from Owl Mountain. Excessive "unremoved" dust on the photo above courtesy of myself!


Thursday, October 16, 2025

Where we are at...


I am typing this from an almost horizontal position. I was supposed to be arriving at Naperville today, but my balky back made other plans. So, I type this from home. It's been a couple months or so since I started things back up in earnest, including casting. As the "RPM season" sets in, I thought it a good time to share a little bit about what's coming over the next few months.


Some old Speedwitch stuff turned up: DT&I gondola, MEC ARA box car parts, NYC stock car roof and 50' combination rectangular and diagonal panel roof (some prototype details here.)

Parts sets have proven to be a good way to dip my toes in the casting pool. I mostly learned a few things about what shape of mold works best for me and how I like a few varieties of silicone. I am adding a couple wrinkles to the existing offerings. First, for the ATSF Bx-34 parts I have added the 1959-1970s scheme, illustrated in the photo at the top of the page. In addition, I have added Shadow Keystone decals covering 1950s+ schemes for the PRR X32A parts

This and the following three photos are of the R-40-25 parts


On the parts front, there are also a couple other offerings nearing release. The first is the PFE R-40-25. This set is intended for an undecorated Intermountain R-40-23 kit or any Amarillo/Intermountain PFE R-40-25 that is NOT the delivery scheme as the UP medallions on those cars are incorrect (I will share info on that when these parts are released.) The sets include correct resin ends and etched parts to correct/upgrade the underframe, side sill details, ladders, hatch cover supports, steps, etc. [there is a companion set for the R-40-26 that is in the works, as well; see undeframe photo below.] The other parts release is for the ITC 1937 AAR box cars with AC&F Carbuilder's ends and also includes resin details, etchings, and decals.

R-40-26 underframe floor casting... board-by-board!

Illinois Terminal AC&F Carbuilder's end for 1937 AAR box car (pre-production before changes)

Photo illustrating the extremely subtle ripples in the side sheathing of the PRR X43A

I am also charging ahead with some full kit offerings. The first is the Milwaukee 50' single sheathed auto cars that I teased awhile back. It will be released November 1st via the Speedwitch site (all decals, etchings, trucks, and other parts are already in house so they will ship immediately!) Another project is the Pullman-Standard-built Central of Georgia 10'0" inside height Emergency box car (PS if you have National Scale Car's set for the A&WP/WofA/Georgia, those decals will work on this model, as well.) If the CofGa offering proves popular, I will add Birmingham Southern, as well. I also have three PRR cars in the hopper: the G28, X43A and X45. The G28 is a project that I started years back. It will be a showstopper, with full underframe detail... and the underframe was a unique welded design with very interesting crossmembers so it bears full attention! The X43A was a 40', mostly postwar AAR design car, with welded sides. I have created patterns with extremely subtle waviness to the sides that I am extremely pleased with and they were unusual in the PRR universe in that they were delivered with black roofs. The last of these three is the X45, a proprietary PRR design for a 50' welded box car. I again added waviness to the sides and the Pennsy proprietary details, including the underframe, are really cool. 

The last of the full kits, but by no means least, and listed in its own paragraph, is a Western Pacific flat car built by AC&F in 1942 that is a fully 3D printed offering. It is spectacular. More details to follow on this gem...

A final tease... several years back I presented a clinic including details about scratchbuilding board-by-board patterns for single sheathed cars. I have been fruitlessly looking for those patterns for over a year. I thought they were lost in the past year's move. Well, a few weeks back, they were presented to me. Turns out I had sent them to someone along with a bunch of other stuff and they were returned! Here is the end for the car in question. IYKYK 


Monday, May 12, 2025

Branchline Trains Yardmaster 1937 AAR Box Car Anomaly


I have been at work on a pilot model for an upcoming Speedwitch kitbash parts set. I had an undecorated Branchline Trains Yardmaster 1937 AAR box car kit in the stash and decided to use it as the foundation for the project instead of the Intermountain car. The BLT YM kit has separate ends (which are being replaced in the kitbash,) the correct single stringer on each side of the underframe and one of the best renditions of the Youngstown door that's been done in HO, albeit with the placard and route card boards integral to the door. It's an attractive base to start with, even knowing I would have to carve off the ladders and grabs on the sides.


However, as things progressed, I discovered an anomaly that I thought worth sharing. One side of the car is "higher" than the other! It is as if one entire side has been raised approximately 0.015" relative to the other. It is a very strange tooling error, but left me scratching my head until I realized what it was. The first underframe image with no "lip" is correct (right side on the model when viewed from the B end,) while the second with the "lip" is incorrect (left side on the model when viewed from the B end.) I am working around it, but it is definitely good to know it's there if you are planning to use one of these cars as fodder for a future effort. I will share a post very soon about the Speedwitch offering as I am almost ready to announce it.

Tuesday, March 5, 2024

New Haven 1937 AAR Box Car completed build


A three-quarter portrait of New Haven 1937 AAR box car NH 31297.


When I left off on the New Haven 1937 AAR build, I was preparing to blast the model for painting. With that step done, I added rivets in places where they might be blown off during blasting. You can see them in the photos above and below at the side sill support tabs, the grabs on the ends, the ladder mounting brackets, the sill steps, the door handles, and on the door tracks, where I simulated the flat rivets using 0.5 mm discs punched with the RPToolz punch and die and 0.005" styrene. One thing I forgot (and did not go back and add once I started painting) were the three rivets per side sheathing panel used to attach side nailing post clips! Oh well...


I airbrushed the car body with Polly Scale Light Freight Car Red thinned with Liquitex Airbrush Medium. The doors, trucks, and couplers were airbrushed with Tamiya flat black. Everything was given a coat of Quick Shine Floor Finish, again with the airbrush, to create a glossy surface for decaling. I used Speedwitch (now National Scale Car) New Haven box car decals as well as chalkmarks. The photo above illustrates the model after the basic decals had been applied and areas that would not be weathered as part of the first steps were masked.


In the first step in weathering, I added a light wash of burnt umber along the bottom of the car, using odorless mineral spirits to dilute the oil paint. This was "crept" up the side a little, as illustrated in the photo above. It's a subtle effect.


Next, I added some weathering effects to the upper portion of the car. I created streaks using a blend of Payne's Grey and Titanium White artists' oils. I dabbed small amounts of the paint on to spots on the side and then diffused and drew them down the car side to create streaks. 


I also made the decision to simulate some paint failure on several of the galvanized metal roof panels. This was done by applying a mix of Payne's Grey, Titanium White, and Cerulean (Blue) in several places. They appear stark in the photo above, but I did "integrate" them into the overall look of the model as the weathering process progressed.


I added some powders to create an overall effect as well as blend the previous steps. On the sides, I added Bragdon's Grimy Grey powder, which is fairly muted once under a flat coat. I also augmented this with some targeted application of Pan Pastels Payne's Grey. The photo above shows these after they were sealed under a flat coat.


I also added the same two powders to the roof, but in greater strength to add grime as well as mute and blend the paint failure patches.


I removed the masking tape from the capacity and reweigh location and added those decals, as shown, reflecting a reweigh at the New Haven's Cedar Hill facility in March, 1949. 


At the same time, added some "fresh" paint failure again using the mix of Payne's Grey, Titanium White, and Cerulean (Blue) to arrive at a satisfactory color. 


I applied another dilute wash of Payne's Grey thinned heavily with odorless mineral spirits and added the repack and brake test stencils, as well. The photo above illustrates the completed right side of the car.


The B end of the completed model...


I applied one more "coat" of powders to the roof to mute the areas exhibiting simulated paint failure. I am mostly satisfied with this effort, although I still think I can improve upon it. I will post some further thoughts about this in the next couple weeks as part of a separate post about paint failure.


The completed left side of the model... I am quite pleased with the overall end result. The New Haven script scheme is one of the iconic box cars of the era. Having a good representation of it will add plenty of context and character to the fleet.

Friday, March 1, 2024

Illinois Terminal 1937 AAR Box Cars


The photo shown above (Karl Geffchen photo, Aug. 1978, from the Fallen Flags site) was posted to the Railroad Modeling the 1970s Group on facebook with a query about details. I posted an answer there, but thought these cars would make an interesting post overall. So, here goes. I will cover the photo above first even though it is the last chronologically, since it is the genesis of this post. It is an ITC 1937 AAR box car that was modified with a wider door opening (six feet to eight feet, although it's possible it's seven; my most "modern" ORER is only from '61 so I am uncertain; if you know, please leave a comment below) and a side sill support spanning from body bolster to body bolster as well as additional bracing where the door posts meet the side sills. Presumably, it also received the underframe modification as shown in the last photos below. Note that this car is one of the members of the group with AC&F proprietary ("Carbuilder's") ends.

East St. Louis, Illinois, 1938, R. J. Foster photo, from Joe Collias

ITC 6041 was from the first group of 1937 AAR box cars acquired by Illinois Terminal (car nos. 6000-6099, 100 cars.) They were built in 1937 by AC&F and were quite "standard" in their details, including Youngstown corrugated steel doors with early Camel Roller Lift fixtures, square corner Dreadnaught ends, Murphy rectangular panel roof, double truss spring plankless trucks, Ajax power hand brakes and wood running boards and brake steps.
American Car & Foundry photo

ITC 6299 was the last car in the second group of 1937 AAR box cars, also from AC&F and built in 1941 (6100-6299, 200 cars.) These had Youngstown doors with Camel fixtures, Murphy rectangular panel roof, double truss spring plankless trucks, Equipco power hand brakes, wood running boards and steel plate brake steps. What made them unusual were the round corner AC&F proprietary ends, as shown in several of the photos herein.

circa 1955, Paul Dunn photo

Circa the mid-1950s, many cars were fitted with side sill support extensions, as shown above as well as bracing where the door posts meet the side sills (click on photo for a larger view.) The door opening remained at six feet. The placard boards were also lowered, as shown.

ebay purchase, undated

At some point in the 60s, cars received heavier side sill support sections, spanning the body bolsters, as shown above and in the first photo of this post. The door openings were increased and the doors were replaced with improved Youngstown corrugated steel doors. The underframe stringers were also augmented. The cars originally had one zee bar stringer on each side of the center sills and between the bolsters and the end sills incorporated a diagonal brace at each corner. As shown, these were augmented with two I-section steel stringers on each side of the original stringers and three I-section stringers on each side of the draft gear, replacing the diagonal braces.

ebay purchase, undated


Friday, January 5, 2024

New Haven 1937 AAR Box Car


While the Western Maryland Baldwin-built I-2 Decapod and its train are no doubt the subject of this image, the color of the New Haven 1937 AAR box car immediately behind the tender is illustrated nicely. Cash Valley, Cumberland, Maryland, Bob's Photo

It's amazing what almost 20 years can do to the approach to a model. I added some detail to this kit a loonngggg time ago and it has languished since. Earlier this year, I pulled it from the pile of in-progress kits and decided to use it as a test bed for some of my detailing efforts.

Circa early 1945, Al Armitage photo, Ron Morse Collection

First, a little about the New Haven's fleet of 1937 AAR box cars. By the early 1940s, the New Haven box car fleet was on borrowed time. It consisted of thousands of thirty-six foot box cars rebuilt in the second half of the 1920s from cars that were built between 1903-1912. To provide a little context, by the early war years, these cars were so rundown that the War Production Board authorized their mass scrapping, even while forcing just about every other railroad to keep their equipment running. In the face of the cars' condition as well as the increase in traffic resulting from the war, the New Haven added 1,000 1937 AAR box cars in 1941 and an additional 2,000 in 1944. Like many blocks of cars built during the war years, they featured a hodgepodge of specialties. I chose to model a Pullman-Standard 1944 product with Superior 7-panel doors and a Miner power hand brake, narrowing my car nos. to 31000-31349 or 31500-31649.

Bob's Photo

This Norman E. Kohl photo of a NH '37 AAR that had come off the rails affords an excellent view of many of the end details, including the unusual placard board and the bracket for the angle cock/air hose. 

The basis for this build is the IMWX/Red Caboose 1937 AAR box car with W-section, round corners, a match for the NH's '37 AAR cars. There are a couple issues with the underframe that I chose to ignore. First, the original '37 AAR cars had two stringers, one on each side of the center sills. Later cars had four, two on each side of the center sills. When tooled, IMWX tried to have their cake and eat it too, so the two stringers on each side of the center sills are not correctly spaced. The other issue is that an option for buyers was to employ stringers between the bolsters and end sills, instead of diagonal bracing, as on the model. The NH's 1944-built cars (and perhaps the '41 cars, as well) used stringers instead of the corner braces. On to the things I did choose to update...


As previously noted, I did not modify the stringers and corner braces on the underframe (if you do wish to go that route, I suggest that you consult "New Haven's first steel boxcars," from the December, 1996 issue of Railroad Model Craftsman, by Ralph Harris.) I did replace the brake equipment with a Detail Associates AB brake set, styrene levers and dead lever bracket, Tichy turnbuckle "clevises," chain, and styrene and vinyl brake component brackets plus Grandt Line nut-bolt-washers on the reservoir lugs, plus Tichy wire for the piping and rods. The draft gear (coupler pockets) are Moloco parts with 1-72 screws.


On the sides, I made a few upgrades. The bolster tab sections (added after I glued the center sills/bolsters to the car body, making the endeavor a little more challenging!) are etchings from my own artwork that capture the "notched" look of the tab sections favored by Pullman-Standard. The door tracks are 0.002" brass sheet cut and bent to represent an angle. I opted to add this detail because the door tracks and hardware for Superior doors is quite different than for Youngstown doors and manufacturers have largely ignored this, opting to replicate Youngstown features. After adding the door tracks, I applied brackets along the side sill supports behind the door tracks. The last bracket is also part side sill support tab, as shown. These features were fabricated from styrene. I scratchbuilt the "ramps" and "stops" for the door latches using styrene. They are fairly crude, but are better than nothing! The placard and route card boards on the doors were scratchbuilt from styrene to match the NH-style ones used on the prototype (I didn't have actual dims so these are my best guess.) Note that the placard boards on the doors and ends are different. The door handles were also fashioned from styrene. They are too long, but do impart some texture that is lacking on the stock IMWX/Red Caboose doors. The final door detail I added is the locking mechanisms pilfered from a Detail Associates Superior door parts set.

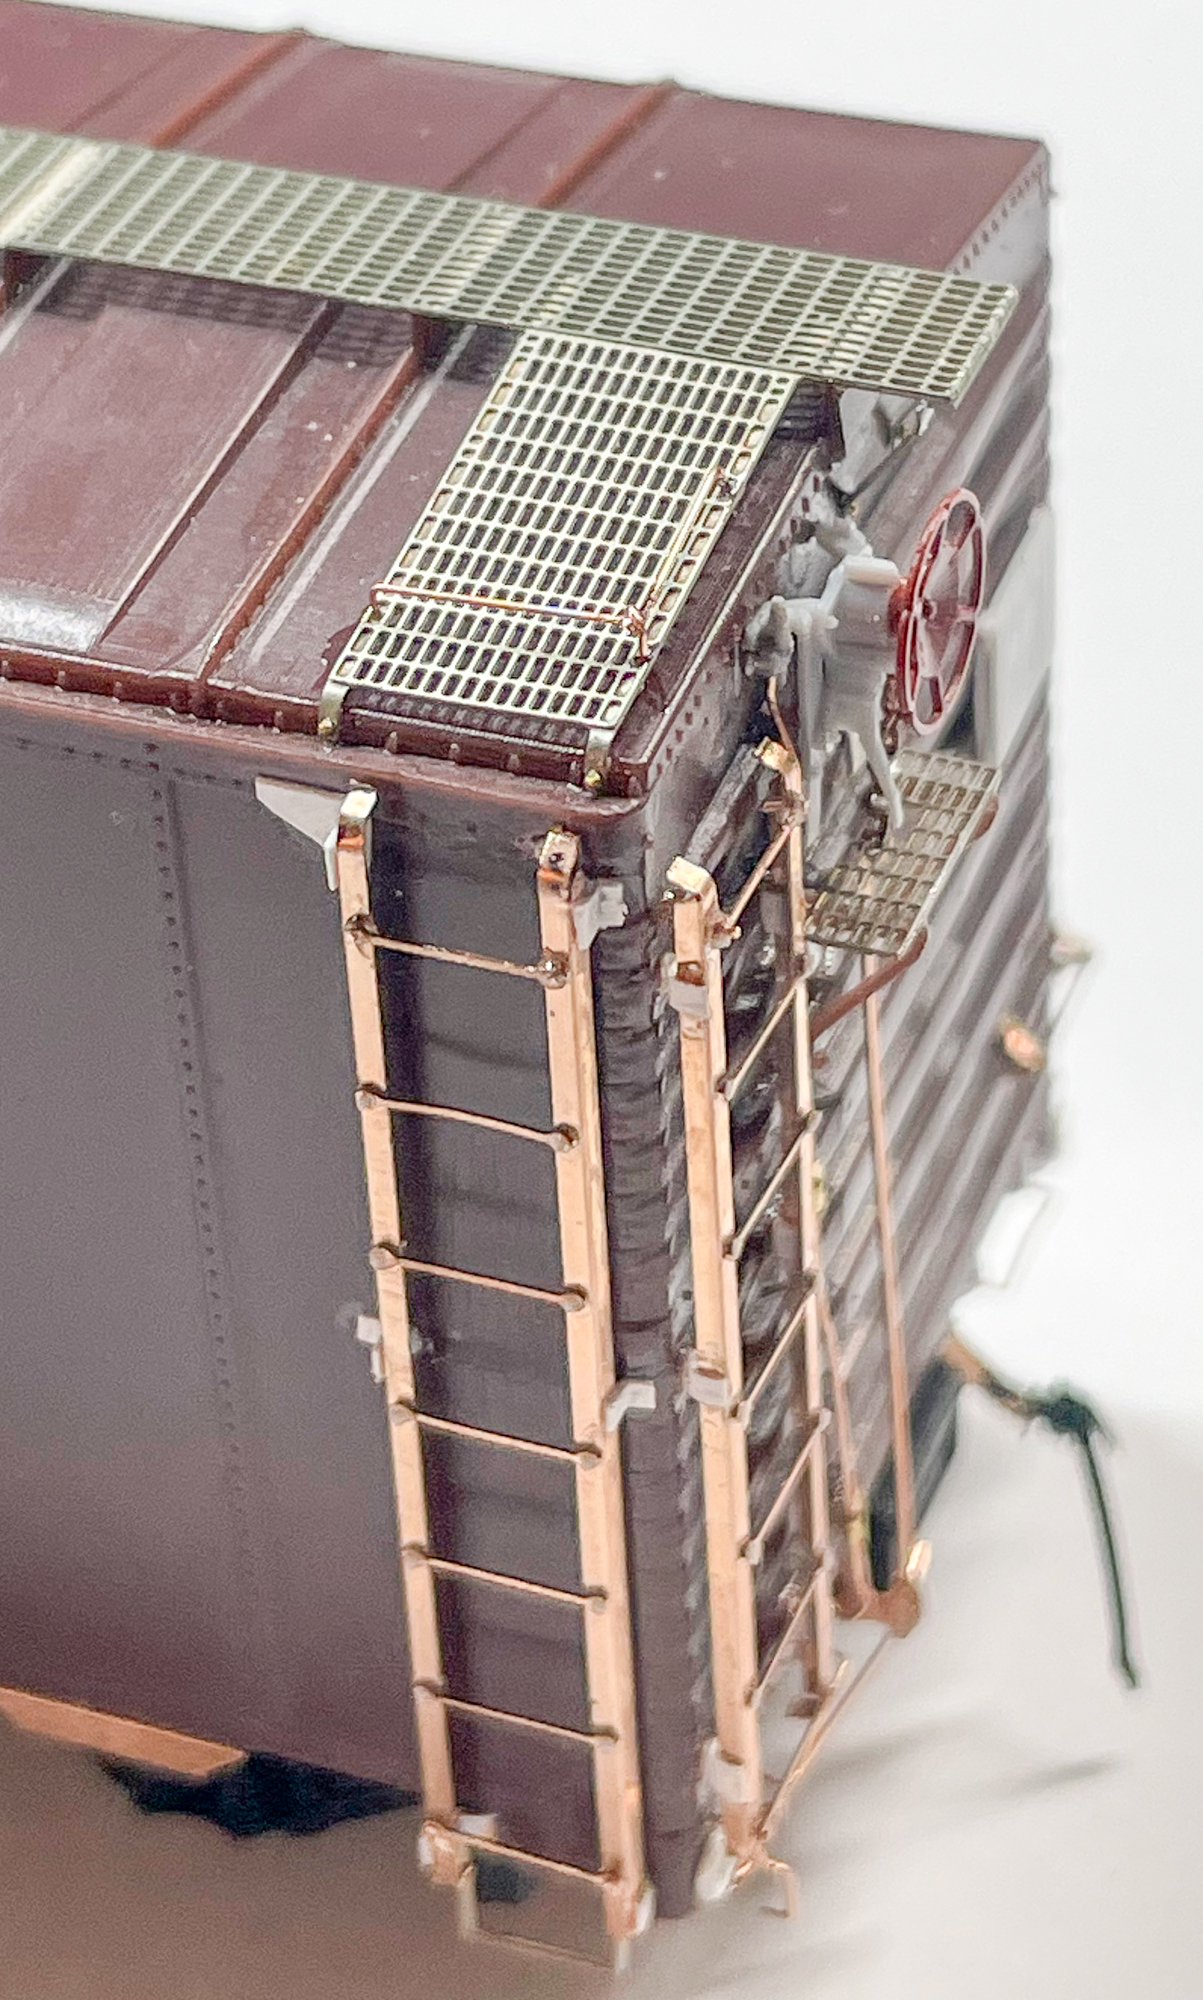
The roof received very minimal change and upgrade. The kit includes wood running boards. The prototype I am modeling was equipped with an Apex Tri-Lok running board (and brake step.) I used etched parts from Yarmouth to replicate this. For the corner grab irons, I used 0.008" wire for the grabs and the corner eye bolt-like fixtures. Before adding the running board, I carefully drilled holes (no. 80 bit) in the "legs" that curve down to the eaves to be able to pin these legs into the roof edge. I also trimmed the legs to an appropriate length. The running board was affixed with Barge cement thinned with MEK (~50/50) augmented with ACC applied with a pin.

I replaced all of the ladders and hand holds with finer parts. The bracket grabs at the left edge of the car sides are Kadee parts (use a Yarmouth etched drilling guide to save yourself some headaches!) The ladders and treads (rungs) are etched parts from my own artwork supplied to PPD and etched in phosphor bronze. They are extremely close to scale-sized and are durable. A little bend here and there looks highly prototypical, as the rungs on the prototype were beaten up over time, as well. The sill steps are from Yarmouth and are designed specifically for this model. The end sill grabs are 0.008" wire (I filled the holes before drilling newer, much smaller diameter ones.) The right edge bracket grabs on the ends are also from my own etching artwork.


For the end details, I again used very little from the kit. Brake step supports are a combination of the kit's with 0.005" styrene. The power hand brake is a Miner housing from Tangent with a Kadee hand wheel. I added chain and 0.012" wire from the housing to the bell crank. The bell crank is from Detail Associates and the "clevis" is also one of my etchings. The pressure retainer valve is a styrene part from Precision Scale with 0.008" wire plus "brackets" created from 0.001" brass. The angle cock/air hose parts are from Hi-Tech Details with brackets created from phosphor bronze scrap from etched parts (the leftover "fret" material.) I used this because it is more rigid than brass. The brackets have pairs of no. 80 holes drilled in each end and a no. 68 hole for the main parts. I secured these brackets to the end sills with "rivets" from Scale Hardware. The angle cock/air hose parts are secured to the brackets with 0.006" wire threaded through the holes and around the angle cocks. The uncoupling devices were bent from 0.010" wire. The brackets for these are also from my own etchings and those are attached to styrene added at the corners. I also added push pole pockets created from round styrene discs punched with an RPToolz punch and die. These push pole pockets were dimpled witha drill bit and the outer edges shaped to replicate the prototype.

The next step is to blast the model with 600-grit aluminum oxide in preparation for painting. This prep will be done to the metal and engineering plastic details, including the trucks. After that, I have a bunch of rivets to add (I save these for post-blasting to ensure none are blown off in that step.) Then, it's off to the paint shop, but that's for Part Two in this journey...