 |
| Side view of the finished model |
I recently finished my Funaro & Camerlengo model of a McKeesport Connecting Railroad 50' gondola. The big hurdle was completing the load. Below, I will chronicle how I secured it into the car body. For the previous posts on the model, please visit these links: Part 1, Part 2, Part 3.
First, I will briefly touch on the painting and weathering. The specs for this group of cars called for Scully #320 black graphite for the paint. I opted for a dark (but not close to black) grey to simulate this. Even heavily weathered the car appears grey and not black, the desired outcome. I also created a separate decal for the Pratt & Lambert "Vitralex" red circle in the emblem. The rest of the decals, except the reweigh and repack stencils, are from Jack Consoli's custom lettering for these cars. I sealed everything with Tamiya flat and applied several alternating coats of weathering and chalkmarks using PanPastels. The rust streaks were created using artist's oils thinned with mineral spirits. I dabbed the rust color on the side and then thinned and streaked it using the mineral spirits.
I finished the weathering by adding PRR freight car oxide patches along with reweigh and repack stencils from a Speedwitch PRR set. I also added some fairly fresh chalkmarks at this step, as well, and sealed everything with a final Tamiya flat coat.
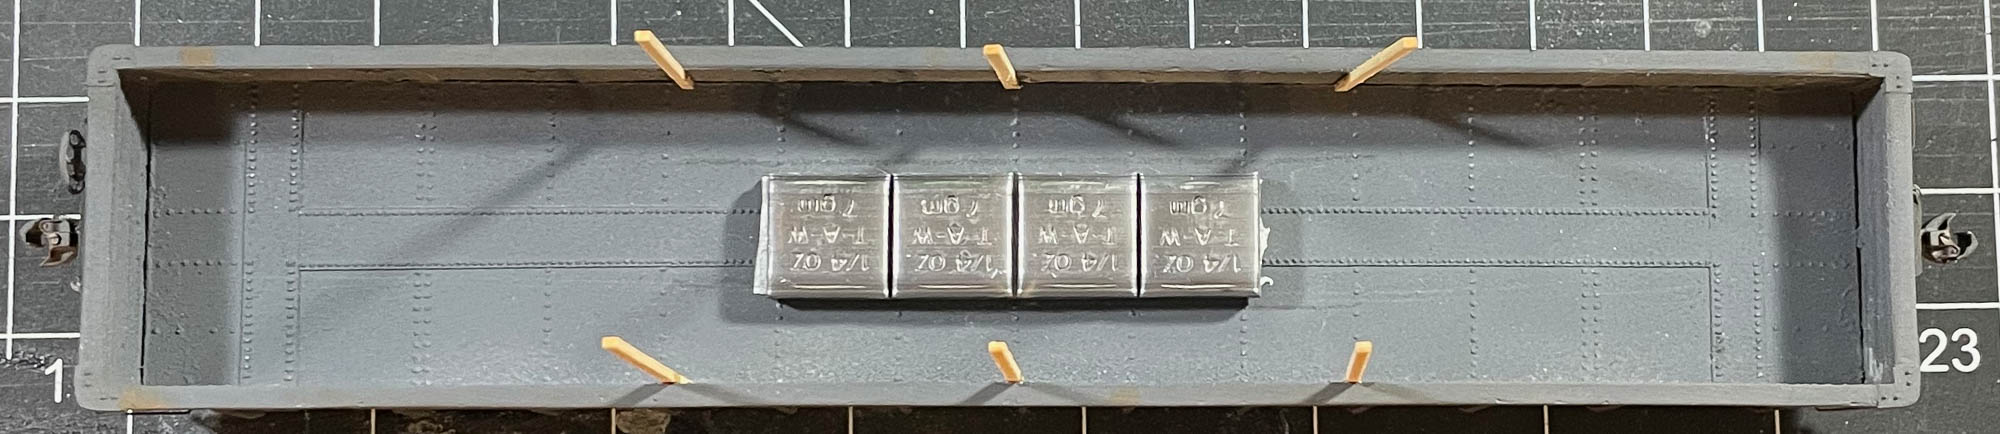
To secure the load, I began by adding the appropriate (for me) amount of weight (I tend to have my cars [consistently] lighter than NMRA standards, with the consistency being key... I am creating a fairly flat switching layout and the weights work well for my needs.) As shown above, I used self-adhesive lead tire weights, being careful to ensure that the bottom layer of pipe (drinking straws) would fit into the car body with no impingements, as shown below. I also added the first three sets of wood stakes to be used to contain the load and for tying together each level of pipe with wire (black thread.) The wood is technically supposed to be at least 4" x 4". However, the inside width of the model plus the thickness of the wood strips limited me to 2" x 4" pieces. It's not all that noticeable and is a concession I can stomach. I glued the strips against the inner face of the sides using a 50/50 mix of Goo and MEK to tack them in place followed by some ACC. The combination is secure with some measure of flex.

I carefully wedged the pipes in between the wood stakes to again ensure all fit as intended. Once satisfied, I removed the bottom pipe layer.
I carefully added Chartpack tape in six places, as shown above, with long strips left flopped over. This was a necessity as each layer of pipe had to be tied together with wire (string).

Once I had the Chartpack tape secure, I re-inserted the bottom layer of pipe and added the end pieces of wood strip, again secured with Goo/MEK and ACC. I also added the first pieces of thread to simulate twisted wire. These were added to each wood stake and then glued to some part of the pipes. Since this part of the "wire" is invisible, attention to detail is not paramount. The "wire" is actually number 50 black thread. It is quite old and has been kicking around my modeling supplies for years.

This photo provides a tighter view of the thread. The second pipe layer was added in an identical fashion, again gluing it to the pipe to secure in place.

With the top layer added, I could complete the Chartpack "bands" and wire. The bands were carefully pulled taught and attached to each other in the top and the center of the load. I created "clips" from 0.001" sheet brass. These served two purposes: to simulate the clips used to secure bands on the prototype and also to provide a place where the Chartpack tape could be secured and glued with ACC. I believe that the bands on the prototype were likely a Signode product (I used Signode to band crates when I worked summers at a machine shop as a teenager.) The metal straps had a piece of metal crimped over the spot where the straps overlapped in order to secure them. I painted these "clips" made from brass with a non-descript grey.
Since the top layer is visible, the simulated wire must appear to be one uniform arrangement across the top of the load at each set of wood stakes. In my hands, I carefully twisted thread around and used sparing amounts of ACC to hold the twisted shape in place. Once that had set, I looped the end over a stake. Then, using two sets of tweezers, I made several twists in the other end, with the thread already looped around the stake. This was accomplished by holding the thread with one set of tweezers and using the other to go "over-under" many times and then securing that with sparing amounts of ACC until the twists held firm. I repeated that for each set of stakes. Once finished, I carefully trimmed the excess thread and was done! The load is quite secure inside the car body and I am happy with the results. The one thing I will watch over time is the glossy face of the Chartpack tape. If I find it objectionable or unrealistic, I will go back and flatten it some.
No comments:
Post a Comment
Comments always welcome!