 |
| The completed XA-14C CB&Q 46696 |
Several weeks back, I shared some of the work I had done on a Sunshine Models CB&Q XA-14C. I have since completed the model and wanted to share that info, particularly how I weathered it. The weathering turned out mostly how I intended, although I think the number of steps could have been reduced and I also didn't quite achieve the look I was seeking. Hence, the use of mostly. However, the car does look good to my eye.

These photos illustrate how the car looked just prior to painting. The differences from what I showed in the last post include the addition of all rivets post-gritblasting as well as the addition of the plates on the main doors for the Burlington Route emblems.

The underframe is shown in the photo above. Again note that the crossties are "unflanged" which I believe is not how the prototype's crossties were fabricated, but have chosen to leave that unchanged on the model.


These two images illustrate the brackets for the hand brake housing, fashioned from 0.002" sheet brass shim stock. The brackets are channel sections and L-sections that were cut and bent to fit. I did not have any drawings, etc. so it was all made “by eye” from photos. You can click on each photo to see the detail. The brake step was created from the same brass stock, with bends at the front and back edges, and a hole punched in the sheet using an RP Toolz punch and die set.

I painted the entire model a mix of two-thirds Tamiya Hull Red (XF-9) and one-third Tamiya Red (XF-7) to approximate the Burlington's freight car red. I also used artist's oils to lighten and darken several boards. The oils were various mixes (on a palette) of Raw Umber and Terra Rosa.

I drybrushed several areas on the roof with Tamiya Light Grey (XF-66) to represent areas of paint peeling/failure.

The decals are from my own artwork and were printed by PDC. You will note that the "Everywhere West" slogan was a tricky one to make conform to the corrugations of the door. Overall, it snuggled down well enough, although there were some splits that I touched up with SP lettering Grey paint. Weathering hides the rest of the warts. The chalkmarks are from National Scale Car. I sealed the decals with Future followed by a coat of Tamiya clear flat, both applied with an airbrush.

For the first step in the weathering, I applied a dilute wash of Titanium white artist's oil heavily thinned with odorless mineral spirits.

I followed the first wash with a similarly dilute wash of medium-dark brown made from Raw Umber and Titanium white artist's oil heavily thinned with odorless mineral spirits.
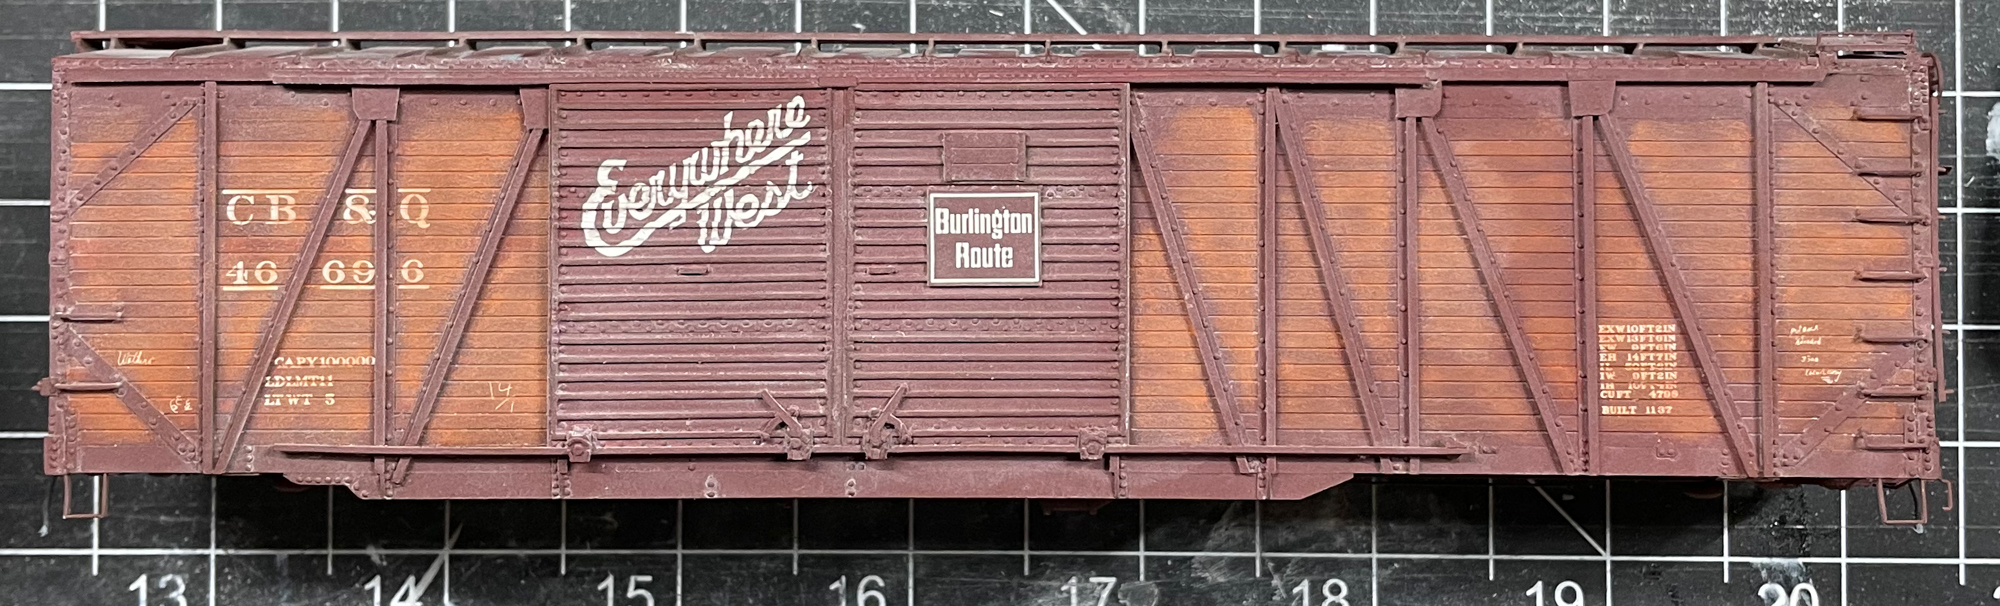


I masked the areas where I needed to apply reweigh, repack, and brake test stencils. They are surprisingly well hidden, but you can see them here if you look closely below and to the right of the capacity data and along the lower right side sill in the panel with the ladder made from grab irons.


Turned out great, Ted. Thanks for sharing the step-by-step info. Look forward to seeing you (and perhaps this car?) at NERPM... -Todd
ReplyDeleteHello Todd - I’ll be there with this car. See you in a week. Cheers, Ted
Delete