Friday, March 29, 2024

Valley Forge RPM 2024


Fred Lass had an extensive display of his steam modeling, including this C&O K-2 cobbled together from Mantua, Cary, and Bachmann components (photo below is also of the same loco)

This past weekend, I attended the Valley Forge RPM in Malvern, Pennsylvania. It was the best one in my memory and it was also the largest, with over 300 attendees. I managed to absorb more clinics than I usually do, and they were all top notch. I particularly enjoyed the presentations by Todd Hermann (LNE Catausqua branch layout,) Bill Schneider (NYO&W layout,) and Matt Herman of 3D Central (3D printing.) There were also an incredible number of fine models in the display room. I photographed a bunch that happened to catch my eye. They are presented herein. Enjoy! P.S. next year's meet will be RPM East in western Pennsylvania, as these unaffiliated events run biannually - the Valley Forge RPM (Philadelphia area) in even years and RPM East (Greensburg/Pittsburgh area) in odd years.


Jerry Dembeck displayed several models, including this Armour reefer built from a Sunshine kit

Shannon Crabtree weathered this Intermountain RF&P box car

Thomas Smapes (spelling?) Sr. had several fine pieces of Western Maryland O scale brass that he had built

Gary Stroh displayed mainy fine weathered subjects, such as this Southern covered hopper from Athearn

Mark Kerlick repped the western PA crew with many models, including this E-L from Walthers, with full-length handrails and spark arrestors

There were many cars with interesting loads, such as this modified well car with axles and wheels shipped by CP-KCS as modeled by John Brown

Bob Stetser showed off a PC 70-ton AAR flat (Protowest kit, he thinks... and I agree) with containers from Shapeways as well as scratchbuilt fraiming and Tichy bulkheads plus decals from the scrap bin

Tom Devenny always has some nicely weathered models to display. One of this year's is GTW 50-foot AAR box car from a P2K kit

This Soo caboose is based on an Athearn blue box car with plated-over windows, Microscale decals, nice weathering, and other details, by Lou Papineau

Jamie Isett displayed this big modern diesel... I confess I don't even know what JRIX and several searches yielded no results. I just thought it looked impressive

This amazing Conrail caboose is the work of Aaron Heaney

Bill Chapin displayed a model of the New Canaan station, based upon the Branchline kit with scratchbuilt platforms, roof trim, and chimneys as well as many replacement windows of correct size

Yet another station... this model of the NYO&W Middletown, NY station and headquarters was built by Jim Dalburg (back in 1968!) Oh... he also built the train

This O&W gon is the work of Bill Schneider. It was drawn by Bill and 3D printed. The decals are his work, too.

This nicely detailed Atlas Southern B23-7 was heavily detailed by Sherm Everlof

Andrew Coniers scratchbuilt this impressive model of Fabian Coal on the Reading Co.'s Newtown branch.

Billy Dale brought an impressive roster of completed freight cars, including this F&C covered hopper of a Lackawanna prototype

Chuck Davis presented a clinic aboput modeling steam and had many finsihed models on display, plus this in-progress steamer

Thomas Richards had an impressive display of 3D printed Soo Line "Wheat Line" North Dakota
 depots. They are exquisite!

Ron Giordani stripped a BLI heavy Mike of all details, then built out a Wooten firebox and added a "gazillion" brass parts to create this stunning CNJ model

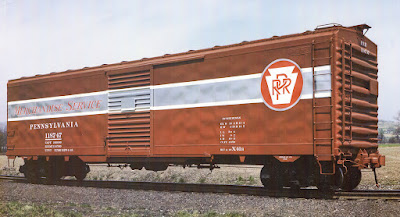
Eric Hansmann had his usual display of numerous 1920s-era freight cars, including this Westerfield model of a Pennsy X23 box car

Butch Eyler always brings along a large number of expertly weathered cars. This is one example

Dennis Lippert also had a TON of freight cars on display, including this AC&Y combination door PS-1

Steve Holzheimer also showed some love for the AC&Y with his model of an S-2 purchased secondhand from the Nickel Plate

Allen Underkofler used a laser to cut the pieces to make this PRR tool house 

Alan Mende had many CNJ models to show off, including this E-2 class 0-8-0, based upon a Mantua Alco 0-8-0 with details removed, frame modified to accept 55" drivers, and new details from Lee Town, CalScale, and Precision Scale added to create a stunning replica. The tender is from an NWSL USRA 0-6-0


Sunday, March 17, 2024

Early Pennsylvania Railroad Welded Box & Automobile Cars


The file for the clinic I presented at the latest Hindsight 20/20 Virtual RPM, "Early Pennsylvania Railroad Welded Box & Automobile Cars" can be accessed via this link. The next Hindsight will be in December. You can stay up to date by joining the Hindsight group at groups.io.

Thursday, March 14, 2024

Roof Paint Failure


crop of "general view of part of Galewood Yard, Chicago, Ill.," [Milwaukee Road,] April, 1943, Jack Delano photo, FSA-OWI Collection, Library of Congress, Call number LC-USW36-619

Roof paint failure (peeling, flaking paint on galvanized roof sheets) is one of those parts of freight car weathering that has taken off in recent years. For my purposes (and those of this blog) I am referring to this phenomenon as it occurred to roofs on freight cars of the 'teens through the 50s, realizing that the effects of weather, etc. on more modern cars is a different subject in many ways. The first thing that I want to emphasize very strongly is that I have looked at lots and lots of period photos where roofs are visible and can report one important fact: paint failure was not universal and, in fact, was not terribly common. Granted, in a yard shot, you can discern the effect on one or two cars out of scores of cars, but it is not evident on every car or even anything approaching a majority. So, if the subject of weathering already causes you angst, I suggest you move along to other facets of weathering and lose no sleep. What am I looking to accomplish in this post is to share some examples of what the prototype effect looked like to aid your efforts, should you choose to model this effect. I recently tried one method that I covered in the final installment on my model of the New Haven 1937 AAR box car.

John Golden has done some incredible work in this area using the "salt" technique, and it is really the standard to which I am working, albeit while stumbling through. many techniques and growing pains along the path. You can read John's excellent blog via this link. He also shared his paint failure techniques here (link.) Charlie Duckworth has also produced some quite credible results. His work can be found on the Steam Era Freight Car list at groups.io or on facebook. Military modelers use various chipping and masking techniques (using hair spray and rubber cement among other things) to represent paint removal by scuffing and wear, although many of the same principles translate to roof paint failure. Good luck!

Utah Rails web site

This image shows some subtle effects on a Rio Grande 12-panel box car. To me, it is a good illustration of what I want to achieve on a few cars... the presence of paint failure, but not a completely degraded surface

Buffalo, New York, NYCSHS Collection, courtesy of Joe Collias

This re-roofed New York Central USRA-design box car demonstrates that some times a small amount of failure is all that is needed when weathering

cropped from Neg no. 45882, Spencer, North Carolina, Standard Oil of New Jersey, Ekstrom Library, University of Louisville

The roof on this SP single sheathed car from the B-50-13 & -14 family displays a nice mix of failure and weathering that would be a good prototype to emulate

cropped from Neg no. 50862, Newark, New Jersey, Standard Oil of New Jersey, Ekstrom Library, University of Louisville

While this image is a very tiny snippet (it was all that was included in the overall yard shot,) it does provide a good look at the shape of paint failure in the center of a roof panel

Missouri Pacific freight house, St. Louis, May, 1946, Joe Collias Collection

This is an extreme example, an it's on a more vintage 36-foot double sheathed Boston & Albany car. Note the variety as some panels show very little failure and others are 75-80% devoid of paint

Columbus, Georgia, crop of image no. CG-2590, Central of Georgia Railway Historical Society

I like this image as it's another that illustrates how eve na small amount of paint failure can be quite realistic

Los Angeles, Morris Abowitz

Color images are always a great tool for weathering. Again, note the randomness of the failure on some panels, but not others on these two roofs

crop if image from Kheel Center for Labor Management Documentation and Archives, Cornell University

This image is the one I will use to guide my efforts when I build my Resin Car Works kit of this prototype. I will continue to share my efforts here so stay tuned (you can receive updates by following this blog by adding your email address using the box at the top of the page)

Friday, March 8, 2024

Finishing the PRR G22 Gondola


"Brooklyn Car & Foundry" builder's photo of PRR 810328


Picking up where I left off on this build, I added some detail that I felt was best applied after the model had been blasted with aluminum oxide. I added rivets to the side in the locations shown in the photo above. They were harvested from an undecorated Athearn snow plow shell.


The rivets that I applied to the lower crossbearer cover plates are decals from Railtec transfers. While they are white (and perhaps harder to discern,) they are the best shaped rivets on the market.


I am adding a structural steel girder load to the interior. It will be secured in the stake pockets inside the car body. I removed the cast portions, as shown, and added wire to simulate the pockets. The wire was installed in holes drilled into the inside of the side, being careful to NOT drill through to the outer faces of the sides. I formed the wire using simple beading pliers to create the 'U' shapes and secured with ACC. The rivets on the corners were harvested from an undecorated Athearn snow plow shell.


I primed the model with Badger Stynylrez grey primer. It's a fine acrylic primer that I applied by airbrush. I then painted the entire car body, as well as trucks and wheelsets, with Mig Ammo "Red Brown Light" [A. MIG-0914,] which is a nice representation of a slightly faded PRR oxide freight car color. It dried to what I would describe as a "satinish" finish. I sprayed a coat of Quick Shine to create a gloss surface for decaling, again using an airbrush. I applied the decals as shown, including some chalk marks. Both the G22 decals and the chalk marks are National Scale Car offerings. I did omit the reweigh, repack, and brake test data off, as those were applied after some weathering, as the following photos illustrate.


To weather the car, I went exclusively with oils diluted with odorless mineral spirirts. I added some diluted burnt sienna along the bottom of the side sill that was drawn up a little on the surface of the side through capillary action. I also did an overall wash of Payne's grey and a little undiluted paint dabbed in a few places softened and blended by mineral spirits to create some darker areas. 


The reweigh (P50 9-49,) repack, and brake test stencils were all added at various stages of the weathering to appear "newer" than the other stencils. 


The interior was weathered, although it is mostly unfinished as the load will obscure most of the detail. I will create a separate post covering the load that will be published in the coming week or so. You can see the four stake pockets that were created from wire that will serve to secure the load. 


These Funaro & Camerlengo kits "assemble" (there's not a lot to assemble with these... it's more just adding details) into nice representations of the G22. For those who can wait, the Rapido cars should be available in the not too distant future.


Tuesday, March 5, 2024

New Haven 1937 AAR Box Car completed build


A three-quarter portrait of New Haven 1937 AAR box car NH 31297.


When I left off on the New Haven 1937 AAR build, I was preparing to blast the model for painting. With that step done, I added rivets in places where they might be blown off during blasting. You can see them in the photos above and below at the side sill support tabs, the grabs on the ends, the ladder mounting brackets, the sill steps, the door handles, and on the door tracks, where I simulated the flat rivets using 0.5 mm discs punched with the RPToolz punch and die and 0.005" styrene. One thing I forgot (and did not go back and add once I started painting) were the three rivets per side sheathing panel used to attach side nailing post clips! Oh well...


I airbrushed the car body with Polly Scale Light Freight Car Red thinned with Liquitex Airbrush Medium. The doors, trucks, and couplers were airbrushed with Tamiya flat black. Everything was given a coat of Quick Shine Floor Finish, again with the airbrush, to create a glossy surface for decaling. I used Speedwitch (now National Scale Car) New Haven box car decals as well as chalkmarks. The photo above illustrates the model after the basic decals had been applied and areas that would not be weathered as part of the first steps were masked.


In the first step in weathering, I added a light wash of burnt umber along the bottom of the car, using odorless mineral spirits to dilute the oil paint. This was "crept" up the side a little, as illustrated in the photo above. It's a subtle effect.


Next, I added some weathering effects to the upper portion of the car. I created streaks using a blend of Payne's Grey and Titanium White artists' oils. I dabbed small amounts of the paint on to spots on the side and then diffused and drew them down the car side to create streaks. 


I also made the decision to simulate some paint failure on several of the galvanized metal roof panels. This was done by applying a mix of Payne's Grey, Titanium White, and Cerulean (Blue) in several places. They appear stark in the photo above, but I did "integrate" them into the overall look of the model as the weathering process progressed.


I added some powders to create an overall effect as well as blend the previous steps. On the sides, I added Bragdon's Grimy Grey powder, which is fairly muted once under a flat coat. I also augmented this with some targeted application of Pan Pastels Payne's Grey. The photo above shows these after they were sealed under a flat coat.


I also added the same two powders to the roof, but in greater strength to add grime as well as mute and blend the paint failure patches.


I removed the masking tape from the capacity and reweigh location and added those decals, as shown, reflecting a reweigh at the New Haven's Cedar Hill facility in March, 1949. 


At the same time, added some "fresh" paint failure again using the mix of Payne's Grey, Titanium White, and Cerulean (Blue) to arrive at a satisfactory color. 


I applied another dilute wash of Payne's Grey thinned heavily with odorless mineral spirits and added the repack and brake test stencils, as well. The photo above illustrates the completed right side of the car.


The B end of the completed model...


I applied one more "coat" of powders to the roof to mute the areas exhibiting simulated paint failure. I am mostly satisfied with this effort, although I still think I can improve upon it. I will post some further thoughts about this in the next couple weeks as part of a separate post about paint failure.


The completed left side of the model... I am quite pleased with the overall end result. The New Haven script scheme is one of the iconic box cars of the era. Having a good representation of it will add plenty of context and character to the fleet.